http://www.webcamxp.com/download.aspx
webcamXP Free
5.9.8.7
(13Mb)
webcamXP Free is free for private use and allows connecting up to 2 cameras.
Download from Mirror 1 (USA)
Download from Mirror 2 (Switzerland)
viernes, 24 de junio de 2016
Editor de Videos para hacer tutoriales gratuito ActivePresenter
Editor de Videos para hacer tutoriales gratuito ActivePresenter
http://atomisystems.com/activepresenter/
http://atomisystems.com/activepresenter/
ActivePresenter Feature Highlights
Comandos Utiles para la conversión y manipulación de videos con FFmpeg, convertir mp4 a mp3
Comandos Utiles para la conversión y manipulación de videos, convertir mp4 a mp3
http://www.labnol.org/internet/useful-ffmpeg-commands/28490/

Also see: Essential Linux Commands
http://www.labnol.org/internet/useful-ffmpeg-commands/28490/
Useful FFmpeg Commands
The FFmpeg tool can help you convert almost any audio and video file
from the command line. Here are some useful FFmpeg commands you should
know.
FFmpeg
is an extremely powerful and versatile command line tool for converting
audio and video files. It is free and available for Windows, Mac and
Linux machines. Whether you want to join two video files, extract the
audio component from a video file, convert your video into an animated
GIF, FFmpeg can do it all and even more.
Extract the audio from a video file with this simple FFmpeg command.
Useful FFmpeg Commands
FFmpeg supports all popular audio and video formats. Or you can running the command ./ffmpeg -formats to get a list of every format that is supported by your FFmpeg installation. If you are just getting started, here are some commands that will give you good idea of the capabilities of this tool.1. Cut video file into a smaller clip
You can use the time offset parameter (-ss) to specify the start time stamp in HH:MM:SS.ms format while the -t parameter is for specifying the actual duration of the clip in seconds.ffmpeg -i input.mp4 -ss 00:00:50.0 -codec copy -t 20 output.mp4
2. Split a video into multiple parts
If you want to split a large video into multiple smaller clips without re-encoding, ffmpeg can help. This command will split the source video into 2 parts – one ending at 50s from the start and the other beginning at 50s and ending at the end of the input video.ffmpeg -i video.mp4 -t 00:00:50 -c copy small-1.mp4 -ss 00:00:50 -codec copy small-2.mp4
3. Convert video from one format to another
You can use the -vcodec parameter to specify the encoding format to be used for the output video. Encoding a video takes time but you can speed up the process by forcing a preset though it would degrade the quality of the output video.ffmpeg -i youtube.flv -c:v libx264 filename.mp4
ffmpeg -i video.wmv -c:v libx264 -preset ultrafast video.mp4
4. Join (concatenate) video files
If you have multiple audio or video files encoded with the same codecs, you can join them into a single file using FFmpeg. Create a input file with a list of all source files that you wish to concatenate and then run this command.ffmpeg -f concat -i file-list.txt -c copy output.mp4
5. Mute a video (Remove the audio component)
Use the -an parameter to disable the audio portion of a video stream.ffmpeg -i video.mp4 -an mute-video.mp4
6. Extract the audio from video
The -vn switch extracts the audio portion from a video and we are using the -ab switch to save the audio as a 256kbps MP3 audio file.ffmpeg -i video.mp4 -vn -ab 256 audio.mp3
7. Convert a video into animated GIF
FFmpeg is an excellent tool for converting videos into animated GIFs and the quality isn’t bad either. Use the scale filter to specify the width of the GIF, the -t parameter specific the duration while -r specifies the frame rate (fps).ffmpeg -i video.mp4 -vf scale=500:-1 -t 10 -r 10 image.gif
8. Extract image frames from a video
This command will extract the video frame at the 15s mark and saves it as a 800px wide JPEG image. You can also use the -s switch (like -s 400×300) to specify the exact dimensions of the image file though it will probably create a stretched image if the image size doesn’t follow the aspect ratio of the original video file.ffmpeg -ss 00:00:15 -i video.mp4 -vf scale=800:-1 -vframes 1 image.jpg
9. Convert Video into Images
You can use FFmpeg to automatically extract image frames from a video every ‘n’ seconds and the images are saved in a sequence. This command saves image frame after every 4 seconds.ffmpeg -i movie.mp4 -r 0.25 frames_%04d.png
10. Merge an audio and video file
You can also specify the -shortest switch to finish the encoding when the shortest clip ends.ffmpeg -i video.mp4 -i audio.mp3 -c:v copy -c:a aac -strict experimental output.mp4
ffmpeg -i video.mp4 -i audio.mp3 -c:v copy -c:a aac -strict experimental -shortest output.mp4
11. Resize a video
Use the size (-s) switch with ffmpeg to resize a video while maintaining the aspect ratio.ffmpeg -i input.mp4 -s 480x320 -c:a copy output.mp4
12. Create video slideshow from images
This command creates a video slideshow using a series of images that are named as img001.png, img002.png, etc. Each image will have a duration of 5 seconds (-r 1/5).ffmpeg -r 1/5 -i img%03d.png -c:v libx264 -r 30 -pix_fmt yuv420p slideshow.mp4
13. Add a poster image to audio
You can add a cover image to an audio file and the length of the output video will be the same as that of the input audio stream. This may come handy for uploading MP3s to YouTube.ffmpeg -loop 1 -i image.jpg -i audio.mp3 -c:v libx264 -c:a aac -strict experimental -b:a 192k -shortest output.mp4
14. Convert a single image into a video
Use the -t parameter to specify the duration of the video.ffmpeg -loop 1 -i image.png -c:v libx264 -t 30 -pix_fmt yuv420p video.mp4
15. Add subtitles to a movie
This will take the subtitles from the .srt file. FFmpeg can decode most common subtitle formats.ffmpeg -i movie.mp4 -i subtitles.srt -map 0 -map 1 -c copy -c:v libx264 -crf 23 -preset veryfast output.mkv
16. Crop an audio file
This will create a 30 second audio file starting at 90 seconds from the original audio file without transcoding.ffmpeg -ss 00:01:30 -t 30 -acodec copy -i inputfile.mp3 outputfile.mp3
17. Change the audio volume
You can use the volume filter to alter the volume of a media file using FFmpeg. This command will half the volume of the audio file.ffmpeg -i input.wav -af 'volume=0.5' output.wav
18. Rotate a video
This command will rotate a video clip 90° clockwise. You can set transpose to 2 to rotate the video 90° anti-clockwise.ffmpeg -i input.mp4 -filter:v 'transpose=1' rotated-video.mp4This will rotate the video 180° counter-clockwise.
ffmpeg -i input.mp4 -filter:v 'transpose=2,transpose=2' rotated-video.mp4
19. Speed up or Slow down the video
You can change the speed of your video using the setpts (set presentation time stamp) filter of FFmpeg. This command will make the video 8x (1/8) faster or use setpts=4*PTS to make the video 4x slower.ffmpeg -i input.mp4 -filter:v "setpts=0.125*PTS" output.mp4
20. Speed up or Slow down the audio
For changing the speed of audio, use the atempo audio filter. This command will double the speed of audio. You can use any value between 0.5 and 2.0 for audio.ffmpeg -i input.mkv -filter:a "atempo=2.0" -vn output.mkvStack Exchange has a good overview to get you started with FFmpeg. You should also check out the official documentation at ffmpeg.org or the wiki at trac.ffmpeg.org to know about all the possible things you can do with FFmpeg.
Also see: Essential Linux Commands
How to Install FFmpeg on Windows
http://adaptivesamples.com/how-to-install-ffmpeg-on-windows/
Understandably, most people are a little lost when it comes to using command-line programs like FFmpeg.
But don’t worry, I was there not too long ago, and now I’ll try explain
as thoroughly as I can how to install it and start using it.
But first, a little info from their site:
That’s it!
If you weren’t successful, just post a comment below and I’ll help you out :)
How to Install FFmpeg on Windows
But first, a little info from their site:
FFmpeg is the leading multimedia framework, able to decode, encode, transcode, mux, demux, stream, filter and play pretty much anything that humans and machines have created. It supports the most obscure ancient formats up to the cutting edge.So really, you’re doing yourself a huge favour by installing it, you just need a little help to get started.
1: Download
2: Unzip
To make the download size nice and small, it’s compressed into a .7z
file, which is just like a .zip file but smaller. Chances are you know
exactly what this is and how to extract it, but if not, you’ll just need
to download a program called 7zip
which will allow you to unzip it. I know it sounds like I’m sending you
further down the rabbit hole, but 7zip is another program you’ll not
regret you installed.
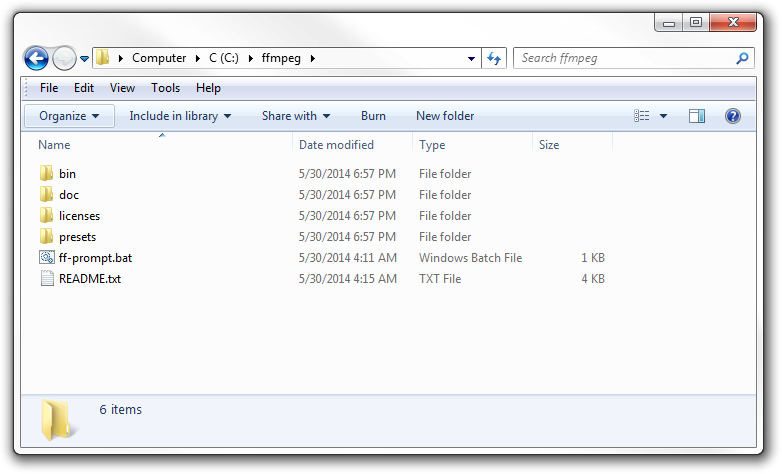
Unzip it to a folder that’s easy to find, like directly to your C:\ drive. It should create a folder like ffmpeg-20140530-git-98a6806-win64-static, but just rename it to ffmpeg for simplicities sake. You’ll thank me later.
It should look something like this:
Unzip it to a folder that’s easy to find, like directly to your C:\ drive. It should create a folder like ffmpeg-20140530-git-98a6806-win64-static, but just rename it to ffmpeg for simplicities sake. You’ll thank me later.
It should look something like this:
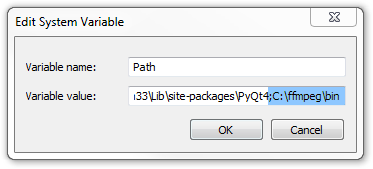
3: Add to Path
Finally, we need to add the bin folder, which contains the ffmpeg.exe file, to our system path to allow us to run the commands easily.
Technically, you could always do something like
but it’s much easier to type
If you try that right now, you’ll get an error saying that the ffmpeg is not recognized as an internal or external command.

That basically means windows has not idea what you’re talking about.
All we need to do is add
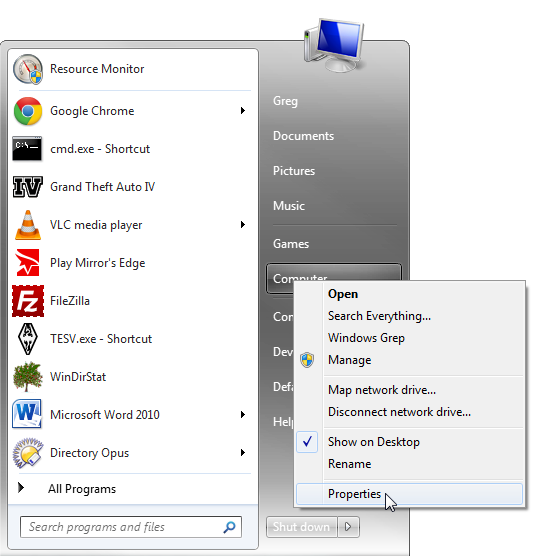
So, in the Start Menu, right click on Computer and choose Properties.
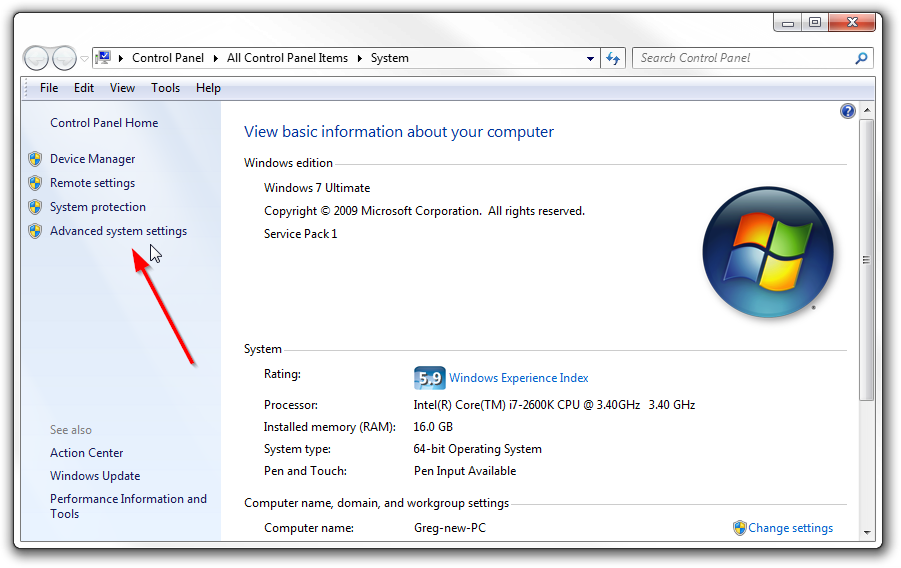
Then select Advanced system settings:
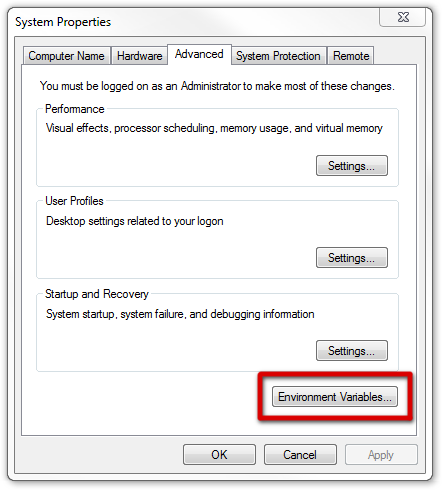
Open up the Environment Variables:
And then edit the Path variable:

The Path is just a list of folders that contain commands you’re allowed to use without typing in the full path of the exe files.
So, go ahead and add
Technically, you could always do something like
C:\ffmpeg\bin\ffmpeg.exe -codecs,but it’s much easier to type
ffmpeg -codecs.If you try that right now, you’ll get an error saying that the ffmpeg is not recognized as an internal or external command.
That basically means windows has not idea what you’re talking about.
All we need to do is add
C:\ffmpeg\bin to our system path, and it’ll understand us.So, in the Start Menu, right click on Computer and choose Properties.
Then select Advanced system settings:
Open up the Environment Variables:
And then edit the Path variable:
The Path is just a list of folders that contain commands you’re allowed to use without typing in the full path of the exe files.
So, go ahead and add
C:\ffmpeg\bin to the end of the line, making sure that there’s a semi-colon (;) after the previous folder:4: Use it!
That’s it!
If you weren’t successful, just post a comment below and I’ll help you out :)
Como actualizar el path de windows sin reiniciar, COMO ADICIONAR UNA VARIABLE A LAS VARIABLES DE ENTORNO EN WINDOWS
Cuando necesitas actualizar el PATH de windows (variables de entorno) sin reiniciar para tomar los cambios:
- Abrir una ventana de consola (cmd):
windows+r
----luego en la consola digitas----> CMD
- Escribir:
SET PATH=%PATH%;C:\CmdShortcuts
Donde La variable creada en el path C:\CmdShortcuts se debe adicionar con el moando set, como se mostro anteriomente.
COMO ADICIONAR UNA VARIABLE A LAS VARIABLES DE ENTORNO EN WINDOWS
Recordar: Para adicionar una variable al PATH:
- Click derecho sobre icono de windows (parte inferior izquierda)
- Click en Sistema, debe salir una ventana: Panel de control\Sistema y seguridad\Sistema
- Click en: Configuración Avanzada del Sistema, aparece ventana Propiedades del Sistema
- Click en el botón inferior derecho: Variables de Entorno, parece ventana Variables de Entorno
- En el frame inferior Variables del Sistema, aparece Path, seleccionarlo (con click)
- Despues de Seleccionar Path, click en botón editar
- En Windows 10: Click en botón nuevo y copiar la ruta que tiene los ejecutables que quieres que se vean desde cualquier ruta, por ejemplo: C:\CmdShortcuts
- Click en Aceptar
- y voila
martes, 14 de junio de 2016
Cuidado con Las estratagemas de mala fe que utilizan los que son malintencionados, Desconfiar de citas de Schopenhauer y Churcill
http://verne.elpais.com/verne/2016/06/13/articulo/1465835721_804186.html?id_externo_rsoc=FB_CM_Verne

El filósofo Arthur Schopenhauer.
Consejos de Schopenhauer para ganar una discusión política
"El arte de tener razón" reúne tretas para enzarzarse en discusiones políticas y salir airoso
La campaña electoral es una buena excusa para desempolvar un clásico: El arte de tener razón,
de Arthur Schopenhauer. El filósofo reúne en este texto 38
"estratagemas de mala fe" para salir airoso de un debate, con
independencia de si lo que decimos es cierto o no. Y es que, según el
alemán, "quien discute no combate en pro de la verdad, sino de su
tesis". La dialéctica es comparable a la esgrima y da igual quién
tuviera "razón en la discusión que originó el duelo: tocar y parar, de
eso se trata".
Estas son algunas de las tretas del libro, aplicables tanto por los candidatos como por nosotros mismos, si cometemos el error de enzarzarnos en una discusión política:
1. Suscitar la cólera del adversario, ya que "encolerizado, no está en condiciones de juzgar de forma correcta". Schopenhauer apunta que si el adversario se enfada con una idea, hay que insistir con el argumento. Hemos tocado un punto débil.
2. Si hacemos comparaciones, hay que elegir los términos que favorezcan nuestra interpretación. "Uno dice 'los sacerdotes', el otro 'la clerigalla'".
3. Si queremos que el adversario acepte una tesis, "debemos presentarle su opuesto" y darle a elegir. Se trata de contraponer el gris al negro, para poder llamarlo blanco. Por ejemplo, se le puede dar a escoger entre "estas medidas para reactivar el empleo o el paro", como si no hubiera más opciones.
4. Buscar contradicciones con cualquier cosa que haya dicho o admitido. El propio filósofo da un ejemplo muy gráfico: si defiende el suicidio, "se exclama de inmediato '¿por qué no te ahorcas tú?'".
5. Si nuestro interlocutor va camino de derrotarnos, no debemos permitir que lleve su argumento hasta el final: "Le interrumpiremos, haremos divagar, desviaremos el curso de la discusión y la llevaremos a otras cuestiones".
6. Schopenhauer llama "jugada brillante" a darle la vuelta al argumento. En su ejemplo, el adversario dice: "Es un niño, hay que tener paciencia". A lo que se puede responder: "Precisamente porque es un niño hay que corregirle".
7. "En vez de razones, empléense autoridades". Schopenhauer recomienda tergiversar, falsificar o incluso inventar citas. El objetivo es aprovechar que "son muy pocos los que pueden pensar, pero todos quieren tener opiniones". Es decir, si alguien cita al pobre Churchill (o a Schopenhauer), es mejor desconfiar.
8. Se puede hacer sospechosa una afirmación del adversario "subsumiéndola en una categoría aborrecible, aun cuando no esté relacionada con ella más que por similitud o de modo vago". Por ejemplo, "eso es comunismo" o "eso es fascismo".
9. "Eso puede ser cierto en la teoría, pero en la práctica es falso". Se trata de un sofisma, ya que "lo que es cierto en teoría tiene que serlo también en la práctica: si no lo es, hay un fallo en la teoría".
10. Si el adversario no responde a una pregunta o a un argumento, sino que lo elude o responde con otra pregunta, hay que insistir. De nuevo, "hemos tocado un punto flaco". Ejemplo clásico: cuando alguien contesta a una acusación de corrupción con "y los ERES, ¿qué?".
11. "Aturdir, desconcertar al adversario mediante palabrería sin sentido". El disparate tiene que sonar "erudito o profundo".
12. Si todo falla y "se advierte que el adversario es superior", pasamos al insulto: "Personalícese, séase ofensivo, grosero".
Hay que añadir que Schopenhauer acabó cansado de "estos escondrijos de la insuficiencia" y no quiso publicarlos: se editaron en 1864, cuatro años después de su muerte. De hecho, cierra sus consejos con "la única contrarregla segura": solo hay que discutir con aquellos que emplean razones y no "sentencias inapelables", por lo que pueden "soportar no llevar la razón cuando la verdad está de otra parte". Y concluye: "Déjese al resto decir lo que quiera".
Instalar Arduino en Linux Ubuntu
/////////////////////////////////////////////////////////////////////////////////////////////////////
1. Descargar Arduino
www.arduino.cc/en/Main/Software
2. Abrir una Terminal o Consola
3. Descomprimir tar (tener en cuenta cambiar números del nombre según la version descargada)
5. Ir a la carpeta que movimos
6. Dar permisos de Ejecución al scrip install.sh
7. Ejecutar el script
8. Abrir IDE Arduino desde el shortcut creado en el escritorio
/////////////////////////////////////////////////////////////////////////////////////////////////////
http://ubuntuhandbook.org/index.php/2015/11/install-arduino-ide-1-6-6-ubuntu/

Quick tutorial shows you how to the latest Arduino IDE, so far its version 1.6.6, in all current Ubuntu releases.
The open-source Arduino IDE has reached the 1.6.6 release recently with lots of changes. The new release has switched to Java 8, which is now both bundled and needed for compiling the IDE. See the RELEASE NOTE for details.
For those who don’t want to use the old 1.0.5 version available in Software Center, you can always follow below steps to install Arduino in all Ubuntu releases:
Don’t know your OS type? Go and check out System Settings -> Details -> Overview.
2. Open terminal from Unity Dash, App Launcher, or via Ctrl+Alt+T keys. When it opens, run below commands one by one:
Navigate to your downloads folder:

Decompress the downloaded archive with tar command:

Move the result folder to /opt/ directory for global use:

3. Now the IDE is ready for use with bundled Java. But it would be good to create desktop icon/launcher for the application:
Navigate to install folder:

Finally, launch Arduino IDE from Unity Dash, Application Launcher, or via Desktop shorcut.
1. Descargar Arduino
www.arduino.cc/en/Main/Software
2. Abrir una Terminal o Consola
3. Descomprimir tar (tener en cuenta cambiar números del nombre según la version descargada)
tar -xvf arduino-1.6.6-*.tar.xz
4. Mover el resultado al directorio /opt para uso Globalsudo mv arduino-1.6.6 /opt
5. Ir a la carpeta que movimos
cd /opt/arduino-1.6.6/
6. Dar permisos de Ejecución al scrip install.sh
chmod +x install.sh
7. Ejecutar el script
./install.sh
8. Abrir IDE Arduino desde el shortcut creado en el escritorio
/////////////////////////////////////////////////////////////////////////////////////////////////////
http://ubuntuhandbook.org/index.php/2015/11/install-arduino-ide-1-6-6-ubuntu/
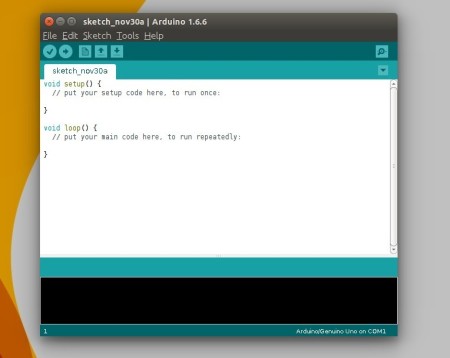
How to Install The Latest Arduino IDE 1.6.6 in Ubuntu
Quick tutorial shows you how to the latest Arduino IDE, so far its version 1.6.6, in all current Ubuntu releases.
The open-source Arduino IDE has reached the 1.6.6 release recently with lots of changes. The new release has switched to Java 8, which is now both bundled and needed for compiling the IDE. See the RELEASE NOTE for details.

For those who don’t want to use the old 1.0.5 version available in Software Center, you can always follow below steps to install Arduino in all Ubuntu releases:
Replace the words in red for future releases
1. Download the latest packages, Linux 32-bit or Linux 64-bit, from the official link below:Don’t know your OS type? Go and check out System Settings -> Details -> Overview.
2. Open terminal from Unity Dash, App Launcher, or via Ctrl+Alt+T keys. When it opens, run below commands one by one:
Navigate to your downloads folder:
cd ~/Downloads

Decompress the downloaded archive with tar command:
tar -xvf arduino-1.6.6-*.tar.xz

Move the result folder to /opt/ directory for global use:
sudo mv arduino-1.6.6 /opt

3. Now the IDE is ready for use with bundled Java. But it would be good to create desktop icon/launcher for the application:
Navigate to install folder:
cd /opt/arduino-1.6.6/
Give executable permission to install.sh script in that folder:chmod +x install.shFinally run the script to install both desktop shortcut and launcher icon:
./install.shIn below picture I’ve combined 3 commands into one via “&&”:
Finally, launch Arduino IDE from Unity Dash, Application Launcher, or via Desktop shorcut.
Enable Serial Port Arduino in Linux, Habilitar consola del puerto serial en linux
Enable Serial Port Arduino in Linux, Habilitar consola del puerto serial en linux
Primero miramos los puertos tty en linux
Luego configuramos los permisos del puerto ttyACM0 (Arduino Uno) en linux:
# sudo chmod 777 /dev/ttyACM0
Luego podemos abrir la consola de Arduino y ya superamos el error
$ sudo chmod 777 /dev/ttyACM0
https://www.youtube.com/watch?v=qzkUkXJkto0
Solucionar el problema del reconocimiento del puerto serial en el IDE de Arduino, comandos ejecutados:
sudo tail -f /var/log/syslog
sudo chmod 777 /dev/ttyACM0
Primero miramos los puertos tty en linux
# dmesg | grep tty
Luego configuramos los permisos del puerto ttyACM0 (Arduino Uno) en linux:
# sudo chmod 777 /dev/ttyACM0
Luego podemos abrir la consola de Arduino y ya superamos el error
$ sudo chmod 777 /dev/ttyACM0
https://www.youtube.com/watch?v=qzkUkXJkto0
Solucionar el problema del reconocimiento del puerto serial en el IDE de Arduino, comandos ejecutados:
sudo tail -f /var/log/syslog
sudo chmod 777 /dev/ttyACM0
lunes, 13 de junio de 2016
Bluetooth HC 05 Arduino Android Configuración
http://www.techbitar.com/modify-the-hc-05-bluetooth-module-defaults-using-at-commands.html
https://geekytheory.com/conectar-android-con-arduino-por-bluetooth-capitulo-1/
http://www.instructables.com/id/Como-conectar-bluetooth-HC-05-Arduino-y-diadema-Mi/
http://saber.patagoniatec.com/hc-05-bluetooth-conectar-esclavo-hc05-maestro-master-save-wireless-tutorial-iot-celular-smartphone-arduino-argentina-ptec/
http://www.naylampmechatronics.com/blog/24_Configuraci%C3%B3n--del-m%C3%B3dulo-bluetooth-HC-05-usa.html
https://play.google.com/store/apps/details?id=es.pymasde.blueterm&hl=es
http://diymakers.es/arduino-bluetooth/
http://blog.theinventorhouse.org/como-conectar-bluetooth-hc-05-arduino-y-diadema-mindwave-neurosky/
https://www.dlabs.co/curso-de-arduino-y-robotica-comunicacion-bluetooth/
http://www.techbitar.com/modify-the-hc-05-bluetooth-module-defaults-using-at-commands.html

 EL
modulo Bluetooth HC-05 viene configurado de fábrica como Esclavo, pero
se puede cambiar para que trabaje como maestro, además al igual que el
hc-06, se puede cambiar el nombre, código de vinculación velocidad y
otros parámetros más.
EL
modulo Bluetooth HC-05 viene configurado de fábrica como Esclavo, pero
se puede cambiar para que trabaje como maestro, además al igual que el
hc-06, se puede cambiar el nombre, código de vinculación velocidad y
otros parámetros más.

Las conexiones serían las siguientes:
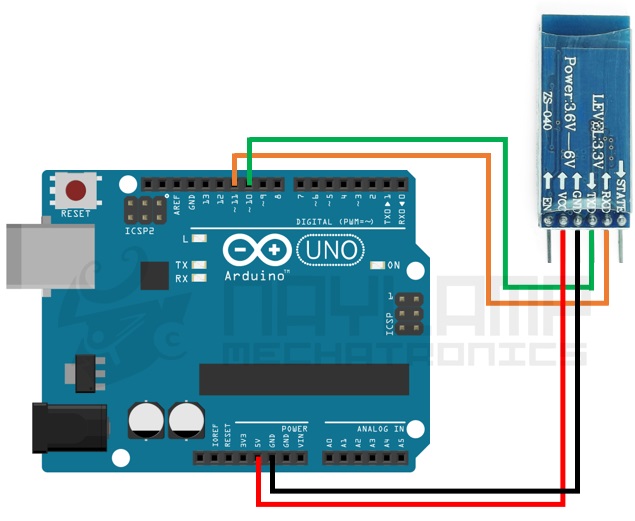
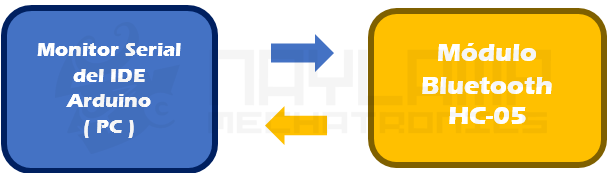
Ahora es necesario compilar y cargar el siguiente sketch que hemos preparado, que como vemos lee los datos enviados de la PC a través de nuestro IDE y se lo envía serialmente hacia los pines RXD y TXD de nuestro módulo HC-05.
Las conexiones serían las siguientes:

Ahora abrimos nuestro Monitor serial del IDE de Arduino, pero puedes usar cualquier monitor serial.
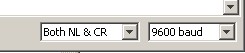
En la parte inferior debemos escoger “Ambos NL & CR” y la velocidad “38400 baud” (la velocidad para comunicarse en el MODO AT 2)

Ejemplo:
Ejemplo:


Updated 19.07.2015
Updated 26.07.2015
Updated 30.10.2015
AT mode allows you to interrogate the BT module and to change some of the settings; things like the name, the baud rate, whether or not it operates in slave mode or master mode. When used as a master device AT commands allow you to connect to other Bluetooth slave devices.
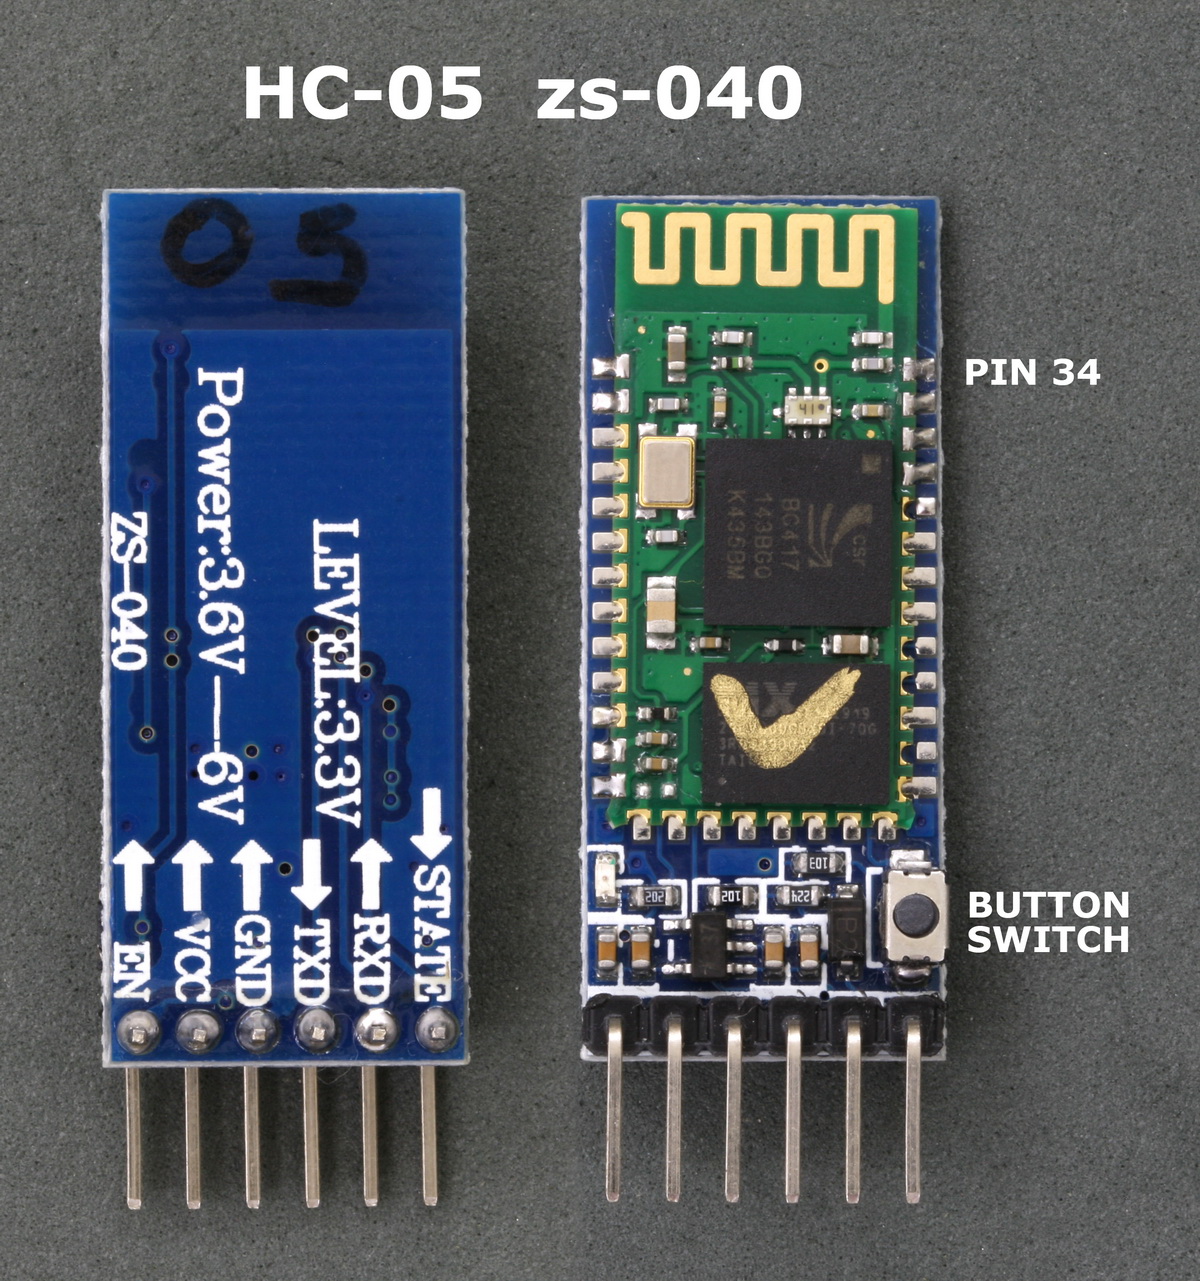
There are many slightly different HC-05 modules, the modules I have are marked ZS-040 and have an EN pin rather than a KEY pin. They also have a small button switch just above the EN pin. They are based on the EGBT-045MS Bluetooth module.
Update: I now also have boards marked fc-114. See:
HC-05 FC-114 and HC-06 FC-114. First Look
HC-05 FC-114 and HC-06 FC-114. Part 2 – Basic AT commands
HC-05 FC-114 and HC-06 FC-114. Part 3 – Master Mode and Auto Connect
On the zs-040 modules there are 2 AT modes. I do not know if this is intentional but some commands only work when pin34 is HIGH. Other commands work when pin 34 is either HIGH or LOW. This fooled me for quite a while. For this post I have called the different modes “mini” AT mode and “full” AT mode.

To activate AT mode on the HC-05 zs-040 modules we can:
– 1. Hold the small button switch closed while powering on the module.
– 2. Set pin 34 HIGH (3.3v) when power on.
– 3. Close the small push button switch after the HC-05 is powered.
– 4. Pull pin 34 HIGH after powering the HC-05.
Method 1.
Enters AT mode with the built in AT mode baud rate of 38400. The baud rate cannot be changed by the user.
This method allows the module to enter AT mode on start but but does not keep pin 34 HIGH and uses the “mini” AT mode.
Method 2.
Enters AT mode with the built in AT mode baud rate of 38400. The baud rate cannot be changed by the user.
If you keep pin 34 HIGH you will enable the “full” AT mode which allows all AT commands to be used.
If you let pin 34 return LOW after power on then “mini” AT mode will be enabled.
Method 3.*
Enters “mini” AT mode using the user defined communication mode baud rate.
Method 4.*
Enters “full” AT mode using the user defined communication mode baud rate.
If pin 34 is kept HIGH then the HC-05 enters the “full” AT mode. If pin 34 is brought HIGH and returned to LOW it will put the module in to “mini” AT mode.
* added 21.07.2015
Method 1 and 2 are good in that you know the baud rate – it will always be 38400. This could be useful if you have modules other people have used or if you forget what communication mode baud rate you have previously set.
Method 3 and 4 adds convenience. You can enter AT mode, make changes and return back to communication mode without switching sketches and messing around with different baud rates.
I use software serial on Arduino pins 2 and 3 to talk to the HC-05. This means I can still use the hardware serial to talk to the serial monitor on a host computer.
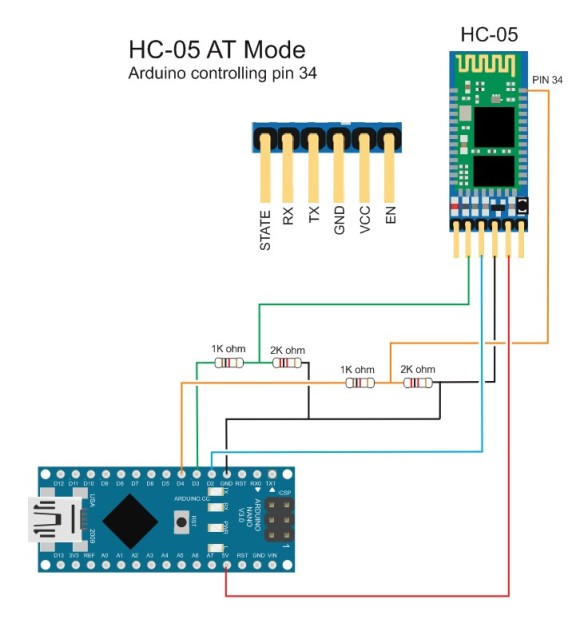
Make the following connections
– BT VCC to Arduiono 5V
– BT GND to Arduino GND
– BT TX to Arduino D2
– BT RX to Arduino D3 through a voltage divider (3.3V)
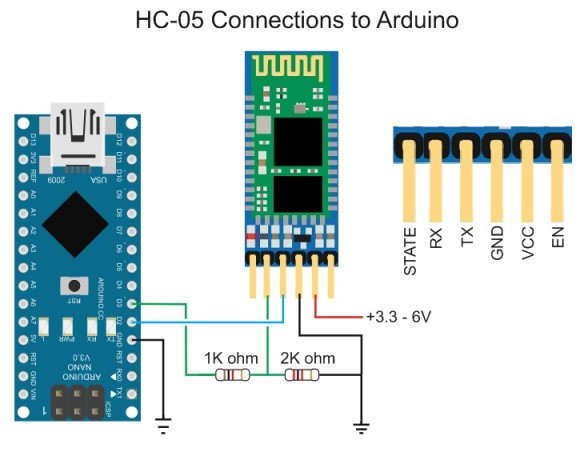
Connect the Arduino to the host computer. The LED on the HC-05 should be blinking quickly at about 5 times a second.
With the Arduino on, do the following
– Remove the 5V connection to BT VCC
– Press and hold the button switch on the BT module
– Re-connect BT VCC to 5V (while still pressing the button switch), the LED should come on.
– Release the button switch and the LED should be blinking slowly on/off once every couple of seconds. This indicates AT mode.
The following sketch is used to talk to the BT module. Run the sketch and put the HC-05 in to AT mode.
Here is the output on the serial monitor
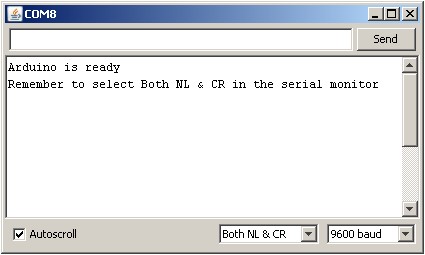
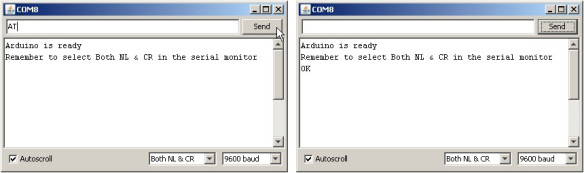
The HC-05 expects a new line and a carriage return character at the end of each command so make sure “Both NL & CR” is selected at the bottom of the serial monitor. To confirm you are actually in AT mode, in the serial monitor type “AT” (no quotes) and hit Send. You should get an “OK”.
This used to be my preferred method but I have found that once I have set up a module I seldom change it and it has become more convenient to use the button switch or a temporary connection to pin 34. The benefit of this example is that the Arduino can control the process. Also, certain commands only work when pin 34 is HIGH. Using this method allows you to keep pin 34 HIGH.
The HC-05 can draw a maximum of 40mA and although Arduino pins can supply 40mA this is the maximum and not recommended. The Arduinos 5V out pin can supply up to 200mA and is a much safer option and we use this to power the HC-05. We still need a regular pin to control the transistor which we are using to switch the power on and off.
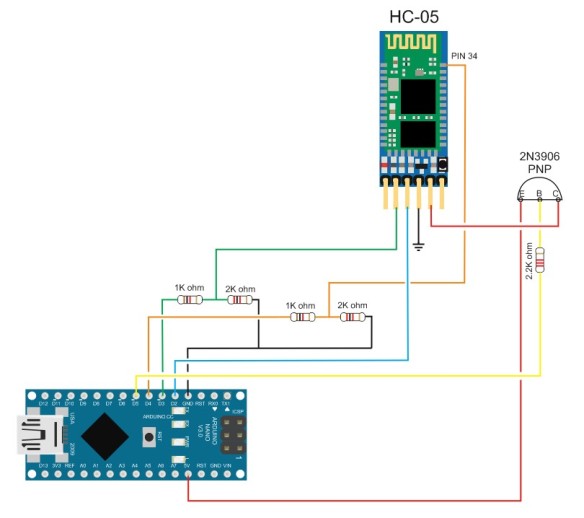
With the Arduino turned off make the following connections:
– Arduino D2 to HC-05 TX
– Arduino D3 to HC-05 RX through a voltage divider
– Arduino D4 to HC-05 pin 34 through a voltage divider
– Arduino D5 to PNP transistor base via a 2.2k resistor
– HC-05 GND to common GND
– PNP emitter to +5V
– PNP collector to HC-05 vcc
I am using a 2N3906 PNP transistor because it is what I have. Similar PNP transistors can also be used.
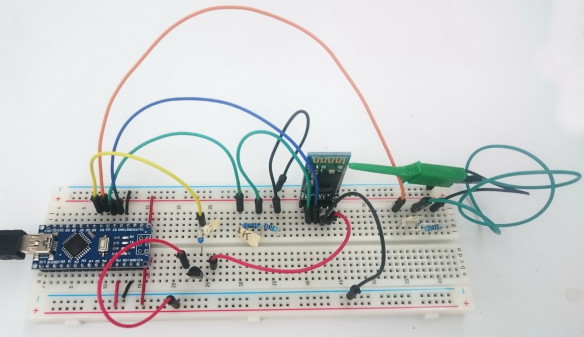
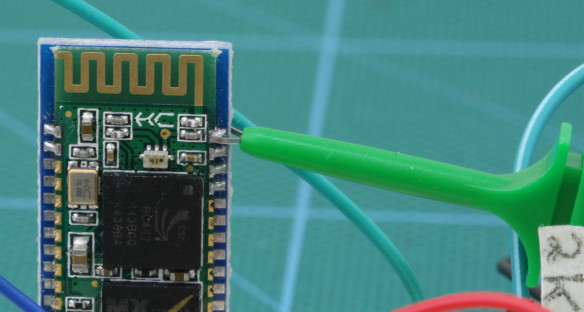
HC-05 with pin 34 connected by a probe clip. You can also simply hold a piece of wire to the pin. For a long term solution you would need to solder a wire to pin 34.
Compile and upload the following sketch
After the sketch has been uploaded, started the Arduino and open the serial monitor at 9600 baud rate. The HC-05 should be off.
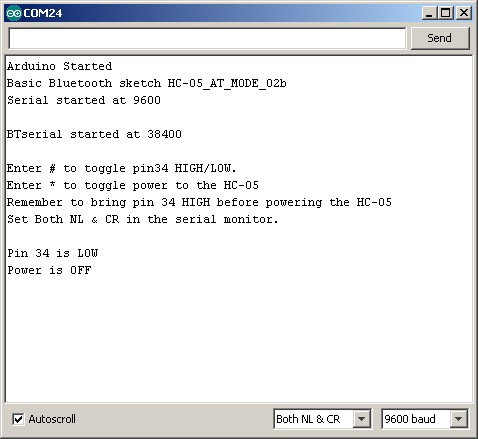
To start the HC-05 in AT mode, bring pin 34 HIGH and then start the BT module.
– Enter “#” (no quotes) to bring pin 34 HIGH
– Enter “*” (no quotes) to turn on the HC-05

The HC-05 should now be on and in AT mode with the on board LED blinking slowly on/off every couple of seconds.
Enter “AT” (no quotes) and you should get a reply of “OK”.
It should be fairly simple to extend this example and fully control the HC-05 from your own sketch.
Set up the HC-05 as below:
Upload the following sketch.
The HC-05 should be in communication mode with the LED on the HC-05
blinking about 5 times a second. This indicates the module is waiting
for a connection or to be paired.
Open the serial monitor.
Press the small button switch.
Release the small button switch.
That’s it. You are now in “mini” AT mode. The LED does not change. It still blinks quickly at 5 times a second.
In the serial monitor enter “AT” (no quotes) and hit Send. You should get an “OK”
To return to communication mode, enter the “AT+RESET” command.
Because pin 34 is being pulled HIGH the HC-05 will enter “full” AT mode and all commands will work.
Make the following connections
– D2 (RX) to HC-05 TX
– D3 (TX) to voltage divider and then HC-05 RX
– D4 to voltage divider and then to pin 34
– HC-05 vcc to 5v
– HC-05 GND to common GND

Upload the following sketch. Once the sketch is uploaded open the serial monitor.
The sketch is similar to the other HC-05 sketches, it copies what is
entered in to the serial monitor to the HC-05 and what ever it receives
from the HC-05 it sends to the serial monitor. The extra bit is # and $.
Entering a “#” (no quotes) puts the HC-05 in to AT mode and entering a
“$” (no quotes) returns to communication mode. It returns the HC-05 to
communication mode by resetting the module.
To enter AT mode type “#”
To exit AT mode type “$”
You can confirm you are in AT mode by entering “AT” or “AT+VERSION”

To leave At mode type “$” (no quotes)
You can also enter them manually in the form AT\r\n. If you forget to add carriage return and newline characters the HC-05 will not respond.
OK
AT+VERSION – returns the firmware version. In my case it returns
+VERSION:2.0-20100601
OK
AT+STATE – returns the current state of the module
+STATE:INITIALIZED
OK
AT+ROLE – the possible values are ; 0 – Slave, 1 – Master, 2 – Slave-Loop
Returns
+ROLE:0
OK
To change to Master Mode, enter AT+ROLE=1, returns:
OK
AT+UART – returns the baud rate used by the HC-05 in communication mode. The default for the modules I have is 9600.
Returns:
+UART:9600,0,0
OK
To change the baud rate to 38400 – AT+UART=38400,0,0
Returns:
OK
Windows does not support baud rates above 115200. If you accidentally set the baud rate higher than 115200 you will not be able to use communication mode. You should still be able to enter AT mode at 38400 using method 1 or method 2 above and change the communication mode baud rate to something Windows can handle.
AT+NAME
Querying the modules name with AT+NAME? only works in “full” At mode. If you cannot get AT+NAME? to work you need to bring pin34 HIGH.
Changing the modules name with AT+NAME=newname works in “full” AT mode and “mini” AT mode.
What you should get is:
AT+NAME?, returns
+NAME:HC-05
OK
(or something similar depending what your module is called)
Other commands that require pin 34 to be HIGH are AT+INQ and AT+RNAME. This is not a complete list through.

This list is taken from the EGBT-045MS bluetooth module user guide and not all commands may be supported or work straight away. For example AT+NAME? only works when pin 34 is HIGH.
For more information look at the HC-05 user guide or the EGBT-046S/EGBT-045MS user guide
https://geekytheory.com/conectar-android-con-arduino-por-bluetooth-capitulo-1/
http://www.instructables.com/id/Como-conectar-bluetooth-HC-05-Arduino-y-diadema-Mi/
http://saber.patagoniatec.com/hc-05-bluetooth-conectar-esclavo-hc05-maestro-master-save-wireless-tutorial-iot-celular-smartphone-arduino-argentina-ptec/
http://www.naylampmechatronics.com/blog/24_Configuraci%C3%B3n--del-m%C3%B3dulo-bluetooth-HC-05-usa.html
https://play.google.com/store/apps/details?id=es.pymasde.blueterm&hl=es
http://diymakers.es/arduino-bluetooth/
http://blog.theinventorhouse.org/como-conectar-bluetooth-hc-05-arduino-y-diadema-mindwave-neurosky/
https://www.dlabs.co/curso-de-arduino-y-robotica-comunicacion-bluetooth/
http://www.techbitar.com/modify-the-hc-05-bluetooth-module-defaults-using-at-commands.html
| TechBitar |
|
Modify The HC-05 Bluetooth Module Defaults Using AT Commands
UPDATES
In this guide, I will explain how to use Arduino to change the settings of the ubiquitous HC-05 Bluetooth module using the AT command set. The HC-05 comes with a rich set of AT commands to perform various tasks such as changing the module's default settings including changing the pass code, the device name, and the baud rate. But the process of switching the HC-05 into AT command mode for first time users of the module is not straight forward and the docs takes short cuts. There are a couple of ways to do this. I have picked the one I think is the easiest I will do my best to illustrate the process in simple to follow steps. You can find the full set of AT commands in the attached datasheet.
BACKGROUND
The HC-05 Bluetooth module and its siblings are by far the most popular and inexpensive Bluetooth modules used for RF communications by microcontroller hackers. It costs less than $10 on ebay and it's easy to implement. I have published two guides based on the HC-05 Bluetooth module. The first guide explains how to use the HC-05 with the Arduino. The second is an Android app that simplifies controlling Arduino from your smart phone over Bluetooth using the HC-05. In both cases, the default settings for the HC-05 were fine. In the process of using the HC-05 for a project, I ran into a situation where I needed to change the defaults for the module. For example, the default baud rate on the HC-05 is 9600. That's slow for high-speed transmission. The HC-05 can go as high as 1382400 baud rate according to the HC-05 reference. Also, the HC-05 has a default device name of HC-05. Having two or more of those devices in the same area can be confusing. You can use an AT command to change the device name. Also, the pin code default is 1234. You may wish to change that for some projects to ensure basic security. After spending some time searching the web I realized many people are having a hard time changing the default settings for the HC-05. Switching the HC-05 from data transmission mode to configuration mode, to send AT commands to the HC-05, involves a few wiring and software acrobatics. Add to the mix all the variations of the HC Bluetooth module family and the various vendor settings and you get the picture. This guide only covers the HC-05 module with the breakout board. WARNING The HC-05 is a 3.3V system but the breakout board offers current limiting resistors for some protection. While it's not advisable to keep the HC-05 connected to the 5V Arduino Uno pins, for this short exercise I decided to skip the voltage dividers which I use to drop 5V to 3.3V. I advise you to use voltage dividers whenever you connect the HC-05 pins to 5V pins such as the Arduino Uno. If you skip the voltage divider, do so at your own risk. Components & Wiring

I have tested this guide with the following:
PARTS
The Arduino Code for HC-05 Command Mode
his Arduino program
(HC_05.ino) does two things. It takes the AT commands you enter from the
Arduino IDE Serial Monitor and sends those commands to the HC-05. The
program then reads the output of the HC-05 and displays it on the
Arduino IDE Serial Monitor. You can also use a terminal emulator such as
Tera Term instead of the Arduino Serial Monitor.
The Arduino communicates with the HC-05 using the SoftwareSerial ports while the Arduino communicates with the user via the Serial Monitor. /* AUTHOR: Hazim Bitar (techbitar) DATE: Aug 29, 2013 LICENSE: Public domain (use at your own risk) CONTACT: techbitar at gmail dot com (techbitar.com) */ #include <SoftwareSerial.h> SoftwareSerial BTSerial(10, 11); // RX | TX void setup() { pinMode(9, OUTPUT); // this pin will pull the HC-05 pin 34 (key pin) HIGH to switch module to AT mode digitalWrite(9, HIGH); Serial.begin(9600); Serial.println("Enter AT commands:"); BTSerial.begin(38400); // HC-05 default speed in AT command more } void loop() { // Keep reading from HC-05 and send to Arduino Serial Monitor if (BTSerial.available()) Serial.write(BTSerial.read()); // Keep reading from Arduino Serial Monitor and send to HC-05 if (Serial.available()) BTSerial.write(Serial.read()); } Steps To Switch The HC-05 Into Command Mode
For the HC-05 module to
switch to AT command mode, the HC-05 pin 34 (often referred to as the
Key pin) needs to pulled HIGH but in a certain order of events explained
below. When the HC-05 enters the AT command mode, it will communicate
at 38400 baud rate.
Follow these steps in the stated order to switch to the HC-05 to AT command mode.
Example HC-05 AT Commands
You can send AT
Commands to the HC-05 from the Arduino IDE Serial Monitor while the
Arduino is running the attached Arduino program.
I have listed a few popular AT commands that will change the HC-05 device name, pass code, and speed. You will find a full set of AT commands from the attached HC-05 reference PDF file. (remove double quotes from AT command)
| |||
Create a free website
Powered by
Start your own free website
A surprisingly easy drag & drop site creator. Learn more.
Configuración del módulo bluetooth HC-05 usando comandos AT
Publicado por Tutoriales 0Comentarios
En
este tutorial aprenderemos como configurar nuestro módulo HC-05, Se
explicara cómo trabajar como dispositivo maestro o esclavo, cambiar la
velocidad de transmisión, el nombre y código de vinculación de nuestro
hc-05 entre otras cosas.
Este tutorial es un equivalente a este otro tutorial, pero aplicado al módulo HC-05, por lo que solo se aplica al módulo bluetooth HC-05.
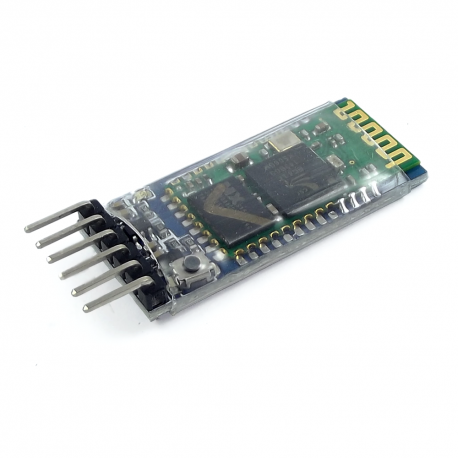
Existen varios modelos y versiones para el módulo HC-05, el que usaremos es el que se muestra en las siguientes imágenes, que como vemos tiene un pulsador, el que nos servirá para entrar en Modo AT y configurarlo.
Este tutorial es un equivalente a este otro tutorial, pero aplicado al módulo HC-05, por lo que solo se aplica al módulo bluetooth HC-05.
Existen varios modelos y versiones para el módulo HC-05, el que usaremos es el que se muestra en las siguientes imágenes, que como vemos tiene un pulsador, el que nos servirá para entrar en Modo AT y configurarlo.
EL
modulo Bluetooth HC-05 viene configurado de fábrica como Esclavo, pero
se puede cambiar para que trabaje como maestro, además al igual que el
hc-06, se puede cambiar el nombre, código de vinculación velocidad y
otros parámetros más.
Definamos primero que es un dispositivo bluetooth maestro y dispositivo esclavo:
Modulo bluetooth hc-05 como esclavo:
Cuando
está configurado de esta forma, se comporta similar a un HC-06, espera
que un dispositivo bluetooth maestro se conecte a este, generalmente se
utiliza cuando se necesita comunicarse con una PC o Celular, pues estos
se comportan como dispositivos maestros.
Modulo bluetooth hc-05 como Maestro:
En
este modo, EL HC-05 es el que inicia la conexión. Un dispositivo
maestro solo se puede conectarse con un dispositivo esclavo.
Generalmente se utiliza este modo para comunicarse entre módulos
bluetooth. Pero es necesario antes especificar con que dispositivo se
tiene que comunicar, esto se explicará más adelante
El módulo HC-05 viene por defecto configurado de la siguiente forma:
- Modo o role: Esclavo
- Nombre por defeco: HC-05
- Código de emparejamiento por defecto: 1234
- La velocidad por defecto (baud rate): 9600
EL Modulo HC-05 tiene 4 estados los cuales es importante conocer:
Estado Desconectado:
-
Entra a este estado tan pronto alimentas el modulo, y cuando no se ha
establecido una conexión bluetooth con ningún otro dispositivo
- EL LED del módulo en este estado parpadea rápidamente
- EL LED del módulo en este estado parpadea rápidamente
- En este estado a diferencia del HC-06, el HC-05 no puede interpretar los comandos AT
Estado Conectado o de comunicación
- Entra a este estado cuando se establece una conexión con otro dispositivo bluetooth.
- El LED hace un doble parpadeo.
-
Todos los datos que se ingresen al HC-05 por el Pin RX se trasmiten por
bluetooth al dispositivo conectado, y los datos recibidos se devuelven
por el pin TX. La comunicación es transparente
Modo AT 1
- Para entrar a este estado después de conectar y alimentar el modulo es necesario presionar el botón del HC-05.
- En este estado, podemos enviar comandos AT, pero a la misma velocidad con el que está configurado.
- EL LED del módulo en este estado parpadea rápidamente igual que en el estado desconectado.
Modo AT 2
-
Para entrar a este estado es necesario tener presionado el botón al
momento de alimentar el modulo, es decir el modulo debe encender con el
botón presionado, después de haber encendido se puede soltar y
permanecerá en este estado.
-
En este estado, para enviar comandos AT es necesario hacerlo a la
velocidad de 38400 baudios, esto es muy útil cuando nos olvidamos la
velocidad con la que hemos dejado configurado nuestro modulo.
- EL LED del módulo en este estado parpadea lentamente.
Entendido lo anterior vamos realizamos las conexiones para configurar el HC-05.
Para configurar el modulo necesitamos enviar los comandos AT desde una computadora, esto lo podemos hacer de dos formas:
Para configurar el modulo necesitamos enviar los comandos AT desde una computadora, esto lo podemos hacer de dos formas:
Hacer la comunicación entre la PC y el módulo de forma indirecta a través de un Arduino:
Las conexiones serían las siguientes:
Ahora es necesario compilar y cargar el siguiente sketch que hemos preparado, que como vemos lee los datos enviados de la PC a través de nuestro IDE y se lo envía serialmente hacia los pines RXD y TXD de nuestro módulo HC-05.
#include <SoftwareSerial.h>   // Incluimos la librería  SoftwareSerial
SoftwareSerial BT(10,11);    // Definimos los pines RX y TX del Arduino conectados al Bluetooth

void setup()
{
  BT.begin(9600);       // Inicializamos el puerto serie BT (Para Modo AT 2)
  Serial.begin(9600);   // Inicializamos  el puerto serie
}

void loop()
{
  if(BT.available())    // Si llega un dato por el puerto BT se envía al monitor serial
  {
    Serial.write(BT.read());
  }

  if(Serial.available())  // Si llega un dato por el monitor serial se envía al puerto BT
  {
     BT.write(Serial.read());
  }
}
Hacer la comunicación entre la PC y el módulo de forma Directa usando un conversor USB-Serial:
Las conexiones serían las siguientes:
Como
se observa los datos le llegan directamente desde la PC a través del
módulo USB a Serial, para esto se pueden usar cualquier modelo de
conversor como el CP2102 y PL2303 pero también se puede hacer a través de un módulo MAX232 en caso tengan un puerto físico serial en su PC.
Configurando nuestro Módulo HC-05
En
nuestro ejemplo usaremos un conversor USB serial CP2102 que se ha
instalado como puerto serial COM5, por lo que antes de abrir el Monitor
serial, en nuestro IDE Arduino debemos escoger dicho Puerto.
El siguiente paso es entrar al Modo AT 1 o Modo AT 2:
-Para
entrar al modo AT 1, después de alimentar el modulo y haber encendido
tan solo basta presionar el botón que tiene el módulo HC-05, el LED del
módulo seguirá parpadeando rápidamente, por lo que para saber si hemos
entrado al Modo AT 1 es necesario enviar comandos AT y ver si responde,
estos comandos se verán más adelante.
-Para entrar al modo AT 2, antes de alimentar o encender el modulo es
necesario presionar su botón, mantener presionado y alimentar el modulo,
después que enciende recién podemos soltar el botón. Si el LED Parpadea
lentamente es porque ya está en Modo AT 2.
En
este tutorial enviaremos los comandos AT usando el Modo AT 2, pero
también es válido si están en el Modo AT 1, con la diferencia que
tendrán que cambiar a la velocidad con la que tienen configurado su
Bluetooth (si es la primera vez que configuran, la velocidad por defecto
es de 9600).
Ahora abrimos nuestro Monitor serial del IDE de Arduino, pero puedes usar cualquier monitor serial.
En la parte inferior debemos escoger “Ambos NL & CR” y la velocidad “38400 baud” (la velocidad para comunicarse en el MODO AT 2)
Echo esto Podemos empezar a enviar los comandos AT a nuestro Bluetooth
Test de comunicación
Lo primero es comprobar si nuestro bluetooth responde a los comandos AT
Enviar: AT
Recibe: OK
Si recibimos como respuesta un OK entonces podemos continuar, sino verificar las conexiones o los pasos anteriores.
Cambiar nombre de nuestro módulo HC-05
Por defecto nuestro bluetooth se llama “HC-05” esto se puede cambiar con el siguiente comando AT
Enviar: AT+NAME=<Nombre> Ejm: AT+NAME=Robot
Respuesta: OK
Cambiar Código de Vinculación
Por defecto viene con el código de vinculación (Pin) “1234”, para cambiarlo hay que enviar el siguiente comando AT
Enviar: AT+PSWD=<Pin> Ejm: AT+PSWD=2560
Respuesta: OK
Se puede saber cuál es el pin actual de nuestro modulo, para eso hay que enviar el siguiente comando: AT+ PSWD?
Configurar la velocidad de comunicación:
La
velocidad por defecto es de 9600 baudios, con Stop bit =0 (1 bit de
parada), y sin Paridad, para cambiar estos parámetros, se hace uso del
siguiente comando AT:
Enviar: AT+UART=<Baud> ,< StopBit>,< Parity>
Respuesta: OK
Donde :
<
Baud > equivale a una velocidad, los valores pueden ser: 4800, 9600,
19200, 38400, 57600, 115200, 23400, 460800, 921600 o 1382400.
<
StopBit> es el Bit de parada, puede ser 0 o 1, para 1 bit o 2 bits
de parada respectivamente, Para aplicaciones comunes se trabaja con 1
bit por lo que este parámetro normalmente se lo deja en 0.
<
Parity> Es la paridad, puede ser 0 (Sin Paridad), 1 (Paridad impar) o
2 (Paridad par). Para aplicaciones comunes no se usa paridad, por lo
que se recomienda dejar este parámetro en 0.
Ejemplo:
Enviar: AT+UART=9600,0,0
Respuesta: OK
Se puede saber cuál es la configuración actual, para eso hay que enviar el siguiente comando: AT+UART?
Configurar el Role: para que trabaje como Maestro o Esclavo
Por defecto nuestro HC-05 viene como esclavo, el Siguiente comando nos permite cambiar esto:
Enviar: AT+ROLE=<Role> Ejm: AT+ROLE=0
Respuesta: OK
Donde:<Role>
0 -> Esclavo
1 -> Maestro
Para saber cuál es la configuración actual, enviar el siguiente comando: AT+ ROLE?
Configurar el modo de conexión (cuando se trabaja como maestro)
Esta
configuración aplica para cuando el modulo está trabajando como
maestro, el modulo necesita saber si se va a conectar con un dispositivo
en particular o con cualquiera que esté disponible.
Enviar: AT+CMODE=<Mode> Ejm: AT+CMODE=1
Respuesta: OK
Donde: < Mode >
0 -> Conectarse a un dispositivo con la dirección especificada(Se utiliza otro comando AT para especificar esta dirección).
1 -> conectar el módulo a cualquier dirección disponible(aleatorio).
Enviar el siguiente comando para averiguar el modo actual de conexión: AT+ CMODE?
Especificar la dirección del dispositivo al cual nos vamos a conectar
Esta
configuración aplica cunado nuestro modulo está configurado como
maestro, y a la vez el modo de conexión está en 0 (CMODE=0) el cual
indica que nos vamos a conectar al dispositivo esclavo en particular.
Para especificar la dirección al cual nos vamos a conectar se usa el
siguiente comando AT
Enviar: AT+BIND=<Address>
Respuesta: OK
Respuesta: OK
Donde:
< Address > Es la dirección del dispositivo al cual nos vamos a conectar, la dirección se envía de la siguiente forma: 1234,56,ABCDEF la cual equivale a la dirección 12:34:56:AB:CD:EF
Ejemplo:
Enviar: AT+BIND=E668,46,9277F2
Respuesta: OK
Para ver la dirección actual en este parámetro hay que enviar el siguiente comando: AT+ BIND?
Otros comandos AT de utilidad:
Obtener la versión del firmware:
Enviar: AT+VERSION?
Respuesta: +VERSION<Versión> Resp Ej: +VERSION:2.0-20100601
Obtener la dirección de nuestro modulo bluetooth
Enviar: AT+ADDR?
Respuesta: +ADDR:<dirección> Resp Ej: +ADDR: 98d3:31:2052e6
Resetear nuestro Modulo, después de hacer esto salimos del MODO AT
Enviar: AT+RESET
Respuesta: OK
Restablecer valores por defecto.
Enviar: AT+ORGL
Respuesta: OK
*Al
hacer esto todos los parámetros del módulo se restablecen, a los
valores por defecto de fábrica. En algunas versiones la velocidad cambia
a 38400 baudios y en otros a 9600.
Ahora veremos Dos ejemplos prácticos, con los pasos para configurar nuestro HC-05 como maestro y esclavo:
Configurando nuestro módulo HC-05 como esclavo:
Realizaremos un ejemplo para configurar nuestro modulo con las siguientes características:
- Modo o role: Esclavo
- Nombre: Robot
- Código de emparejamiento: 1212
- Código de emparejamiento: 1212
- Velocidad o Baud rate: 9600 baudios
A continuación se muestra los pasos para realizar la configuración:
- Entrar en modo AT 1 o Modo AT 2
- Verificar si estamos en modo AT
Enviar: AT
Recibe: OK
- Establecer el Role como Esclavo
Enviar: AT+ROLE=0
Respuesta: OK
- Configurar el Nombre del modulo
Enviar: AT+NAME=Robot
Respuesta: OK
- Establecer el Pin de vinculación
Enviar: AT+PSWD=1212
Respuesta: OK
- Configura la Velocidad
Enviar: AT+UART=9600,0,0
Respuesta: OK
- Verificar los parámetros cambiados
Enviar:
AT+ROLE?
AT+PSWD?
AT+UART?
Respuesta:
+ROLE:0
OK
+PSWD:1212
OK
+UART:9600,0,0
OK
- Resetear el modulo
Enviar: AT+RESET
Respuesta: OK
En
la siguiente imagen podemos ver la secuencia de datos recibidos por el
monitor serial en el mismo orden en que se realizaron los pasos
anteriores.
Después
de hacer la configuración anterior, podemos usar el modulo como un
dispositivo esclavo, el cual estará siempre en espera de una conexión
por parte de una dispositivo bluetooth maestro.
Configurando nuestro módulo HC-05 como Maestro:
Ahora veremos un ejemplo para configurar nuestro modulo como maestro, con las siguientes características:
-Modo o role: Maestro
-Nombre: Naylamp
-Código de emparejamiento: 1465 (La misma que el dispositivo a conectarse)
-Velocidad o Baud rate: 57600 baudios
-Dirección del dispositivo esclavo con el que se desea conectar: 98:D3:31:20:3A:D0
A continuación se muestra los pasos para realizar la configuración:
- Entrar en modo AT 1 o Modo AT 2
- Verificar si estamos en modo AT
Enviar: AT
Recibe: OK
- Establecer el Role como Maestro
Enviar: AT+ROLE=1
Respuesta: OK
- Configurar el Nombre del modulo
Enviar: AT+NAME=Naylamp
Respuesta: OK
- Establecer el Pin de vinculación
Enviar: AT+PSWD=1465
Respuesta: OK
- Configura la Velocidad
Enviar: AT+UART=57600,0,0
Respuesta: OK
- Configurar el modo de conexión
Enviar: AT+CMODE=0
Respuesta: OK
- Especificar la dirección del dispositivo a conectarse
Enviar: AT+BIND=98D3,31,203AD0
Respuesta: OK
- Verificar los parámetros cambiados
Enviar:
AT+ROLE?
AT+PSWD?
AT+UART?
AT+CMODE?
AT+BIND?
Respuesta:
+ROLE:1
OK
+PSWD:1465
OK
+UART:57600,0,0
OK
+CMOD:0
OK
+BIND:98d3:31:203ad0
OK
- Resetear el modulo
Enviar: AT+RESET
Respuesta: OK
En
la siguiente imagen podemos ver la secuencia de datos recibidos por el
monitor serial en el mismo orden en que se realizaron los pasos
anteriores.
Después
de haber hecho las configuraciones, nuestro modulo se comporta como un
dispositivo maestro, el cual estará constantemente buscando el
dispositivo especificado hasta encontrarlo y conectarse. Para que el
Maestro pueda conectarse con el dispositivo esclavo, ambos deben tener
el mismo código de vinculación.
Arduino with HC-05 (ZS-040) Bluetooth module – AT MODE
Updated 26.07.2015
Updated 30.10.2015
AT mode allows you to interrogate the BT module and to change some of the settings; things like the name, the baud rate, whether or not it operates in slave mode or master mode. When used as a master device AT commands allow you to connect to other Bluetooth slave devices.
There are many slightly different HC-05 modules, the modules I have are marked ZS-040 and have an EN pin rather than a KEY pin. They also have a small button switch just above the EN pin. They are based on the EGBT-045MS Bluetooth module.
Update: I now also have boards marked fc-114. See:
HC-05 FC-114 and HC-06 FC-114. First Look
HC-05 FC-114 and HC-06 FC-114. Part 2 – Basic AT commands
HC-05 FC-114 and HC-06 FC-114. Part 3 – Master Mode and Auto Connect
On the zs-040 modules there are 2 AT modes. I do not know if this is intentional but some commands only work when pin34 is HIGH. Other commands work when pin 34 is either HIGH or LOW. This fooled me for quite a while. For this post I have called the different modes “mini” AT mode and “full” AT mode.
To activate AT mode on the HC-05 zs-040 modules we can:
– 1. Hold the small button switch closed while powering on the module.
– 2. Set pin 34 HIGH (3.3v) when power on.
– 3. Close the small push button switch after the HC-05 is powered.
– 4. Pull pin 34 HIGH after powering the HC-05.
Method 1.
Enters AT mode with the built in AT mode baud rate of 38400. The baud rate cannot be changed by the user.
This method allows the module to enter AT mode on start but but does not keep pin 34 HIGH and uses the “mini” AT mode.
Method 2.
Enters AT mode with the built in AT mode baud rate of 38400. The baud rate cannot be changed by the user.
If you keep pin 34 HIGH you will enable the “full” AT mode which allows all AT commands to be used.
If you let pin 34 return LOW after power on then “mini” AT mode will be enabled.
Method 3.*
Enters “mini” AT mode using the user defined communication mode baud rate.
Method 4.*
Enters “full” AT mode using the user defined communication mode baud rate.
If pin 34 is kept HIGH then the HC-05 enters the “full” AT mode. If pin 34 is brought HIGH and returned to LOW it will put the module in to “mini” AT mode.
* added 21.07.2015
Method 1 and 2 are good in that you know the baud rate – it will always be 38400. This could be useful if you have modules other people have used or if you forget what communication mode baud rate you have previously set.
Method 3 and 4 adds convenience. You can enter AT mode, make changes and return back to communication mode without switching sketches and messing around with different baud rates.
I use software serial on Arduino pins 2 and 3 to talk to the HC-05. This means I can still use the hardware serial to talk to the serial monitor on a host computer.
Entering AT Mode Method 1. Use the button switch
The small push button switch, when closed, connects pin 34 to vcc which allows you to enter AT mode. Close the button switch when powering on the module and you enter AT mode using 38400 baud rate. Once on you can release the button switch, however, releasing the button switch puts the module in to a mini AT mode and some commands will not work. Commands such as AT+NAME?, AT+INQ, AT+RNAME? only work when pin 34 is HIGH. As soon as you release the button switch pin 34 returns LOW. If you want access to the extended commands you can simply close the switch just before issuing the AT command and release the button switch after the command has been sent.Make the following connections
– BT VCC to Arduiono 5V
– BT GND to Arduino GND
– BT TX to Arduino D2
– BT RX to Arduino D3 through a voltage divider (3.3V)
Connect the Arduino to the host computer. The LED on the HC-05 should be blinking quickly at about 5 times a second.
With the Arduino on, do the following
– Remove the 5V connection to BT VCC
– Press and hold the button switch on the BT module
– Re-connect BT VCC to 5V (while still pressing the button switch), the LED should come on.
– Release the button switch and the LED should be blinking slowly on/off once every couple of seconds. This indicates AT mode.
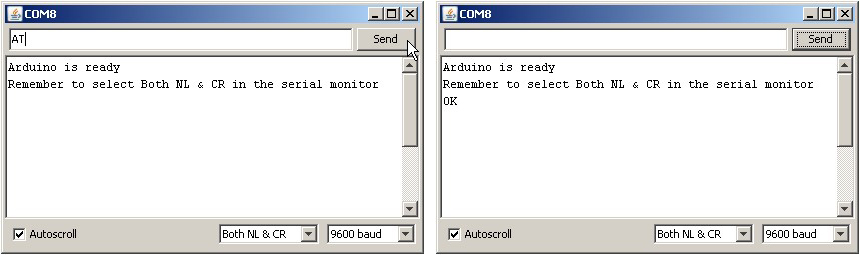
The following sketch is used to talk to the BT module. Run the sketch and put the HC-05 in to AT mode.
// Basic Bluetooth sketch HC-05_AT_MODE_01 // Communicate with a HC-05 using the serial monitor // // The HC-05 defaults to communication mode when first powered on you will need to manually enter AT mode // The default baud rate for AT mode is 38400 // See www.martyncurrey.com for details // #include <SoftwareSerial.h> SoftwareSerial BTserial(2, 3); // RX | TX // Connect the HC-05 TX to Arduino pin 2 RX. // Connect the HC-05 RX to Arduino pin 3 TX through a voltage divider. // char c = ' '; void setup() { Serial.begin(9600); Serial.println("Arduino is ready"); Serial.println("Remember to select Both NL & CR in the serial monitor"); // HC-05 default serial speed for AT mode is 38400 BTserial.begin(38400); } void loop() { // Keep reading from HC-05 and send to Arduino Serial Monitor if (BTserial.available()) { c = BTserial.read(); Serial.write(c); } // Keep reading from Arduino Serial Monitor and send to HC-05 if (Serial.available()) { c = Serial.read(); BTserial.write(c); } } |
The HC-05 expects a new line and a carriage return character at the end of each command so make sure “Both NL & CR” is selected at the bottom of the serial monitor. To confirm you are actually in AT mode, in the serial monitor type “AT” (no quotes) and hit Send. You should get an “OK”.
Entering AT Mode Method 2. Using the Arduino to Control the HC-05
In this example the Arduino fully controls the HC-05. The Arduino pin D4 connects to a PNP transistor which is used as a switch to control the power and D5 is connected to the HC-05 pin 34 to control AT mode. Of course you can control the HC-05 manually if you wish.This used to be my preferred method but I have found that once I have set up a module I seldom change it and it has become more convenient to use the button switch or a temporary connection to pin 34. The benefit of this example is that the Arduino can control the process. Also, certain commands only work when pin 34 is HIGH. Using this method allows you to keep pin 34 HIGH.
The HC-05 can draw a maximum of 40mA and although Arduino pins can supply 40mA this is the maximum and not recommended. The Arduinos 5V out pin can supply up to 200mA and is a much safer option and we use this to power the HC-05. We still need a regular pin to control the transistor which we are using to switch the power on and off.
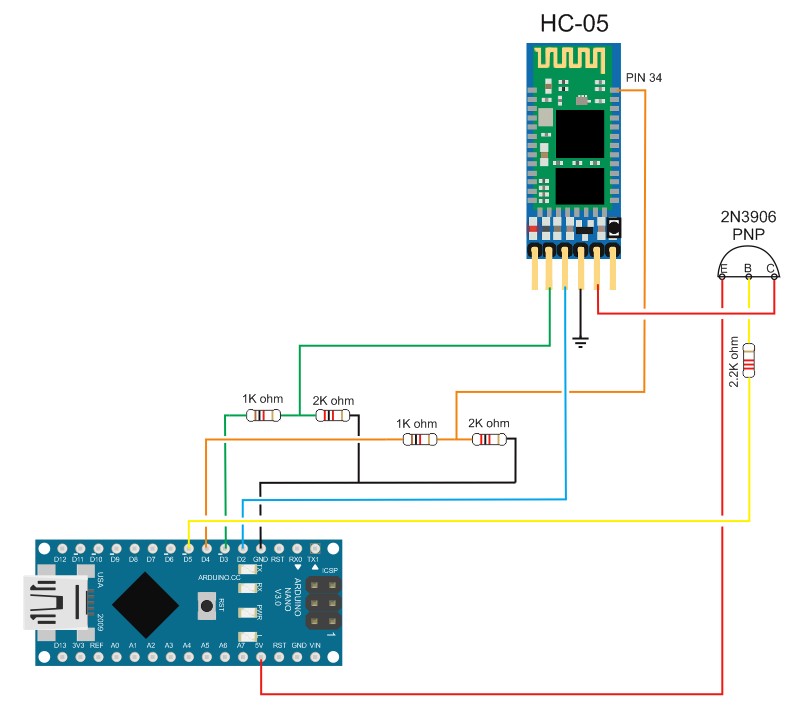
With the Arduino turned off make the following connections:
– Arduino D2 to HC-05 TX
– Arduino D3 to HC-05 RX through a voltage divider
– Arduino D4 to HC-05 pin 34 through a voltage divider
– Arduino D5 to PNP transistor base via a 2.2k resistor
– HC-05 GND to common GND
– PNP emitter to +5V
– PNP collector to HC-05 vcc
I am using a 2N3906 PNP transistor because it is what I have. Similar PNP transistors can also be used.


HC-05 with pin 34 connected by a probe clip. You can also simply hold a piece of wire to the pin. For a long term solution you would need to solder a wire to pin 34.
Compile and upload the following sketch
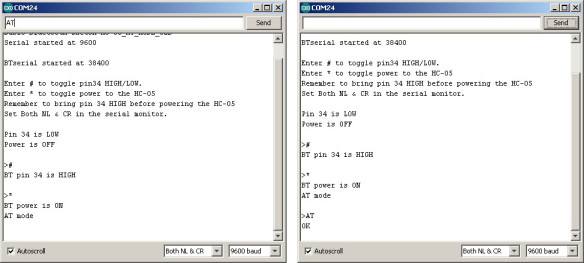
// Basic Bluetooth sketch HC-05_AT_MODE_02b // Connect the HC-05 module and communicate using the serial monitor // Arduino automates entering AT mode // // The default baud rate for AT mode when pin 34 is HIGH on power on is 38400 // See www.martyncurrey.com for details // // // Pins // Arduino D2 to HC-05 TX // Arduino D3 to HC-05 RX via a voltage divider // Arduino D4 to HX-05 pin 34 via a voltage divider // Arduino D5 to PNP Base via a 2.2k resistor // BT VCC to PNP Collector // BT GND to GND // PNP Emitter to vcc // // When a command is entered in to the serial monitor on the computer // the Arduino will relay it to the Bluetooth module and display the result. // const byte BT_POWERPIN = 5; const byte BT_PIN34_PIN = 4; const boolean ON = LOW; const boolean OFF = HIGH; boolean BT_POWER = HIGH; boolean PIN34_STATE = LOW; boolean NL = true; char c = ' '; #include <SoftwareSerial.h> SoftwareSerial BTserial(2, 3); // RX | TX void setup() { pinMode(BT_POWERPIN, OUTPUT); pinMode(BT_PIN34_PIN, OUTPUT); digitalWrite(BT_POWERPIN, OFF); digitalWrite(BT_PIN34_PIN, LOW); Serial.begin(9600); // communication with the host computer //while (!Serial) { ; } Serial.println("Arduino Started"); Serial.println("Basic Bluetooth sketch HC-05_AT_MODE_02b"); Serial.println("Serial started at 9600"); Serial.println(" "); // Start the software serial - baud rate for AT mode is 38400 BTserial.begin(38400); Serial.println("BTserial started at 38400"); Serial.println(" "); Serial.println("Enter # to toggle pin34 HIGH/LOW."); Serial.println("Enter * to toggle power to the HC-05"); Serial.println("Remember to bring pin 34 HIGH before powering the HC-05"); Serial.println("Set Both NL & CR in the serial monitor."); Serial.println(" "); Serial.println("Pin 34 is LOW"); Serial.println("Power is OFF"); Serial.println(" "); } void loop() { // Keep reading from Arduino Serial Monitor and send to HC-05 if (Serial.available()) { c = Serial.read(); // Echo the user input to the main window. The ">" character indicates the user entered text. if (NL) { Serial.print(">"); NL = false; } Serial.write(c); if (c==10) { NL = true; } if (c=='*') { Serial.println(""); Serial.print("BT power is "); if (BT_POWER == ON) { BT_POWER = OFF; digitalWrite(BT_POWERPIN, OFF); Serial.println("OFF"); } else if (BT_POWER == OFF) { BT_POWER = ON; digitalWrite(BT_POWERPIN, ON); Serial.println("ON"); } if ( (PIN34_STATE == HIGH) && (BT_POWER == ON) ) { Serial.println("AT mode"); } } else if (c=='#') { Serial.println(""); Serial.print("BT pin 34 is "); if (PIN34_STATE == LOW) { PIN34_STATE = HIGH; digitalWrite(BT_PIN34_PIN, HIGH); Serial.println("HIGH"); } else if (PIN34_STATE == HIGH) { PIN34_STATE = LOW; digitalWrite(BT_PIN34_PIN, LOW); Serial.println("LOW"); } } else { BTserial.write(c); } } // Keep reading from the HC-05 and send to the Arduino Serial Monitor if (BTserial.available()) { c = BTserial.read(); Serial.write(c); } } |
To start the HC-05 in AT mode, bring pin 34 HIGH and then start the BT module.
– Enter “#” (no quotes) to bring pin 34 HIGH
– Enter “*” (no quotes) to turn on the HC-05
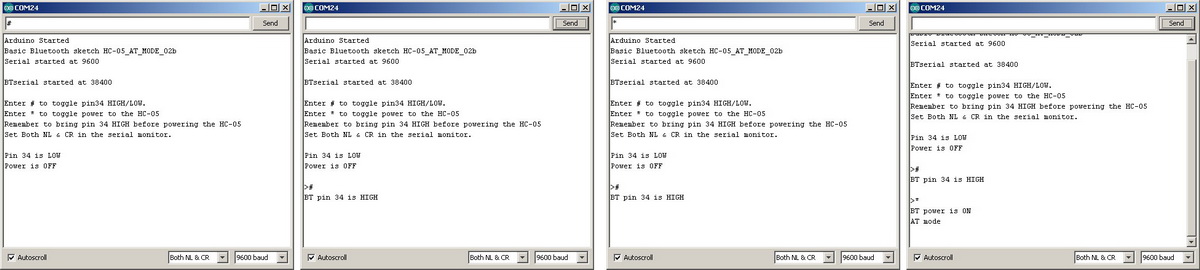
The HC-05 should now be on and in AT mode with the on board LED blinking slowly on/off every couple of seconds.
Enter “AT” (no quotes) and you should get a reply of “OK”.
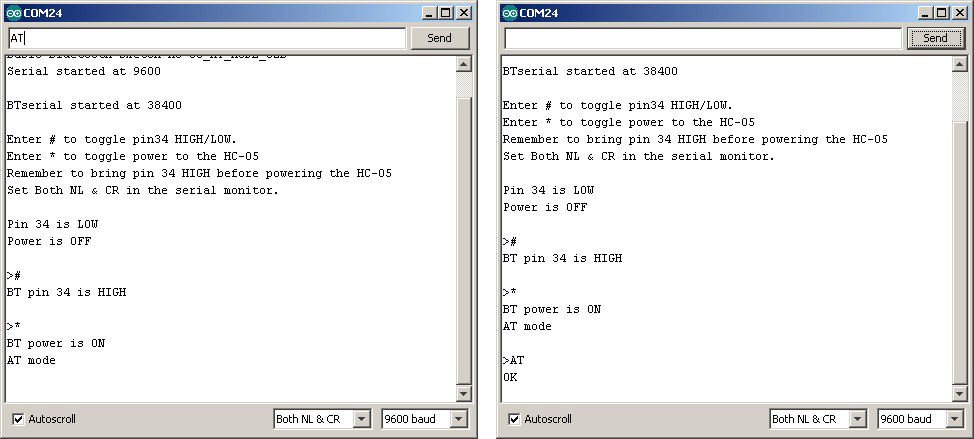
It should be fairly simple to extend this example and fully control the HC-05 from your own sketch.
Entering AT Mode Method 3. Close the small push button switch after the HC-05 is powered.
This method enters the “mini” AT mode using the baud rate defined for communication mode. This means you can use communication mode and enter AT mode without uploading a new sketch but not all commands will work.Set up the HC-05 as below:
Upload the following sketch.
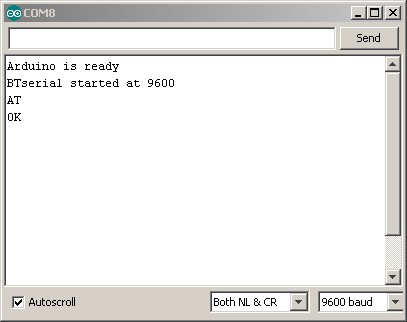
// Basic Bluetooth sketch HC-05_02_9600+ECHO // Connect the HC-05 module and communicate using the serial monitor // // The HC-05 defaults to commincation mode when first powered on. // The default baud rate for communication mode is 9600. Your module may have a different speed. // #include <SoftwareSerial.h> SoftwareSerial BTserial(2, 3); // RX | TX // Connect the HC-05 TX to Arduino pin 2 RX. // Connect the HC-05 RX to Arduino pin 3 TX through a voltage divider. char c = ' '; void setup() { Serial.begin(9600); Serial.println("Arduino is ready"); // HC-05 default serial speed for communication mode is 9600 BTserial.begin(9600); Serial.println("BTserial started at 9600"); } void loop() { // Keep reading from HC-05 and send to Arduino Serial Monitor if (BTserial.available()) { c = BTserial.read(); Serial.write(c); } // Keep reading from Arduino Serial Monitor and send to HC-05 if (Serial.available()) { c = Serial.read(); // Copy the serial data back to to the serial monitor. // This makes it easy to follow the commands and replies Serial.write(c); BTserial.write(c); } } |
Open the serial monitor.
Press the small button switch.
Release the small button switch.
That’s it. You are now in “mini” AT mode. The LED does not change. It still blinks quickly at 5 times a second.
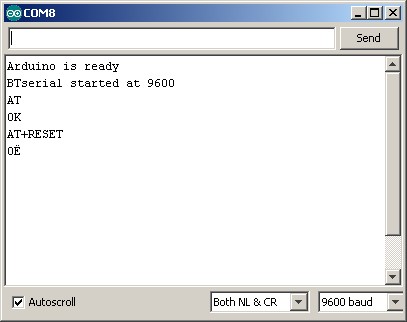
In the serial monitor enter “AT” (no quotes) and hit Send. You should get an “OK”
To return to communication mode, enter the “AT+RESET” command.
Entering AT Mode Method 4. Pull pin 34 HIGH after powering the HC-05.
This method allows you to enter and exit AT mode from within a sketch. This can be handy when you run a set up sketch or when you want the user to be able to make changes. For example change the name of the HC-05. The sketch could ask the user for the new name and then set it without the need to change sketches or any manual operation from the user.Because pin 34 is being pulled HIGH the HC-05 will enter “full” AT mode and all commands will work.
Make the following connections
– D2 (RX) to HC-05 TX
– D3 (TX) to voltage divider and then HC-05 RX
– D4 to voltage divider and then to pin 34
– HC-05 vcc to 5v
– HC-05 GND to common GND

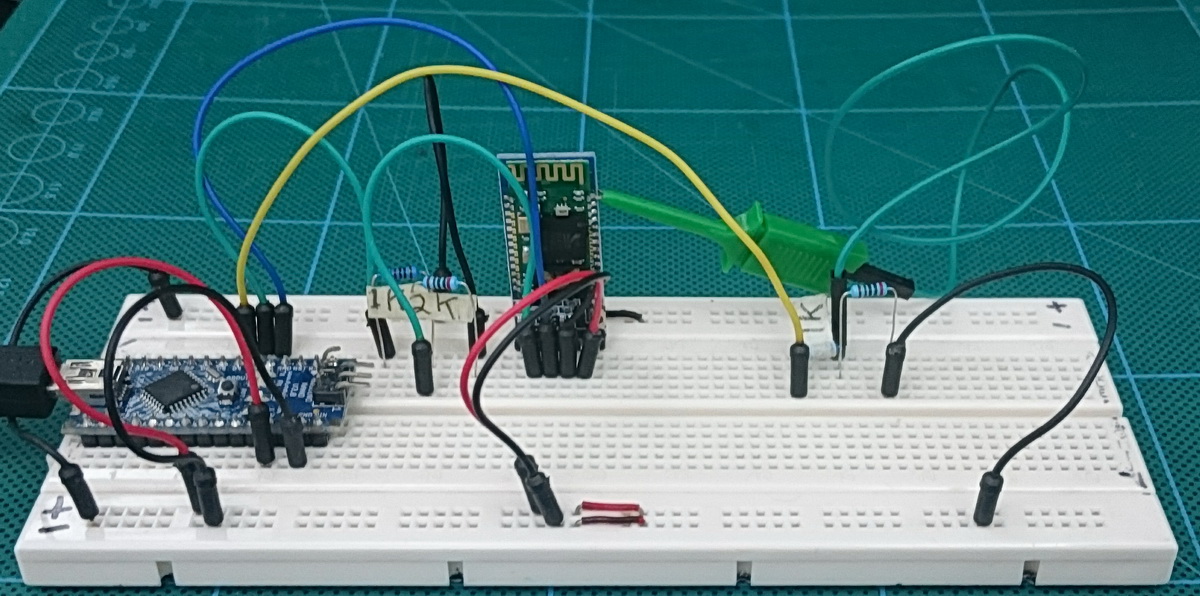
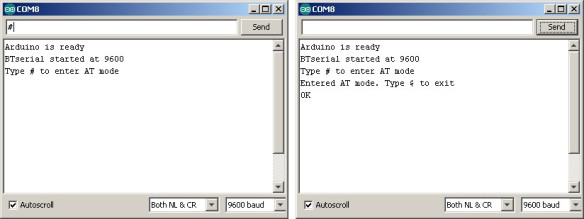
Upload the following sketch. Once the sketch is uploaded open the serial monitor.
// Basic Bluetooth sketch HC-05_03_AT_MODE_Controlled // Connect the HC-05 module and communicate using the serial monitor // // The HC-05 defaults to communication mode when first powered on. // The default baud rate for communication mode is 9600. Your module may have a different speed. // This sketch allows the user to enter AT mode on the HC-05 // // // Pins // D2 (RX) to HC-05 TX // D3 (TX) to voltage divider and then HC-05 RX // D4 to voltage divider and then to pin 34 // HC-05 vcc to 5v // HC-05 GND to common GND // #include <SoftwareSerial.h> SoftwareSerial BTserial(2, 3); // RX | TX // Connect the HC-05 TX to Arduino pin 2 RX. // Connect the HC-05 RX to Arduino pin 3 TX through a voltage divider. char c = ' '; byte ATmodePin=4; void setup() { // set up the pin used to turn on AT mode pinMode(ATmodePin, OUTPUT); digitalWrite(ATmodePin, LOW); // Start the serial monitor Serial.begin(9600); Serial.println("Arduino is ready"); // HC-05 default serial speed for communication mode is 9600 BTserial.begin(9600); Serial.println("BTserial started at 9600"); Serial.println("Type # to enter AT mode"); } void loop() { // Keep reading from HC-05 and send to Arduino Serial Monitor if (BTserial.available()) { c = BTserial.read(); Serial.write(c); } // Keep reading from Arduino Serial Monitor and send to HC-05 if (Serial.available()) { c = Serial.read(); if (c=='#') // enter AT mode { digitalWrite(ATmodePin, HIGH); Serial.print("Entered AT mode. Type $ to exit"); } else if (c=='$') // exit AT mode by reseting the HC-05 { digitalWrite(ATmodePin, LOW); BTserial.print("AT+RESET\n\r"); Serial.print("AT+RESET\n\r"); } else { // Copy the serial data back to to the serial monitor. // This makes it easy to follow the commands and replies Serial.write(c); BTserial.write(c); } } } |
To enter AT mode type “#”
To exit AT mode type “$”
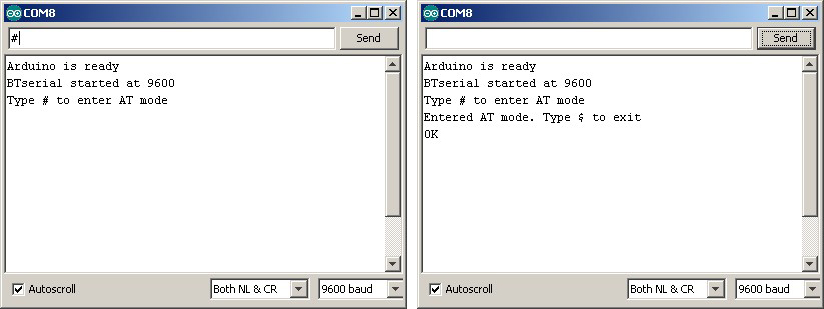
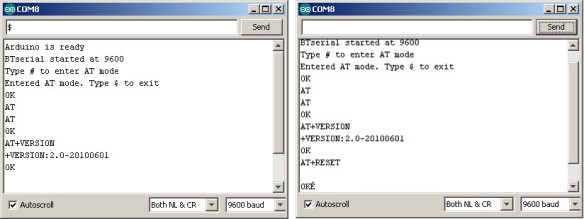
You can confirm you are in AT mode by entering “AT” or “AT+VERSION”
To leave At mode type “$” (no quotes)
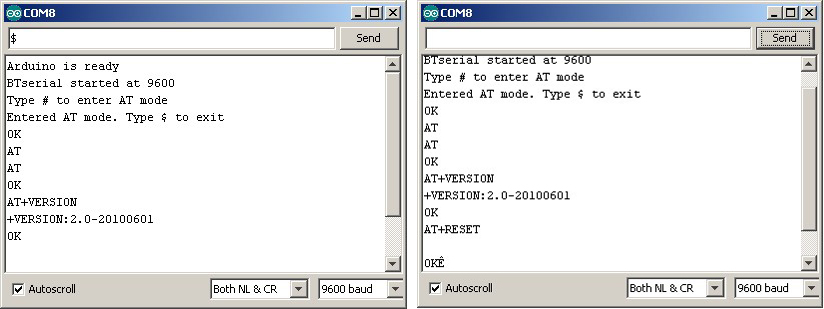
AT commands
The HC-05 expects commands to include a carriage return and newline characters (\r\n). You can add these automatically in the serial monitor by selecting Both NL & CR at the bottom of the window.You can also enter them manually in the form AT\r\n. If you forget to add carriage return and newline characters the HC-05 will not respond.
Example commands
AT – simple feedback request. Will returnOK
AT+VERSION – returns the firmware version. In my case it returns
+VERSION:2.0-20100601
OK
AT+STATE – returns the current state of the module
+STATE:INITIALIZED
OK
AT+ROLE – the possible values are ; 0 – Slave, 1 – Master, 2 – Slave-Loop
Returns
+ROLE:0
OK
To change to Master Mode, enter AT+ROLE=1, returns:
OK
AT+UART – returns the baud rate used by the HC-05 in communication mode. The default for the modules I have is 9600.
Returns:
+UART:9600,0,0
OK
To change the baud rate to 38400 – AT+UART=38400,0,0
Returns:
OK
Windows does not support baud rates above 115200. If you accidentally set the baud rate higher than 115200 you will not be able to use communication mode. You should still be able to enter AT mode at 38400 using method 1 or method 2 above and change the communication mode baud rate to something Windows can handle.
AT+NAME
Querying the modules name with AT+NAME? only works in “full” At mode. If you cannot get AT+NAME? to work you need to bring pin34 HIGH.
Changing the modules name with AT+NAME=newname works in “full” AT mode and “mini” AT mode.
What you should get is:
AT+NAME?, returns
+NAME:HC-05
OK
(or something similar depending what your module is called)
Other commands that require pin 34 to be HIGH are AT+INQ and AT+RNAME. This is not a complete list through.
Full list of AT commands

This list is taken from the EGBT-045MS bluetooth module user guide and not all commands may be supported or work straight away. For example AT+NAME? only works when pin 34 is HIGH.
For more information look at the HC-05 user guide or the EGBT-046S/EGBT-045MS user guide
Suscribirse a:
Entradas (Atom)