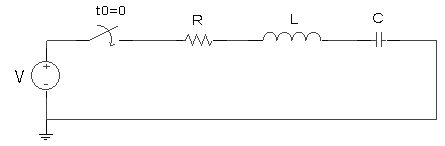
GAUSS JORDAN EN EXCEL
Código de la aplicación en la parte final de este artículo
https://www.youtube.com/watch?v=J3GPUhaSdxU
http://borradoresalfonso.blogspot.com.co/2015/01/gauss-jordan-en-visual-basic-de-excel.html
La hoja de excel quedaría de la siguiente forma:
Ahora hacemos click sobre el botón, o combinamos las teclas "Ctrl + h", y nos saldrá la ventana siguiente:
Elegimos el Nro de filas que en nuestro caso son "5" *(1-5)
elegimos el Nro de columnas que en nuestro caso son "6" *(A-F)
y presionamos el boton "REDUCCION GAUSS"
Y obtenemos la matriz en su forma escalonada reducida. como muestra la siguiente figura, debidamente demarcada:
El sistema ha sido probado ampliamente con la mayoria de casos donde podría haber error y ha sido satisfecho cualquier examen.
Esperamos sea de utilidad.
***(si al hacer click en el link de descarga le aparece publicidad cierre y vuelva a intentarlo)***
PUEDES BAJARTE LA HOJA DE EXCEL GRATIS QUE CONTIENE LA APLICACIÓN CLICK AQUI
Haz click en este link para descargar la hoja de excel gratis-->>
Código de la aplicación
/////////////////////////////////////////////////////
Sub form()
ActiveSheet.Range("A1").Select
frmgauss.Show
End Sub
Sub gauss()
'
' gauss Macro
' abre el reductor de matrices gauss Jordan
'
' Acceso directo: CTRL+h
'
ActiveSheet.Range("A1").Select
frmgauss.Show
End Sub
//////////////////////////////////////////////////////////
'///////////////////////////////////////////////////////////////////////////////////////////////////////////////
'******************************
'GAUSS JORDAN
'REDUCCION MATRICIAL NXN
'DESARROLLADO POR JOSE ARIVILCA
'CIPRODIQ - IQ UNSA
'2014
'PARA: VBX DESARROLLO
'UNSA 2014
'*******************************
Option Explicit
Dim ct As Double
Dim ft As Double
Dim a As Double
Dim c As Double
Dim f As Double
Dim fx As Double
Dim piv As Double
Dim cmc As Double
Dim varx As Double
Dim divs As Double
Dim rc As Double
Dim rf As Double
Private Sub cbocol_Change()
End Sub
Private Sub cmdcreditos_Click()
MsgBox "REDUCCION DE GAUSS" & vbCrLf & "programado por JOSE ALFONSO ARIVILCA" & vbCrLf & "VBX DESARROLLO 2015" & vbCrLf & "jose_alfonso@peru.com / pjose_alfonso@hotmail.com", vbInformation, "Acerca de..."
End Sub
Private Sub cmdmatriz_Click()
If cbofil.Text <> Empty Then
If cbocol.Text <> Empty Then
completar
inicio_gauss
seleccionar
frmgauss.Hide
MsgBox "La reducción de gauss ha concluido", vbInformation, "VBX DESARROLLO 2015"
Unload Me
Else
MsgBox "Ingrese el numero de filas y columnas del sistema", vbCritical, "Datos necesarios"
cbocol.SetFocus
End If
Else
MsgBox "Ingrese el numero de filas y columnas del sistema", vbCritical, "Datos necesarios"
cbofil.SetFocus
End If
End Sub
Sub completar()
Dim cdfil As Double
Dim cdcol As Double
For cdcol = 1 To CDbl(cbocol.Text)
For cdfil = 1 To CDbl(cbofil.Text)
If Not IsNumeric(Cells(cdfil, cdcol).Value) Then
Cells(cdfil, cdcol).Value = "0"
End If
If (Cells(cdfil, cdcol).Value) = Empty Then
Cells(cdfil, cdcol).Value = "0"
End If
Next cdfil
Next cdcol
End Sub
Sub inicio_gauss()
ct = CDbl(cbocol.Text)
ft = CDbl(cbofil.Text)
a = 1
For c = 1 To ct
For f = a To ft
fx = a
piv = CDbl(Cells(f, c).Value)
If piv <> 0 Then
If a <> f Then
cambiar_filas
f = fx
reducir_gauss
a = fx + 1
Exit For
Else
reducir_gauss
a = fx + 1
Exit For
End If
Else
If f = ft Then
a = fx
End If
End If
Next f
If c = ct - 1 Then
Exit For
End If
Next c
End Sub
Sub cambiar_filas()
For cmc = 1 To ct
varx = Cells(f, cmc).Value
Cells(f, cmc).Value = Cells(fx, cmc).Value
Cells(fx, cmc).Value = varx
Next cmc
End Sub
Sub reducir_gauss()
Dim redx As Double
If c < ct Then
For divs = c + 1 To ct
Cells(f, divs).Value = "=" & Cells(f, divs).Value & "/" & Cells(f, c).Value
Next divs
Cells(f, c).Value = "=" & Cells(f, c).Value & "/" & Cells(f, c).Value
End If
If f < ft Then
If c < ct Then
For rc = c + 1 To ct
For rf = f + 1 To ft
Cells(rf, rc).Value = "=-1*" & Cells(rf, c).Value & "*" & Cells(f, rc).Value & "+" & Cells(rf, rc).Value
Next rf 'constante
Next rc
For redx = f + 1 To ft
Cells(redx, c).Value = "=0"
Next redx
End If
End If
If f > 1 Then
If c < ct Then
For rc = c + 1 To ct
For rf = f - 1 To 1 Step -1
Cells(rf, rc).Value = "=-1*" & Cells(rf, c).Value & "*" & Cells(f, rc).Value & "+" & Cells(rf, rc).Value
Next rf
Next rc
For redx = f - 1 To 1 Step -1
Cells(redx, c).Value = "=0"
Next redx
End If
End If
End Sub
Private Sub UserForm_Initialize()
Dim numb As Double
cbofil.Clear
cbocol.Clear
For numb = 2 To 1000
cbofil.AddItem numb
cbocol.AddItem numb
Next numb
End Sub
Sub seleccionar()
'*borramos cualquier linea en nuestra area de trabajo*****************
Range(Cells(1, 1), Cells(CDbl(cbofil.Text), CDbl(cbocol.Text))).Select
Selection.Borders(xlDiagonalDown).LineStyle = xlNone
Selection.Borders(xlDiagonalUp).LineStyle = xlNone
Selection.Borders(xlEdgeLeft).LineStyle = xlNone
Selection.Borders(xlEdgeTop).LineStyle = xlNone
Selection.Borders(xlEdgeBottom).LineStyle = xlNone
Selection.Borders(xlEdgeRight).LineStyle = xlNone
Selection.Borders(xlInsideVertical).LineStyle = xlNone
Selection.Borders(xlInsideHorizontal).LineStyle = xlNone
'*********************************************************************
'ponemos en recuadro nuestra matriz
Range(Cells(1, 1), Cells(CDbl(cbofil.Text), CDbl(cbocol.Text))).Select
Selection.Borders(xlDiagonalDown).LineStyle = xlNone
Selection.Borders(xlDiagonalUp).LineStyle = xlNone
With Selection.Borders(xlEdgeLeft)
.LineStyle = xlContinuous
.ColorIndex = 0
.TintAndShade = 0
.Weight = xlMedium
End With
With Selection.Borders(xlEdgeTop)
.LineStyle = xlContinuous
.ColorIndex = 0
.TintAndShade = 0
.Weight = xlMedium
End With
With Selection.Borders(xlEdgeBottom)
.LineStyle = xlContinuous
.ColorIndex = 0
.TintAndShade = 0
.Weight = xlMedium
End With
With Selection.Borders(xlEdgeRight)
.LineStyle = xlContinuous
.ColorIndex = 0
.TintAndShade = 0
.Weight = xlMedium
End With
Selection.Borders(xlInsideVertical).LineStyle = xlNone
Selection.Borders(xlInsideHorizontal).LineStyle = xlNone
'** ahora ponemos en cuadro nuestros resultados de variables
Range(Cells(1, 1), Cells(CDbl(cbofil.Text), CDbl(cbocol.Text) - 1)).Select
Selection.Borders(xlDiagonalDown).LineStyle = xlNone
Selection.Borders(xlDiagonalUp).LineStyle = xlNone
With Selection.Borders(xlEdgeLeft)
.LineStyle = xlContinuous
.ColorIndex = 0
.TintAndShade = 0
.Weight = xlMedium
End With
With Selection.Borders(xlEdgeTop)
.LineStyle = xlContinuous
.ColorIndex = 0
.TintAndShade = 0
.Weight = xlMedium
End With
With Selection.Borders(xlEdgeBottom)
.LineStyle = xlContinuous
.ColorIndex = 0
.TintAndShade = 0
.Weight = xlMedium
End With
With Selection.Borders(xlEdgeRight)
.LineStyle = xlContinuous
.ColorIndex = 0
.TintAndShade = 0
.Weight = xlMedium
End With
Selection.Borders(xlInsideVertical).LineStyle = xlNone
Selection.Borders(xlInsideHorizontal).LineStyle = xlNone
Range("A1").Select
End Sub
'//////////////////////////////////////////////////////////////////////////////////////////////////


 OPTION ONE


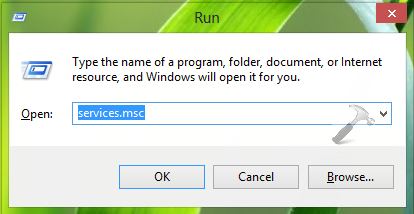
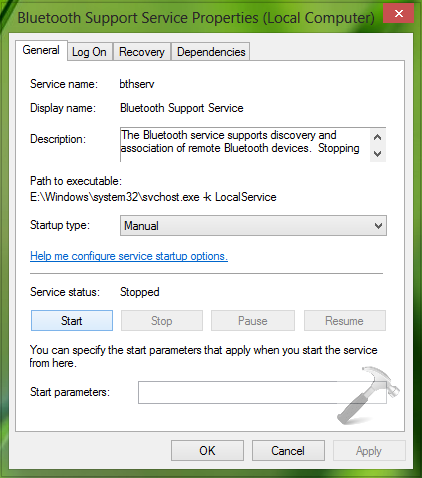
 + R and put services.msc in Run dialog box. Click OK to open Services.