Karol G - Mi Cama (Official Video)
https://youtu.be/8-mloCL49vs?list=PLRZlMhcYkA2GDuq-8BTLzTRGpwNsGlWjj


| Celda De Carga | Módulo HX711 |
|---|---|
| Cable Rojo | Pin E+ |
| Cable Negro | Pin E- |
| Cable Verde | Pin A- |
| Cable Blanco | Pin A+ |
| Módulo HX711 | Arduino UNO, MEGA, NANO |
|---|---|
| Pin GND | Pin GND |
| Pin DT | Pin A1 |
| Pin SCK | Pin A0 |
| Pin VCC | Pin 5V |
#include "HX711.h"

#define DOUT  A1
#define CLK  A0

HX711 balanza(DOUT, CLK);

void setup() {
  Serial.begin(9600);
  Serial.print("Lectura del valor del ADC:  ");
  Serial.println(balanza.read());
  Serial.println("No ponga ningun  objeto sobre la balanza");
  Serial.println("Destarando...");
  balanza.set_scale(); //La escala por defecto es 1
  balanza.tare(20); //El peso actual es considerado Tara.
  Serial.println("Coloque un peso conocido:");

}


void loop() {

  Serial.print("Valor de lectura:  ");
  Serial.println(balanza.get_value(10),0);
  delay(100);
}
El programa debe correr sin el peso colocado, pues al inicio de programa calcula la tara.
#include "HX711.h"

#define DOUT  A1
#define CLK  A0

HX711 balanza(DOUT, CLK);

void setup() {
Serial.begin(9600);
  Serial.print("Lectura del valor del ADC:  ");
  Serial.println(balanza.read());
  Serial.println("No ponga ningun  objeto sobre la balanza");
  Serial.println("Destarando...");
  Serial.println("...");
  balanza.set_scale(439430.25); // Establecemos la escala
  balanza.tare(20); //El peso actual es considerado Tara.

  Serial.println("Listo para pesar");
}

void loop() {
  Serial.print("Peso: ");
  Serial.print(balanza.get_units(20),3);
  Serial.println(" kg");
  delay(500);
}
Como se observa en el código, es necesario encender el Arduino antes de colocar los objetos que se desean pesar, de lo contrario el peso que esté sobre la balanza se considerará como tara.


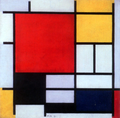 Se parte de una imagen Se parte de una imagen |
Con la correspondiente |
Nota: El vértice inferior izquierdo permite desplazar la imagen.
| |
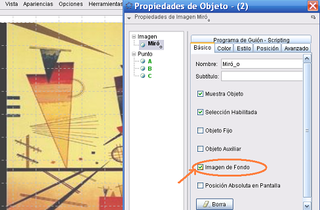 |
Fijar la imagen como la de fondo (tildando la casilla correspondiente que aparece en la pestaña Básico del caja de diálogo de Propiedades). |
 |
Reducir la opacidad de la imagen (con el dial que aparece en la pestaña Color del cuadro de Propiedades). |
Nota: Se puede quitar la cualidad de la imagen como de fondo para seguir operando con ella con las herramientas de transformación.
| |
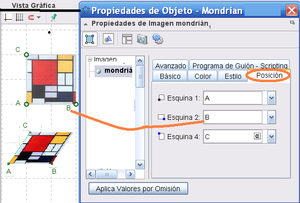 |
Al crear tres |
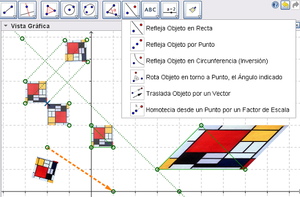 |
Se puede reflejar la imagen por |
Rellenos y Teselados 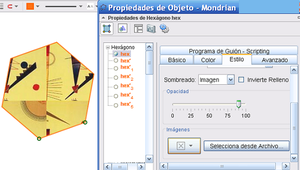 |
Se puede emplear un archivo de imagen para que haga las veces de relleno de cualquier polígono, |
 |
Nota: Es posible fijar la Opacidad con el dial correspondiente y/o establecer que se Invierte Relleno.
|
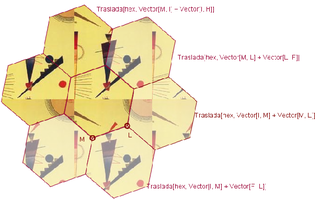 |
Se puede teselar cualquier polígono y algunos de los
regulares con maniobras de traslación sencillas y cuando el relleno del
original es una imagen, el resultado es vistoso y artístico, incluso.
en:Tutorial:Transformations & Inserting Pictures into the Graphics View
|

from tensorflow.examples.tutorials.mnist import input_data
import tensorflow as tf

# Fetch MNIST Dataset using the supplied Tensorflow Utility Function
mnist = input_data.read_data_sets("data/MNIST_data/", one_hot=True)

# Setup the Model Parameters
INPUT_SIZE, OUTPUT_SIZE = 784, 10
FILTER_SIZE, FILTER_ONE_DEPTH, FILTER_TWO_DEPTH = 5, 32, 64
FLAT_SIZE, HIDDEN_SIZE = 7 * 7 * 64, 1024
 Source
 Source
# Create Convolution/Pooling Helper Functions
def conv2d(x, W):
  return tf.nn.conv2d(x, W, strides=[1, 1, 1, 1], padding='SAME')

def max_pool_2x2(x):
  return tf.nn.max_pool(x, ksize=[1, 2, 2, 1], strides=[1, 2, 2, 1], padding='SAME')

### Start Building the Computation Graph ###

# Initializer - initialize our variables from standard normal with stddev 0.1
initializer = tf.random_normal_initializer(stddev=0.1)

# Setup Placeholders => None argument in shape lets us pass in arbitrary sized batches
X = tf.placeholder(tf.float32, shape=[None, INPUT_SIZE])
Y = tf.placeholder(tf.float32, shape=[None, OUTPUT_SIZE])
keep_prob = tf.placeholder(tf.float32)

# Reshape input so it resembles an image (height x width x depth)
X_image = tf.reshape(X, [-1, 28, 28, 1])

# Conv Filter 1 Variables
Wconv_1 = tf.get_variable("WConv_1", shape=[FILTER_SIZE, FILTER_SIZE,
                                            1, FILTER_ONE_DEPTH], initializer=initializer)
bconv_1 = tf.get_variable("bConv_1", shape=[FILTER_ONE_DEPTH], initializer=initializer)

# First Convolutional + Pooling Transformation
h_conv1 = tf.nn.relu(conv2d(X_image, Wconv_1) + bconv_1)
h_pool1 = max_pool_2x2(h_conv1)

# Conv Filter 2 Variables
Wconv_2 = tf.get_variable("WConv_2", shape=[FILTER_SIZE, FILTER_SIZE,
                                            FILTER_ONE_DEPTH, FILTER_TWO_DEPTH],
                          initializer=initializer)
bconv_2 = tf.get_variable("bConv_2", shape=[FILTER_TWO_DEPTH], initializer=initializer)

# Second Convolutional + Pooling Transformation
h_conv2 = tf.nn.relu(conv2d(h_pool1, Wconv_2) + bconv_2)
h_pool2 = max_pool_2x2(h_conv2)
keep_prob,
removing them as well as their connections from the graph. This also
means they aren't trained during that particular iteration. This limits
the performance of the model, preventing it from over fitting the train
dataset.
# Flatten Convolved Image, into vector for remaining feed-forward transformations
h_pool2_flat = tf.reshape(h_pool2, [-1, FLAT_SIZE])

# Hidden Layer Variables
W_1 = tf.get_variable("W_1", shape=[FLAT_SIZE, HIDDEN_SIZE], initializer=initializer)
b_1 = tf.get_variable("b_1", shape=[HIDDEN_SIZE], initializer=initializer)

# Hidden Layer Transformation
hidden = tf.nn.relu(tf.matmul(h_pool2_flat, W_1) + b_1)

# DROPOUT - For regularization
hidden_drop = tf.nn.dropout(hidden, keep_prob)

# Output Layer Variables
W_2 = tf.get_variable("W_2", shape=[HIDDEN_SIZE, OUTPUT_SIZE], initializer=initializer)
b_2 = tf.get_variable("b_2", shape=[OUTPUT_SIZE], initializer=initializer)

# Output Layer Transformation
output = tf.matmul(hidden_drop, W_2) + b_2

# Compute Loss
loss = tf.losses.softmax_cross_entropy(Y, output)
# Compute Accuracy
correct_prediction = tf.equal(tf.argmax(Y, 1), tf.argmax(output, 1))
accuracy = 100 * tf.reduce_mean(tf.cast(correct_prediction, tf.float32))

# Setup Optimizer
train_op = tf.train.AdamOptimizer().minimize(loss)

### Launch the Session, to Communicate with Computation Graph ###
BATCH_SIZE, NUM_TRAINING_STEPS = 100, 1000
with tf.Session() as sess:
    # Initialize all variables in the graph
    sess.run(tf.global_variables_initializer())

    # Training Loop
    for i in range(NUM_TRAINING_STEPS):
        batch_x, batch_y = mnist.train.next_batch(BATCH_SIZE)
        curr_acc, _ = sess.run([accuracy, train_op], feed_dict={X: batch_x,
                                                                Y: batch_y,
                                                                keep_prob: 0.5})
        if i % 100 == 0:
            print('Step {} Current Training Accuracy: {:.3f}'.format(i, curr_acc))

    # Evaluate on Test Data
    # keep-prop = 1.0 to disable dropout
    print('Test Accuracy: {:.3f}'.format(sess.run(accuracy, feed_dict={X: mnist.test.images,
                                                                Y: mnist.test.labels,
                                                                keep_prob: 1.0})))
Step 0 Current Training Accuracy: 9.000
Step 100 Current Training Accuracy: 91.000
Step 200 Current Training Accuracy: 96.000
Step 300 Current Training Accuracy: 99.000
Step 400 Current Training Accuracy: 96.000
Step 500 Current Training Accuracy: 95.000
Step 600 Current Training Accuracy: 98.000
Step 700 Current Training Accuracy: 97.000
Step 800 Current Training Accuracy: 99.000
Step 900 Current Training Accuracy: 99.000
Test Accuracy: 98.730