viernes, 21 de junio de 2019

IoT Thing Speak ESP8266


https://circuits4you.com/2017/12/09/thingspeak-esp8266/


Thing Speak ESP8266

ThingSpeak™ is an IoT analytics cloud platform service that allows you to aggregate, visualize and analyze live data streams in the cloud. ThingSpeak provides instant visualizations of data posted by ESP8266 to ThingSpeak. ThingSpeak is often used for prototyping and proof of concept IoT systems that require analytics.
In this tutorial, We will learn following thinds
  1. How to Configuring ThingSpeak Cloud server Account ?
  2. How to program ESP8266 to upload sensor data ?

Lets understand the cloud concept first. Uploading of ESP8266 sensor data is done using Internet. It is three step process.
  1. Connect to your WiFi hot spot having internet access.
  2. Read Sensor data
  3. Upload data to ThingSpeak

Step 1: Sign up ThingSpeak

Its simple just enter your email id and verify your account.

Step 2: Configuring ThingSpeak

Configuration is just few clicks job

Step 2.1: Create New Channel

Click on New Channel
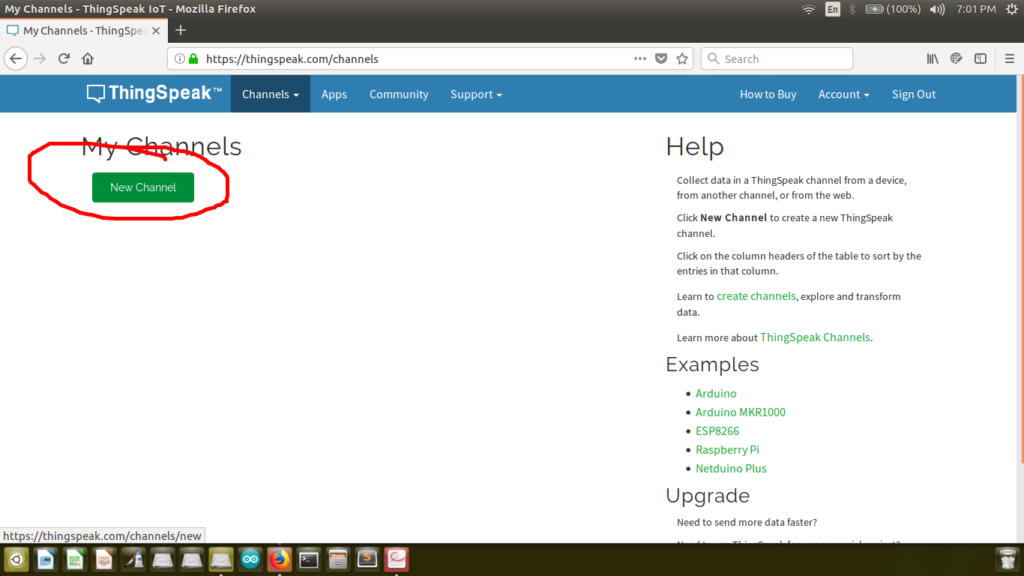
Create Channel Thing speak for ESP8266
Enter Name and Field. You may have multiple Fields depending on number of sensor create multiple fields such as Light, Temperature, Humidity, etc.
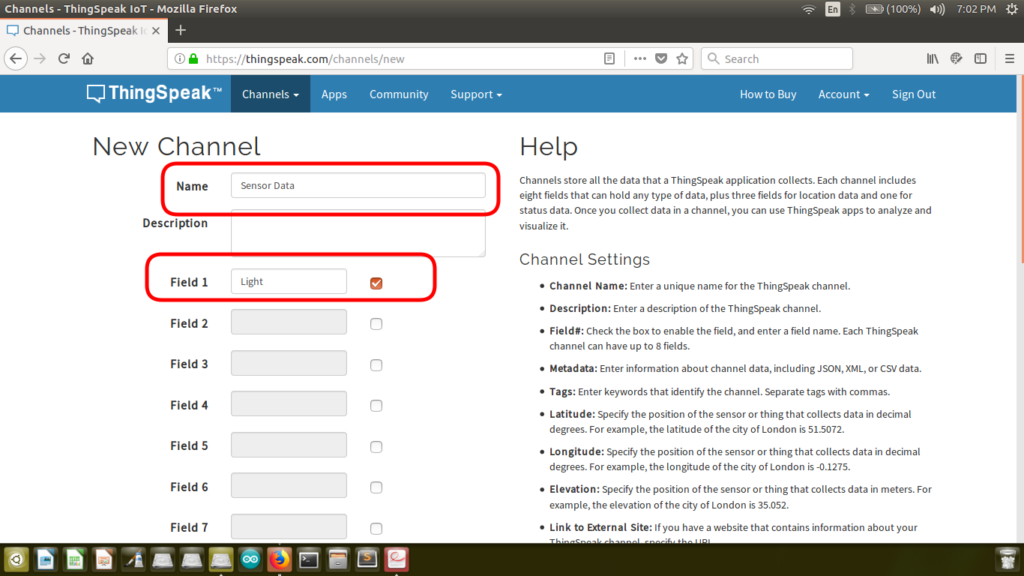
Enter Name and Label thing speak esp8266
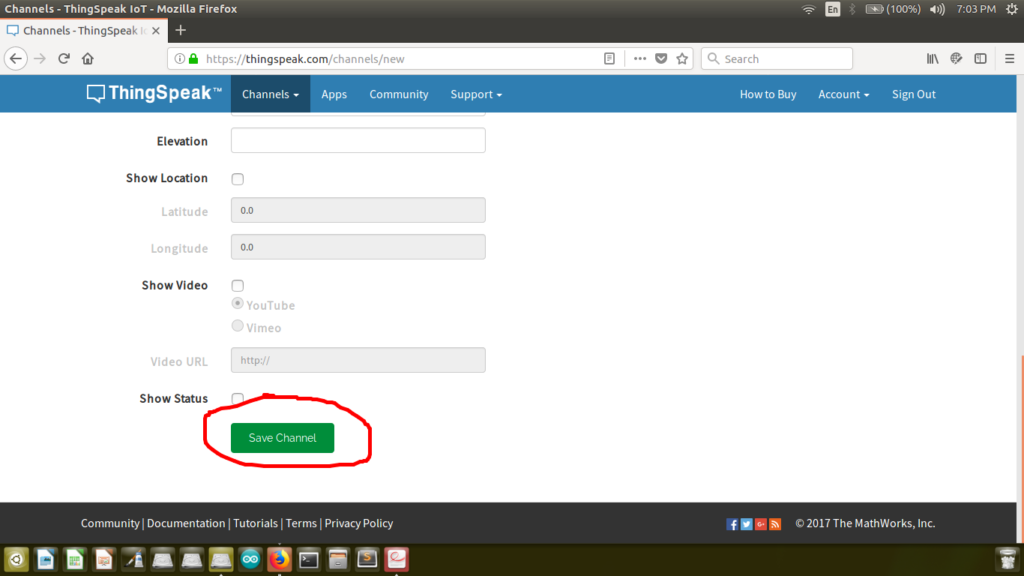
Keep everything else as it is. Blank or default values. and click on Save Channel.thing speak save channel

Step 2.2: Getting API Key

Click on API Key Tab and look for these two fields Write Api Key and Update channel feed line.
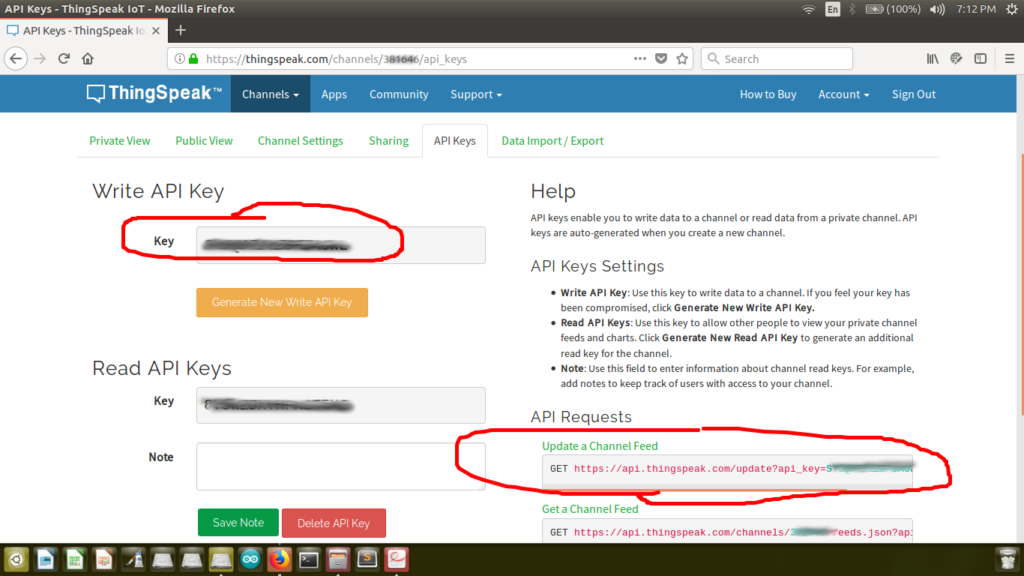
api key esp8266 thing speak
This line is important for data upload to cloud server
First parameter is Api Key. Do not share API key it makes decision of which user it is. In most cases I create own cloud server as per requirements. Second parameter is field1=0 here you can pass the ADC value ex. field1=1234
value in front of field1=0 is your sensor data for example if your adc value is 1234 then you call this GET request with https://api.thingspeak.com/update?api_key=yourapikey&field1=1234
For multiple sensors you need to add multiple fields as shown in below example
https://api.thingspeak.com/update?api_key=yourapikey&field1=1234&field2=442

Step 3: Programming ESP8266 to upload data to ThingSpeak cloud server

Make Changes in program for API KEY, SSID and PASSWORD
Upload Program and Open Serial monitor with baud rate of 115200. First it will show connection status to your wifi router then It uploads data to server and displays response from server. Do not try to upload data at very high rate ThingSpeak server will simply blocks it. 5 Seconds update time is okay.
ThingSpeak Response on Serial Monitor

Step 4: Check Data on ThingSpeak Server

Open Your ThingSpeak Account and Click on Private View of Your Channel
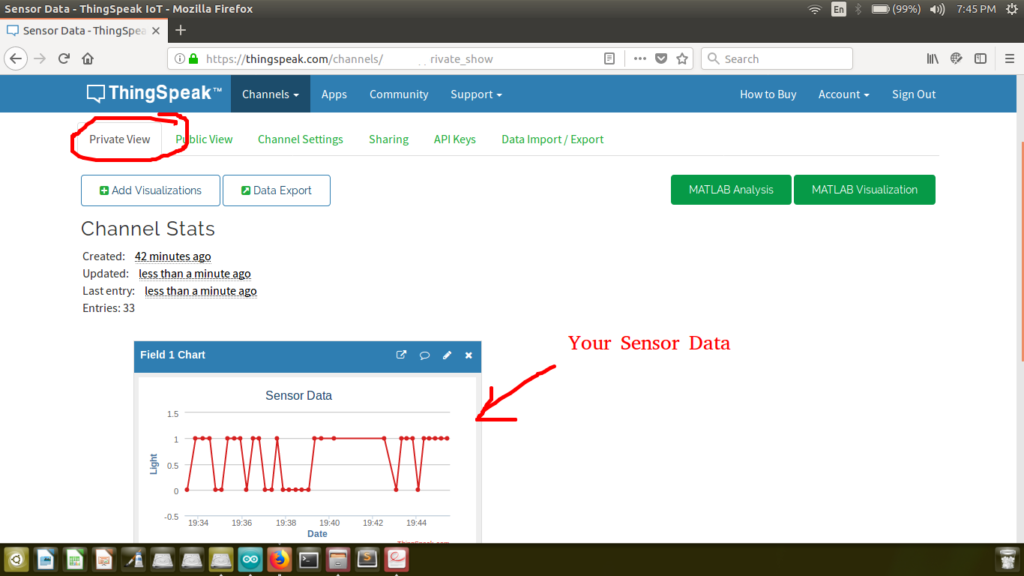
thingspeak esp8266 dataupload
You did it well….Thats it….You can Create multiple Fields and Upload multiple sensor data. and also you can create multiple channels for multiple Data Nodes.
In case of any problem upload your project on Steps2Make.com to hear from me.

martes, 18 de junio de 2019

Materiales de apoyo para curso de IoT Internet de las Cosas

Materiales de apoyo para curso de IoT Internet de las Cosas

https://cursointernetdelascosas.es/

Introducción al IoT Introducción al IoT
Hardware IoT Hardware
Software IoT Software
Protocolos de comunicación Protocolos comunicación
Plataformas IoT Plataformas IoT
Arquitecturas, IIoT y cierre Arquitecturas e IIoT

Dirigido a: Profesionales, profesores, técnicos, ingenieros y en general personas que tengan interés en conocer herramientas esenciales para empezar a hacer proyectos en el ámbito del Internet de las Cosas.

Objetivos:
- Entenderás los campos de aplicación del Internet de las Cosas
- Identificarás la tecnología que lo compone
- Desarrollarás arquitecturas IoT
- Programarás dispositivos conectados
- Harás uso de plataformas web para generar servicios
- Serás capaz de identificar los protocolos de comunicación necesarios

Prácticas:
La modalidad del curso permite que cada alumno escoja el tipo de materiales que desea utilizar para llevar a cabo prácticas en el curso: placas Arduino Yún Standard o Mini, placas Arduino Uno o Mega + Shields, módulo ESP8266...


http://www.mouser.com/news/allthingsiot-ebook1/mobile/index.html?utm_source=BusinessWire&utm_medium=pr&utm_campaign=EIT-AllThingsIoT_ebook1&utm_content=2018-11-07#p=3
Introducción al IoT
Línea de tiempo de la Automatización del Hogar
Introducción a la Automatización del Hogar
Arquitecturas y Protocolos para Sistemas de Automatización del Hogar
Selección de Hardware para Automatización del Hogar
Demistificando los Asistentes Digitales
Conectividad para IoT de rango Corto
Tecnología LEDS y Wireless para construir luces inteligentes
Hogares con ojos, oidos y sentidos
cuando los desarrolladores de IoT pueden aprrender de Bloqueos Inteligentes


https://bsginstitute.com/Transformacion-Digital/Curso-Internet-de-las-cosas-IoT-7546
¿Qué es el Internet de las Cosas (IoT)?
Los dispositivos finales del Internet de las Cosas (IoT)
La red de comunicación del Internet de las Cosas (IoT)
La programación orientada al Internet de las Cosas (IoT)
La seguridad en el Internet de las Cosas (IoT)
Armando el rompecabezas del Internet de las Cosas (IoT)

lunes, 17 de junio de 2019

Internet of Things with esp8266

Internet of Things with esp8266

Circus Of Things. Control Fan Speed from Dashboard. Thing: ESP32.


https://www.youtube.com/watch?v=hGW3wlUNRfc&fbclid=IwAR2tg5UzIQuY3nxFrG2Cw8SJyjM_B7karEAFdRJESebrr8cYDTo0GBfZ-ng


https://www.youtube.com/watch?v=RnT9xRnxBgg

Internet of Things - ESP8266 Fundamentos tecnicos para el Control de las Casas Inteligentes


TelegramBot solo usando el #ESP8266


https://www.youtube.com/watch?v=Gd0aG_DExkw

sábado, 8 de junio de 2019

Paiza Cloud and Ruby Hello World with Sinatra

Paiza Cloud and Ruby  Hello World with Sinatra

1. Create account in paiza.cloud

2. Create New file: myapp.rb


# my_app.rb
require 'sinatra'

get '/' do
 'Hello world!'
end


3. Open Terminal:
Install sinatra:
sudo gem install sinatra

4. Terminal:
ruby myapp.rb

5. Icon
In the left side create icon 4567
Click
https://localhost-profeitm-1.paiza-user.cloud:4567/

And there apper the app. Hello World

References:
https://www.netguru.com/codestories/first-steps-sinatra-1
https://engineering.paiza.io/entry/paizacloud_sinatra


Ordenamiento por el método Merge Sort - Mezcla - Codigo en c, Ejecutable

Ordenamiento por el método Merge Sort - Mezcla

Código en c
ejecutable
presentación pptx

https://cloud.mail.ru/public/4mK5/23cHzSxoJ

https://youtu.be/bONDMMtCgoo


Los 7 números de prueba son:
38 27 43 3 9 82 10


ingrese los 7 numeros a ordenar
38
ingrese los 7 numeros a ordenar
27
ingrese los 7 numeros a ordenar
43
ingrese los 7 numeros a ordenar
3
ingrese los 7 numeros a ordenar
9
ingrese los 7 numeros a ordenar
82
ingrese los 7 numeros a ordenar
10
arreglo generado: 38 27 43 3 9 82 10
arreglo ordenado: 3 9 10 27 38 43 82
Presione una tecla para continuar . . .

-----------------------
Otros datos de Prueba:
5 6 1 2 3 7 4

ingrese los 7 numeros a ordenar
5
ingrese los 7 numeros a ordenar
6
ingrese los 7 numeros a ordenar
1
ingrese los 7 numeros a ordenar
2
ingrese los 7 numeros a ordenar
3
ingrese los 7 numeros a ordenar
7
ingrese los 7 numeros a ordenar
4
arreglo generado: 5 6 1 2 3 7 4
arreglo ordenado: 1 2 3 4 5 6 7
Presione una tecla para continuar . . .


Ordenamiento por el método Heap Sort - Montículos - Código en c, diagrama de flujo

Ordenamiento por el método Heap Sort - Montículos
En los enlaces se puede encontrar:
Código en c
archivo de prueba
presentación en ppt
diagrama de flujo
Ejecutable


https://cloud.mail.ru/public/3gxs/ga9TdUWfi
codigo.c
codigo.exe
diagrama.fprg
Diapositivas(heapsort).pptx
vectordesordenado.txt


https://youtu.be/oUN22ZfCiYA