sábado, 29 de agosto de 2020

Applied Text Mining in Python

 Applied Text Mining in Python


https://github.com/AstunTechnology/python-basics/blob/master/regular-expressions.md

https://github.com/agniiyer/Applied-Text-Mining-in-Python

https://github.com/umer7/Applied-Text-Mining-in-Python

https://github.com/Jasonluo666/Coursera---Applied-Text-Mining-in-Python

https://github.com/jhwong18/Applied-Text-Mining-in-Python

https://github.com/AadiBhumihar/Applied-Text-Mining-python-Coursera

https://www.kaggle.com/askolkova/coursera-nlp-learning-assignment2

https://necromuralist.github.io/data_science/posts/assignment-2-introduction-to-nltk/


https://pythonexamples.org/python-regex-check-if-string-ends-with-specific-word/#:~:text=To%20check%20if%20a%20string,expression%20match%20against%20the%20string.


https://www.nltk.org/


https://www.w3schools.com/python/ref_string_lstrip.asp

martes, 25 de agosto de 2020

Como crear un grupo con muchos correos en gmail desde un archivo CSV - Como crear un grupo de estudiantes con tdos sus correos en un CSV

Como crear un grupo con muchos correos en gmail desde un archivo CSV

Como crear un grupo de estudiantes con tdos sus correos en un CSV


https://www.cedarville.edu/insights/blog/google-mail-create-contact-group-from-an-excel-file.aspx


How to Create Contact Group From an Excel File

Google Mail allows you to import a contact group from an Excel file into Google Contacts. This process consists of two steps: saving the contact group Excel file as a .CSV file and then importing the .CSV file into your Google Contacts.

Step 1: Entering contacts into an Excel file and saving it as a .CSV

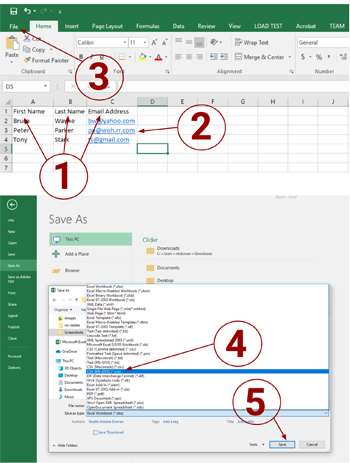
A screenshot of Microsoft Excel with numbers on it that coorelate with the steps listed below

  1. Open Microsoft Excel. In the first row, label the first three columns as follows:
    • First Column: First Name
    • Second Column: Last Name
    • Third Column: Email Address
  2. In the rows below those, enter the corresponding information for each contact.
  3. When you are done entering all the information for each contact, navigate to “File” > “Save As”.
  4. From the “Save as type:” drop-down menu, select “CSV (Comma delimited) (*.csv).”
  5. Select a location to save the file.
  6. Click [Save]. If a window pop-ups asking if you want to keep the workbook in this format, click [Yes].
Note:
You may also include more contact information by adding columns titled "Home Address" and "Home Phone". To view the complete list of column headings you can include, create a "Test" Google Contact and fill in all the desired fields. Export (.CSV) the "Test" Google Contact and open it in Excel. Copy and paste all the relevant column headings into the Excel sheet you wish to import into Google Contacts.

Step 2: Importing the .CSV file into Google Contacts

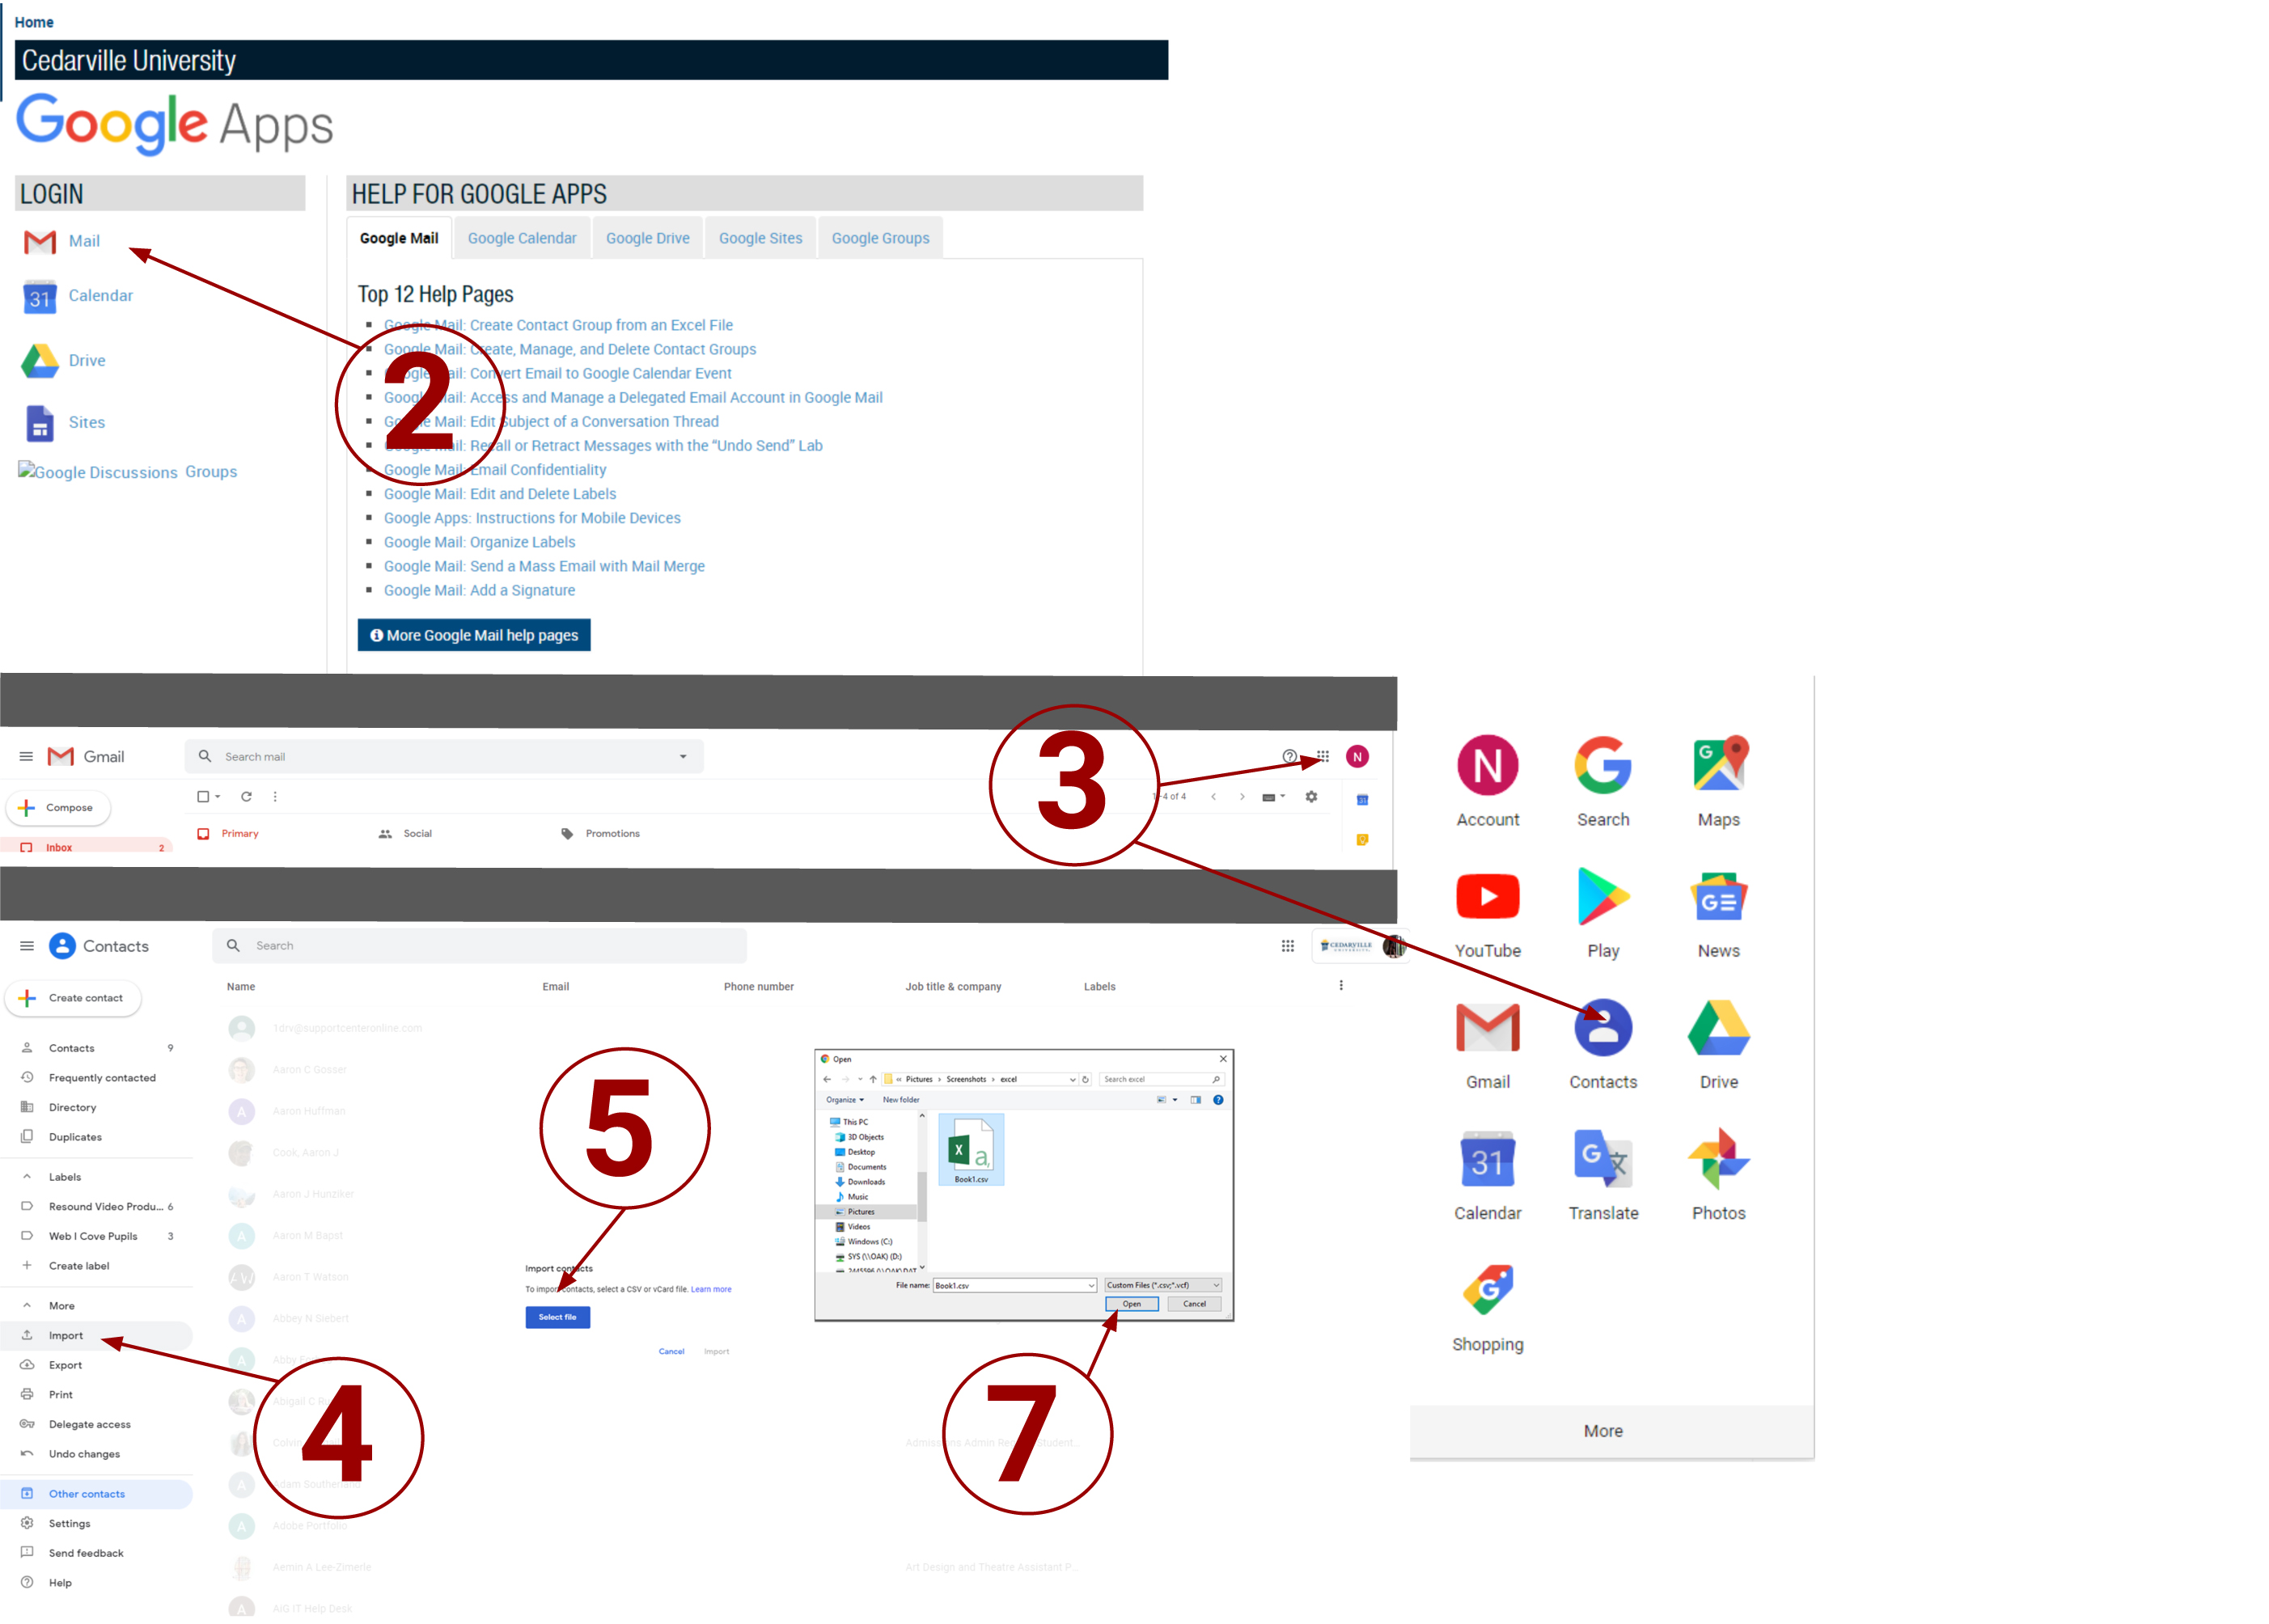
Screenshot of google screens with numbers coorelating to the instructions below.

The new Google Mail only offers a preview version of your Google Contacts. Google will prompt you to restore your old contacts in order to import them. If you already have the old version of Google Contacts, you can skip to Step 5.

  1. Navigate to cedarville.edu/google.
  2. Click the “Mail” link and log in using your CedarNet credentials.
  3. In the upper-left corner, click the "Mail" drop-down menu > Select "Contacts."
  4. From left side panel, select "More" > "Import."
  5. In the resulting dialogue box, click [GO TO OLD CONTACTS].
  6. Click [More] > Select "Import..."
  7. Click [Choose File] and double-click the file containg the shared contact group > Click [Import].
  8. Click the name of the contact group in the sidebar. (The name will be “Imported” along with the date.) You will have a notification that “These contacts have been imported, but not yet merged.”
  9. Click [More] > Select “Find & merge duplicates.”
  10. Click [Merge]. The contacts are now merged and imported.
  11. To rename the group, select the group from the left side panel.
  12. Click [More] > Select "Rename group".
  13. In the resulting dialogue box, enter a new name in the provided field, and then click [OK]. The group is renamed and will appear as that name in the contact groups list.
Note:
If the .CSV filed you imported contained contacts already in your Google Contacts, you may have duplicates of those contacts in the base "My Contacts" group. For more information, see the Google Mail: Merge Duplicate Contacts help page.

miércoles, 19 de agosto de 2020

Arreglar problemas de lentitud en iconos de la barra de windows 10

 https://thegeekpage.com/fix-desktop-icons-loading-slow-issue-in-windows-10/


Fix- Desktop icons loading slow issue in Windows 10

Are the desktop icons on your computer loading very slowly? If they are then you will face a problem of lengthier booting time on your computer. You can solve this issue just by following these easy fixes on your computer.


Fix-1 Delete Iconcache from Local folder-

Iconcache is the cache containing temporary info of cache, deleting it will resolve this issue.

1. Press Windows key+R to launch Run window.

2. To access the temp folder, you need to type “%temp%” and then hit Enter.
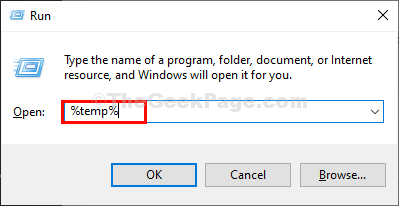
 

Temp Run


3. In the Temp folder, click on “Local” on the address bar to go back to the designated folder.
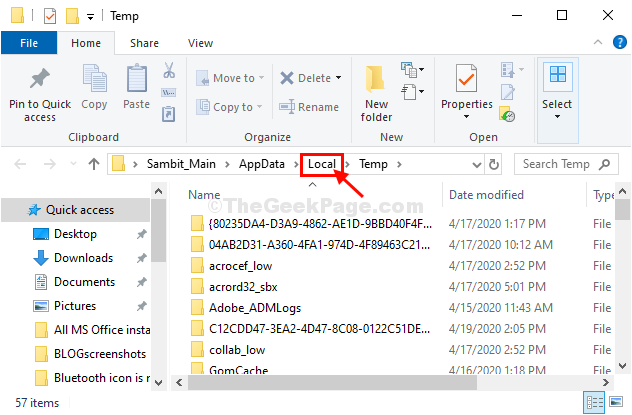
 

Lcoal Folder


4. In the Local folder, on the menu-bar, click on “View“.

5. Then, click on “Options“.
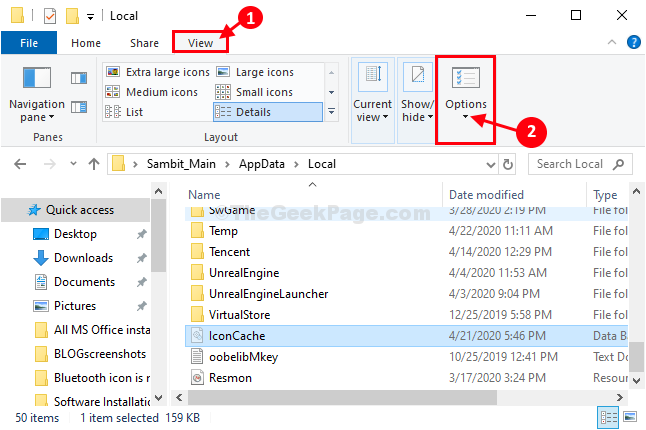
 

Local Options


6. Now, go to the “View” tab.

7. Now, check the option “Show hidden files, folders, and drives“.
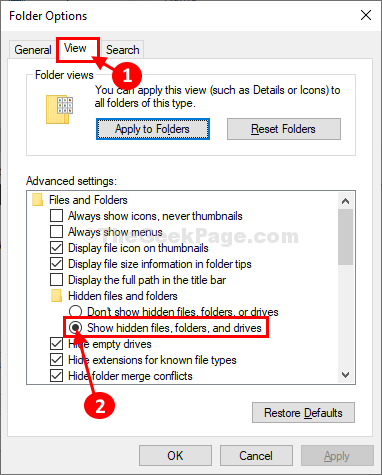


View Show Folders


8. Now, click on “Apply” and OK” to save it.
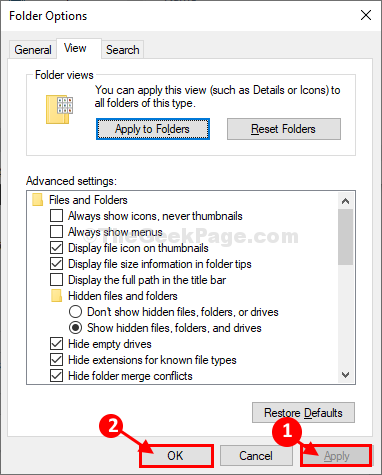
 

Apply Ok Final


You will see the hidden folders/ files on your computer.

9. Now, scroll down and find the “Iconcache” file.

10. Right-click on the “Iconcache” file and then click on “Delete” to delete it from your computer.
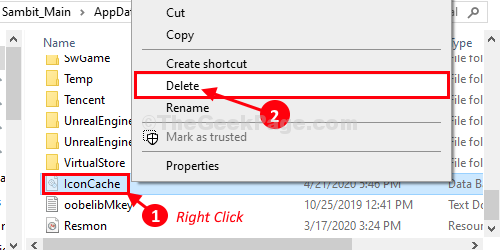
 

Icon Cache Delete


Close File Explorer window.

Restart your pc to let the changes take effect.

After rebooting check the loading time of icons on your desktop.


Fix-2 Delete all iconcache files from Appdata-

1. Pressing Windows key+R will pop up the Run terminal.

2. Paste this run command and then click on “OK“.

appdata
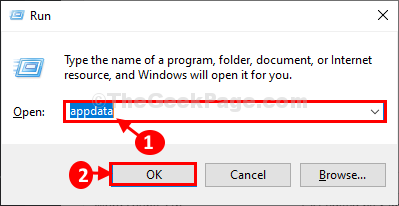
 

Appdata Ok


3. In the Appdata folder, double click on the “Local” folder to access it.

Local > Microsoft > Windows > Explorer
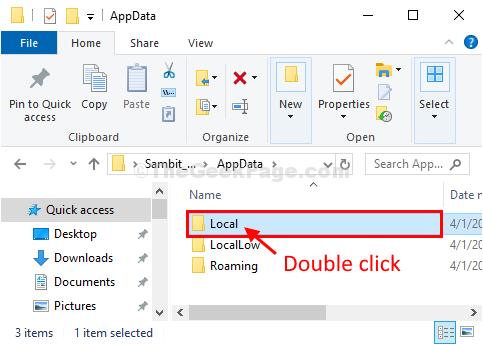
Local Double Click


4. Now, in Explorer folder, select all the files (iconcache / thumbcache) and then press the ‘Delete‘ key from your keyboard to empty the folder.
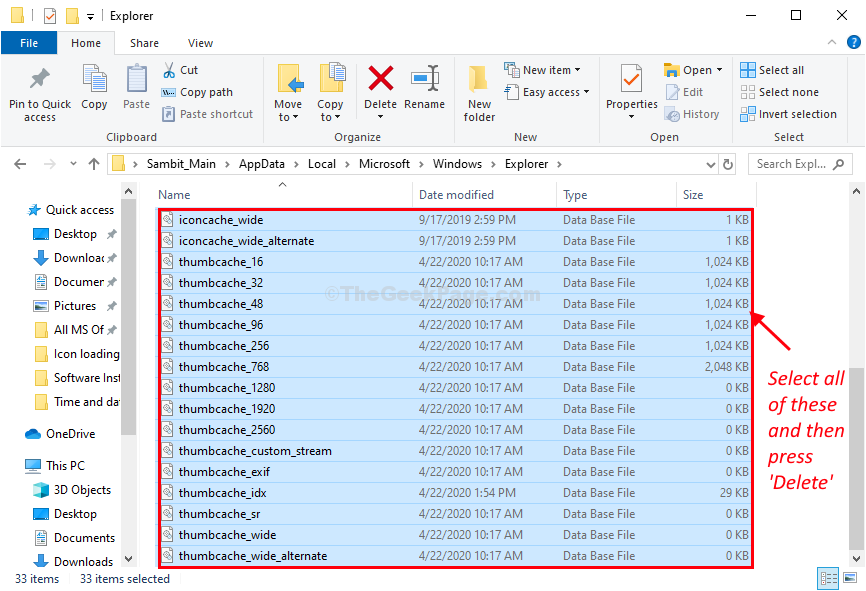
 

Select All Iconcache Files And Delete


Close File Explorer window.

You will need to restart your computer.

After rebooting check the loading time of icons on your desktop.


Fix-3 Add a string value in Registry Editor-

1. Click on the search box on the bottom-left corner for the “regedit” from the search box.

2. Then, click on the “Registry Editor“.


Regedit


The Registry Editor window will be opened.

NOTE

The preliminary process before you go for the actual solution involves creating a backup of the Registry Editor. To do so, after you have opened the Registry Editor, click not the “File” on the menu bar and then click on the “Export“.


Export Registry


Don’t forget to save the backup in a secure place.


3. Now, expand the headers on the left-side in this way-

Computer\HKEY_LOCAL_MACHINE\SOFTWARE\Microsoft\Windows\CurrentVersion\Explorer


4. Now, right-click on “Explorer” and then sequentially click on “New>” and then on “String Value“.

5. Name the new string as “Max Cached Icons“.
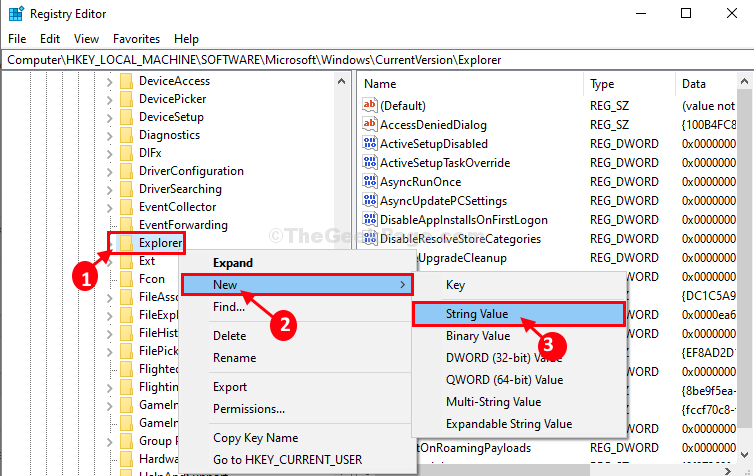
 

New String Value


6. Now, on the right-hand side of the Registry Editor window, double click on “Max Cached Icons“.
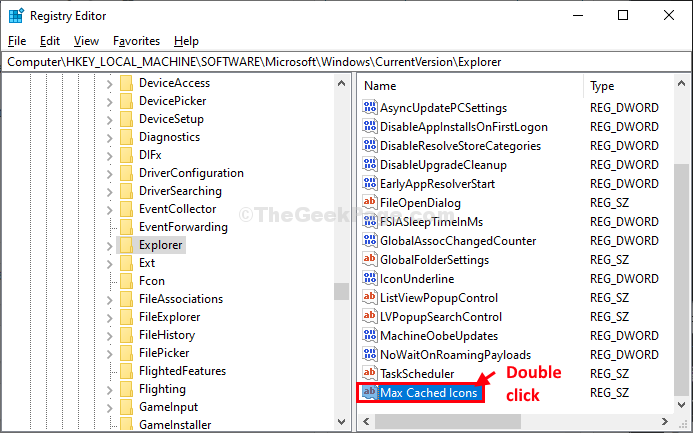
 

Double Click On Max Cached Icons


7. In the Edit String window, put “4096” in the ‘Value data:‘ option.

8. Click on “OK” to save the changes on your computer.
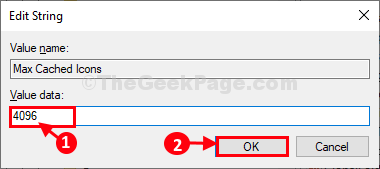
 

Value Data


Close the Registry Editor window and then reboot your computer to save the changes on your computer.

After restarting your problem will be solved.
Using Avidemux to split a video file


Using Avidemux to split a video file

https://cybertext.wordpress.com/2016/12/11/using-avidemux-to-split-a-video-file/

  1. Load the file into Avidemux (either drag and drop from the folder or use File > Open).
  2. If displayed, wait a minute or two until the two progress bar screens are finished.
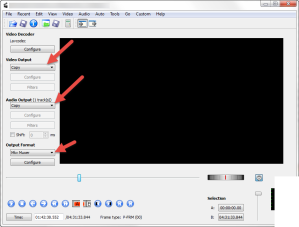
  3. Check the settings on the left side of the Avidemux screen: Video and Audio Output – Copy; Output Format – select the same as the original file (e.g. MP4, MKV)

    avidemux01

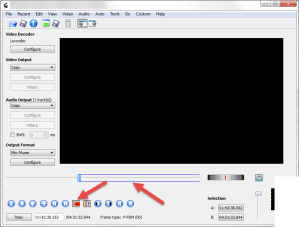
  4. Use the slider or playback controls to get to the starting point of the new clip.
  5. Click A.
    avidemux02
  6. Use the slider or playback controls to get to the end point of the new clip.
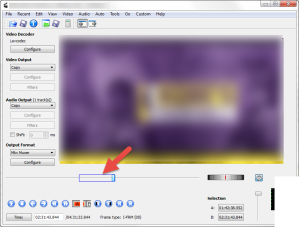
  7. Click B. The new clip is bounded by a blue box in the slider area.
    avidemux03
  8. Go to File > Save, then navigate to where you want to save your new clip.
  9. Give it a file name, then click Save. The recording will start and take a few minutes.
  10. When finished, you can either create another clip (as you would if you’re splitting a large file), or close the file. To create another clip, click A again then repeat steps 6 to 9.


How to cut or join video files with AVIDEMUX

 https://www.contaware.com/manual-faqs/32-04-contacam-video-and-frames/60-how-to-cut-or-join-video-file.html


On of the better free software is Avidemux. Install it and follow these easy steps:

Lossless cut a video file

  1. Open the video in Avidemux through File - Open.
  2. Make a selection with the A and B controls at the bottom of the video view.
  3. Under Edit menu call Cut.
  4. Set Video Output and Audio Output to Copy mode and the Output Format to MP4 Muxer.
  5. Run File - Save giving a new name.

Lossless join video files

  1. Click on File - Open and select the first video file.
  2. Click on File - Append for your second file and repeat that for the rest of your files (it's also possible to Drag and Drop the files into Avidemux).
  3. Run File - Save giving a new name.

Note: if you have many files to join download the following Avidemux Tinypy Scripts, extract the zip file and run the script through File - Project Script - Run Project...

Hint: create a shorcut that executes the following: avidemux.exe --run AvidemuxJoinMp4s.py

jueves, 13 de agosto de 2020

Best practices for planning Meets in Classroom


Best practices for planning Meets in Classroom

https://support.google.com/edu/classroom/thread/40408862?hl=en


Best practices for planning Meets:

1. Post an announcement in Classroom, noting the Meet time. Teacher enters the Meet just before the scheduled time. Students use the Meet icon at the top of the Classroom page.

2. Create an event in Calendar but do not activate a Meet within the event. Put a note in the event for participants to check back just before the Meet time for the link. Just before the Meet time, teacher enters the meet and captures the nickname from the pop-up. Teacher posts the link in the Calendar event.

Exámenes Online con Formularios de Google

 Exámenes Online con Formularios de Google 👩🏼‍💻👨🏻‍💻 (Tutorial Básico)


Exámenes Online con Formularios de Google 👩🏼‍💻👨🏻‍💻 (Tutorial Intermedio):

Libros ebooks de ciencia

Libros ebooks de ciencia

http://dl.booktolearn.com/ebooks2/science/


Index of /ebooks2/science/


../
archaeology/                                       07-Feb-2020 22:03                   -
astronomy/                                         04-Jun-2020 11:28                   -
biology/                                           27-Jul-2020 14:19                   -
chemistry/                                         27-Jul-2020 13:13                   -
dictionaries/                                      24-Jun-2019 07:29                   -
economy/                                           20-Mar-2020 15:14                   -
geography/                                         02-Mar-2020 11:54                   -
geosciences/                                       08-Jun-2020 01:35                   -
history/                                           04-Jun-2020 00:32                   -
mathematics/                                       27-Jul-2020 14:39                   -
medicine/                                          27-Jul-2020 17:22                   -
philosophy/                                        03-Jun-2020 23:12                   -
physics/                                           27-Jul-2020 16:41                   -
popular/                                           24-Jun-2019 11:28                   -
psychology/                                        13-Apr-2020 01:16                   -
sociology/                                         22-Dec-2019 15:23                   -
statistics/  

Buen tutorial de C

Buen tutorial de C


Introducción al lenguaje C - Contenido

Introducción al lenguaje C - T�tulo

A beginners guide to the Unix and Linux operating system

UNIX Tutorial for Beginners

 http://www.ee.surrey.ac.uk/Teaching/Unix/


A beginners guide to the Unix and Linux operating system. Eight simple tutorials which cover the basics of UNIX / Linux commands.


UNIX and Linux books
If you wish to continue learning Unix, here is a list of good Unix and Linux books, ranging from beginners to advanced.


Introduction to the UNIX Operating System

  • What is UNIX?
  • Files and processes
  • The Directory Structure
  • Starting an UNIX terminal

Tutorial One

  • Listing files and directories
  • Making Directories
  • Changing to a different Directory
  • The directories . and ..
  • Pathnames
  • More about home directories and pathnames

Tutorial Two

  • Copying Files
  • Moving Files
  • Removing Files and directories
  • Displaying the contents of a file on the screen
  • Searching the contents of a file

Tutorial Three

  • Redirection
  • Redirecting the Output
  • Redirecting the Input
  • Pipes

Tutorial Four

  • Wildcards
  • Filename Conventions
  • Getting Help

Tutorial Five

  • File system security (access rights)
  • Changing access rights
  • Processes and Jobs
  • Listing suspended and background processes
  • Killing a process

Tutorial Six

  • Other Useful UNIX commands

Tutorial Seven

  • Compiling UNIX software packages
  • Download source code
  • Extracting source code
  • Configuring and creating the Makefile
  • Building the package
  • Running the software
  • Stripping unnecessary code

Tutorial Eight

  • UNIX variables
  • Environment variables
  • Shell variables
  • Using and setting variables

Recommended UNIX and Linux books

Download

  • This tutorial is available for download so you can work offline. You can also copy and modify it for your own site. Please read the terms and conditions.

Useful Links

  • Links to other UNIX resources.