jueves, 5 de diciembre de 2019

Botón de apagado en la Raspberry Pi con GPIO


fpaez tiene 32 tutoriales de Raspberry Pi


http://fpaez.com/boton-de-apagado-en-la-raspberry-pi-con-gpio/

Tutorial #1

Botón de apagado en la Raspberry Pi con GPIO

By Tutoriales Raspberry Pi, With 25 comments
  Descripción Uno de los fallos (bajo mi punto de vista) de la Raspberry Pi es el no disponer de una forma limpia de apagar la placa sin interactuar con el terminal o con la interfaz gráfica del sistema operativo que tengamos instalado. Se echa de menos un botón de encendido/apagado como el de cualquier […]

AskSensors-ESP8266-DHT DHT Temperature and humidity monitoring using ESP8266 and Asksensors

DHT Temperature and humidity monitoring using ESP8266 and Asksensors

Windows - Automated Data Sending to AskSensors Using Node.js

Windows - Automated Data Sending to AskSensors Using Node.js

Automated Data Sending to AskSensors Using Node.js


In a previous tutorial, I showed how to send data to AskSensors IoT platform using the web browser. It was helpful especially for beginners and people don't have material in hand or don't work with electronics!
This made me thinking more about providing you different ways to communicate with AskSensors without using electronics. This instructable explains step-by-step how to conduct automated data sending to AskSensors using Node.js over HTTPS GET Requests.
Note for guys not familiar with Node.js:
  • We will type command-line instructions, so you need to be comfortable with or at least know how to start a command-line tool like the Windows Command Prompt, or the Git shell.
  • Npm makes it easy for JavaScript developers to share and reuse code, and makes it easy to update the code that you’re sharing. Later we will need npm to install an HTTPS package for HTTP secure communications with AskSensors.
So let's do it!

Teacher Notes

Teachers! Did you use this instructable in your classroom?
Add a Teacher Note to share how you incorporated it into your lesson.

Step 1: Install Node.js and NPM

  1. First thing’s first: You need to download Node.js. It’s free and available for Windows, MacOs and Linux (in my case I'm using Windows).
  2. Run the installer, follow the prompts in the installer. Accept the license agreement, click the NEXT button a bunch of times and accept the default installation settings.
  3. NPM is distributed with Node.js, which means that when you download Node.js, you automatically get npm installed on your computer.
  4. Restart your computer. You will not be able to run Node.js until you restart your computer!

Step 2: Test the Node.js

To Make sure you have Node.js and NPM installed, we will run simple commands to see what version of each is installed and to run a simple test program:
  • Test Node.js: To confirm that you have Node.js installed, type this command in your terminal:
node -v
This should print a version number.
  • Test NPM: To check if you have NPM installed, you can run this command in your terminal:
npm -v
  • Create a test file and run it: A simple way to test that Node.js works is to create a JavaScript file: for example name it ask.js, and add the code below:
console.log('Hello AskSensors!');
  • Run the code: open your command line program, navigate to the folder where you save the file and type:
node  ask.js
You should see " Hello AskSensors!", means all fine!
Now, you have the Node.js and NPM ready. By next we will create an AskSensors account..

Step 3: Create a Free AskSensors Account

Picture of Create a Free AskSensors Account
Create an AskSensors account for free at https://askSensors.com.
You may need to refer to these tutorials to get started with AskSensors IoT platform:

Do you feel familiar with AskSensors now? if yes, let's continue..

Step 4: Create a Sensor for Node.js Data

This video shows how to create a new sensor, add module, and get the sensor informations (Api Key In, ..).
Once you have your sensor and module set, copy down your Api Key In, we will need it for the next step.

Step 5: The Code

  • Download this example code from the AskSensors github page. It provides you a simple and already tested code to start with.
  • You need to install the https NPM package.
  • Put your Api Key In generated for your sensor.
  • This code will be sending data every 20 seconds, You can modify this by setting the timerInterval value.
var ApiKeyIn = '................'; // Api Key In
var timerInterval = 20000;        // timer interval

Step 6: Result

Picture of Result
  1. run the JavaScript file
    node https_GET.js<br>
  2. Sign in to Asksensors, open your Sensor and show your module graph.
  3. You should see your graph plotting all the data sent from your Node.js.
That's it!

SIM800L and Raspberry Pi 3 B Controlled 3 LED -- Tutorial

SIM800L and Raspberry Pi 3 B Controlled 3 LED -- Tutorial


SIM800L and Raspberry Pi 3 B Controlled 3 LED -- Tutorial


Introduction

Raspberry Pi is a series of credit card-sized single-board computer while SIM800L is available for GPRS and SMS message data remote transmission. Combining both of them we would be able to control different devices via GPRS data communication or Text messaging. 
In this tutorial we will be using SIM800L SMS message data remote transmission mode to control three LED. We will be covering also how to setup serial communication for raspberry pi.

Hardware Required:

Configuring the GPIO Serial Port On

The first thing you’ll need to do is to ensure all software components are up-to-date.
Update the repository and upgrade the installed packages:
pi@raspberrypi:~ $ sudo apt-get update && sudo apt-get upgrade -y
Update the firmware:
pi@raspberrypi:~ $ sudo rpi-update
Reboot to apply changes:
pi@raspberrypi:~ $ sudo reboot

Enable UART

Raspberry Pi 3 compared to previous Raspberry pi behaves differently with regards to the UART interface on the GPIO header, that's why we need to enable it first.
Enabling UART with minimum core frequency:
pi@raspberrypi:~ $ sudo nano /boot/config.txt
Add this line to the bottom
# Enable UART
enable_uart=1

Disable Console

In case you would like to connect a HAT using the UART interface, it’s recommended to disable the console.
To disable the console, edit the following file as follows:
pi@raspberrypi:~ $ sudo nano /boot/cmdline.txt 
you will see something like:
dwc_otg.lpm_enable=0 console=serial0,115200 console=tty1 root=/dev/mmcblk0p2 rootfstype=ext4 elevator=deadline fsck.repair=yes rootwait
remove the line: console=serial0,115200 and save.
 Reboot to apply changes:
pi@raspberrypi:~ $ sudo reboot

Circuit Connection:

  • SIM800L ------ Rasp GPIO
  • Vcc ------- 5V
  • Gnd ------ Gnd
  • Rx ------- Tx
  • Tx ------- Rx
  • LED1 --- GPIO 23
  • LED2 --- GPIO 24
  • LED3 ---- GPIO 25

Code

The code focuses more on receiving messages, but it can be modify depending on the usage.

#This is an open-source code
#Created by Noel S. Orbong Jr. 
#16 january 2017

import RPi.GPIO as GPIO
import serial
import time, sys
import datetime

def setup():
    GPIO.setmode(GPIO.BCM)
    GPIO.setwarnings(False)
    GPIO.setup(23, GPIO.OUT)
    GPIO.setup(24, GPIO.OUT)
    GPIO.setup(25, GPIO.OUT)

SERIAL_PORT = "/dev/ttyS0"    # Rasp 3 UART Port

ser = serial.Serial(SERIAL_PORT, baudrate = 115200, timeout = 5)
setup()
ser.write("AT+CMGF=1\r") # set to text mode
time.sleep(1)
ser.write('AT+CMGDA="DEL ALL"\r') # delete all SMS
time.sleep(1)
reply = ser.read(ser.inWaiting()) # Clean buf
print "Listening for incomming SMS..."
while True:
    reply = ser.read(ser.inWaiting())
    if reply != "":
        ser.write("AT+CMGR=1\r") 
        time.sleep(1)
        reply = ser.read(ser.inWaiting())
        print "SMS received. Content:"
        print reply
  if "ON" in reply.upper():
    if "LED1" in reply.upper():
                print "LED 1 ON"
                GPIO.output(23,GPIO.HIGH)
    if "LED2" in reply.upper():
                print "LED 2 ON"
                GPIO.output(24,GPIO.HIGH)
            if "LED3" in reply.upper():
                print "LED 3 ON"
                GPIO.output(25,GPIO.HIGH)
            if "ALL" in reply.upper():
print ("ALL LED ON")
                GPIO.output(23,GPIO.HIGH)
                GPIO.output(24,GPIO.HIGH)
                GPIO.output(25,GPIO.HIGH)
if "OFF" in reply.upper():
    if "LED1" in reply.upper():
                print "LED 1 OFF"
                GPIO.output(23,GPIO.LOW)
    if "LED2" in reply.upper():
                print "LED 2 OFF"
                GPIO.output(24,GPIO.LOW)
            if "LED3" in reply.upper():
                print "LED 3 OFF"
                GPIO.output(25,GPIO.LOW)
            if "ALL" in reply.upper():
                print "ALL LED OFF"
                GPIO.output(23,GPIO.LOW)
                GPIO.output(24,GPIO.LOW)
                GPIO.output(25,GPIO.LOW)
        time.sleep(.500)
        ser.write('AT+CMGDA="DEL ALL"\r') # delete all
        time.sleep(.500)
        ser.read(ser.inWaiting()) # Clear buffer
        time.sleep(.500)    


Drivers Portatil Aspire A515-41G - Laptop

Drivers Portatil Aspire A515-41G - Laptop

https://www.acer.com/ac/en/IL/content/support-product/7298?b=1&pn=NX.GPYAL.006

Instalar y activar Winrar de por vida de forma fácil y sin cracks

Winrar descargar

https://www.programasvirtualespc.net/winrar/winrar-v5-40-final-espanol-crack-autoregistrado32-64-bitmega/

ACTIVAR WINRAR DE DE FORMA PERMANENTE


https://geekland.eu/instalar-activar-winrar-por-vida/
Para activar WinRar y evitar estos molestos mensajes crearemos un archivo de texto del siguiente modo:
Crear un archivo de texto para activar Winrar
Una vez abierto el archivo de texto pegaremos el siguiente código:
RAR registration data
Federal Agency for Education
1000000 PC usage license
UID=b621cca9a84bc5deffbf
6412612250ffbf533df6db2dfe8ccc3aae5362c06d54762105357d
5e3b1489e751c76bf6e0640001014be50a52303fed29664b074145
7e567d04159ad8defc3fb6edf32831fd1966f72c21c0c53c02fbbb
2f91cfca671d9c482b11b8ac3281cb21378e85606494da349941fa
e9ee328f12dc73e90b6356b921fbfb8522d6562a6a4b97e8ef6c9f
fb866be1e3826b5aa126a4d2bfe9336ad63003fc0e71c307fc2c60
64416495d4c55a0cc82d402110498da970812063934815d81470829275
A continuación accedemos al menú Archivo y clicamos sobre la opción Guardar como…
Guardar la licencia de Winrar
Seguidamente, en el campo Nombre escribimos rarreg.key. En el campo Tipo seleccionamos Todos los archivos y finalmente presionamos sobre el botón Guardar.
Guardar la licencia de Winrar como rarreg.key
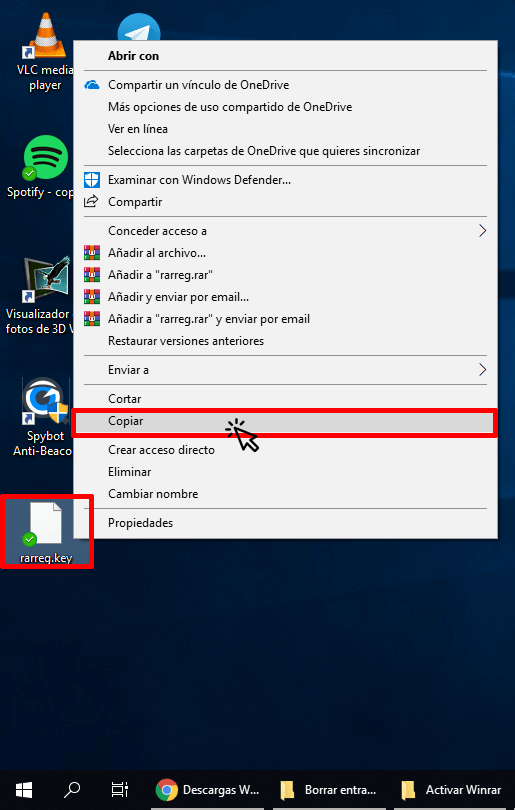
Una vez guardado el archivo lo cerramos y lo copiamos del siguiente modo:
Copiar la licencia de Winrar
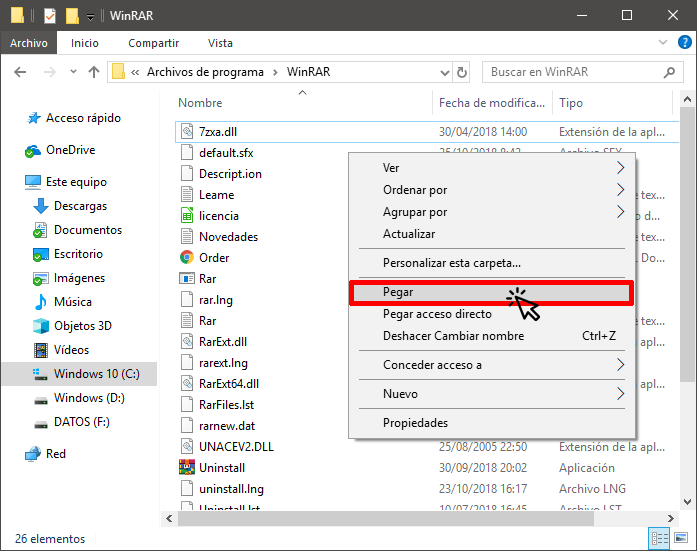
Acto seguido iremos a la carpeta donde se instalamos WinRar. En mi caso la ruta es C:\Program Files\WinRAR. Una vez dentro de la carpeta pegaremos el archivo rarreg.key.
Copiar el registro de Winrar en su carpeta de instalación
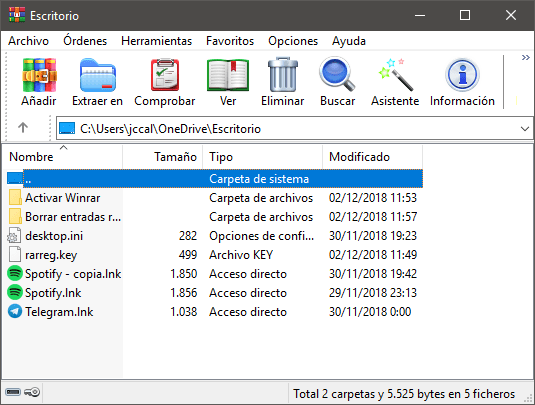
La próxima vez que arranquemos WinRar ya no aparecerá el mensaje de copia de evaluación.
Winrar activado de por vida
De esta forma tan sencilla podremos instalar y activar WinRar de forma completamente segura.

Send sms with nodemcu Esp8266 12-e using sim900 GSM module

Send sms with nodemcu Esp8266 12-e using sim900 GSM module
https://www.engineersgarage.com/esp8266/send-text-message-with-nodemcu/