viernes, 24 de junio de 2022

Motores paso a paso


Motores paso a paso


https://zaragozamakerspace.com/index.php/lessons/motores-paso-a-paso/


Curso de Arduino y robótica: Motores paso a paso

Una de las  lecciones más importantes para poder desbloquear una gran cantidad de proyectos es el control de motores paso a paso.

Los motores paso a paso son el componente primordial para crear proyectos como una impresora 3D, una máquina láser, una CNC... Máquinas que ofrecen una extensión operativa maker y que suponen una entrada al mundillo.

Estos motores son componentes de bajo coste que se pueden controlar fácilmente y ofrecen una precisión suficientemente alta para desarrollar proyectos de calidad.

Además estos motores se pueden obtener de impresoras viejas u otros aparatos que a veces la gente tira sin conocer el potencial de sus componentes. Así que podemos reciclar, ahorrar dinero y luchar contra la obsolescencia programada .

Funcionamiento de los motores

Los motores tienen dos componentes importantes, que nos definirán su funcionamiento.

El funcionamiento de los motores eléctricos, está basado en repulsión/atracción de campos magnéticos. Hay un imán permanente y con electroimanes se produce el giro.

  • Estator: Que es la parte fija del motor
  • Rotor: Que es la parte móvil.

Los motores de corriente continua por ejemplo tienen imanes fijos en el estator y unas bobinas en el rotor, que son alimentadas por unas escobillas.

Los motores de pasos, por ejemplo tienen una construcción que permite avanzar un número concreto de pasos, y tienen el imán en el rotor y el bobinado en el estator.

Los motores brushless por ejemplo, los imanes están en el rotor, que es la parte exterior, mientras que el bobinado está en interior.

Motores paso a paso

Los motores paso a paso, son un tipo especial de motores, que por su construcción nos permiten indicar el número de pasos ( o ángulo ) a girar y que nos permiten desarrollar controles precisos para nuestras máquinas.

Los motores paso a paso, suelen ser utilizados en sistemas de posicionamiento, como impresoras, impresoras 3d, plotters, máquinas que utilicen un sistemas de coordenadas en general, etc.

Los motores paso a paso necesitan más potencia de la que puede dar el arduino, para ello vamos a necesitar un controlador o Driver.


Los motores de pasos, tienen 2 bobinados por separado, y juegan con las diferentes posibilidades de orientación.

Cuando cogemos un motor de pasos hay que identificar las bobinas.
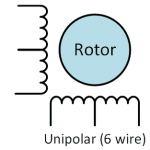
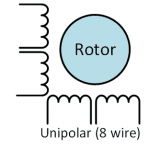
Hay motores de pasos de 4 cables ( Bipolar ) y motores con 6 cables ( Unipolar ), dependiendo si tienen conexionados a mitad de la bobina. Los dos cables extra están conectados entre sí. Pero también pueden existir motores de 5 cables y 8 cables como se muestran en los siguientes esquemas.

En nuestro caso vamos a centrarnos en los motores de 4 cables, para saber cuales están emparejados, pero si quisieramos conocer qué pines están conectados podemos medir la resistencia con un polímetro, y eso nos dará una idea para el cálculo de la intensidad que circula por ellas.

Aunque el cableado pueda resultar confuso para identificar los pares de cables de cada bobina, aquí dejamos un estándar, pero cada fabricante puede definirlos de distinto modo.

Su movimiento consiste en ir activando y desactivando los pines de las bobinas, creando un flujo magnético equivalente a un movimiento relativo; como su nombre indica; paso a paso. Es decir, realizaremos una secuencia en sus pines de control para moverlos en una dirección o en otra.
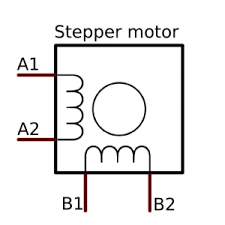
Primero, deberemos definir los cables que se correspondan a cada bobina y posteriormente programar la señal para ejecutar el movimiento.

Paso

Bobina A

Bobina B

Bobina C

Bobina D

Paso 1

1

0

0

0

Paso 2

1

1

0

0

Paso 3

0

1

0

0

Paso 4

0

1

1

0

Paso 5

0

0

1

0

Paso 6

0

0

1

1

Paso 7

0

0

0

1

Paso 8

1

0

0

1

Estos pines de control son los que irán conectados a la placa Arduino y que irán definiendo la secuencia. Pero antes tenemos que disponer de un driver de motores paso a paso, ya que la placa Arduino no suministra suficiente potencia para mover los motores. Este componente intermedio es el que distribuye la energía desde una fuente de alimentación al motor.

Drive Modes

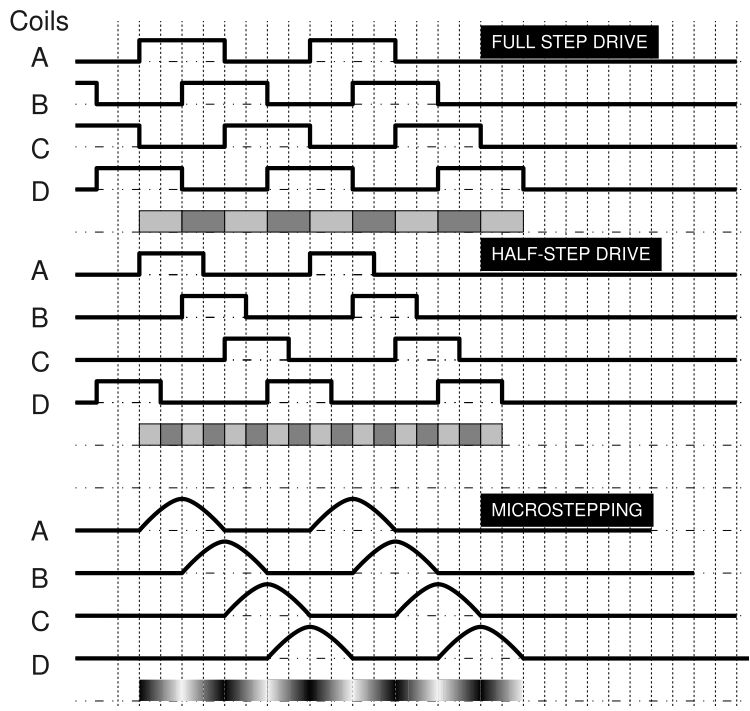
Existen distintos modos de hacer funcionar la secuencia de pasos de un motor y son las siguientes.

  • Full Step
  • Half Step
  • Microstepping


Características de un motor paso a paso

Los motores paso a paso se determinan mediante un parámetro denominado steps per revolution o número de pasos por vuelta.

Este parámetro es el que nos indica cuántos niveles existen en la secuencia de giro o como se denomina, step angle. La mayoría de motores tiene un ángulo por paso de 1.8º/step; es decir; por cada nivel de la secuencia, el motor gira 1,8 grados.

Por lo que el número de pasos para realizar una vuelta completa, será el resultado de dividir 360º por ese valor.

En el caso más usual 360/1.8 = 200 pasos.

Existe electrónica que en lugar de funcionar con pasos o medios pasos funcionan con micropasos de 1/16 , 1/32 …de paso.

Holding Torque

Torque de retención, se traduce como el par que puede sostener en una posición fija. Se mide en [N·cm] , o en [g·cm]

Resistencia de cada fase

Este dato es una manera de identificar la corriente que circula por cada bobina si aplicamos un voltaje, aplicando la Ley de Ohm, conoceremos la intensidad que consume. Pero de la potencia y la corriente consumida, ya se encarga el driver de control.

Un motor estándar que se suele utilizar tiene las siguientes características.

  • Pasos por vuelta = 200
  • Grados por paso = 1,8º
  • Holding Torque = 40 N·cm
  • Resistance Phase = 2,4 ohm

El tamaño y peso del motor ya son cuestiones mecánicas a tener en cuenta en nuestros modelos.

Tipos de motores

NEMA es el acrónimo de National Electrical Manufacturers Association. Se puede deducir que cada motor NEMA, cuanto más grande, soportará más torque.
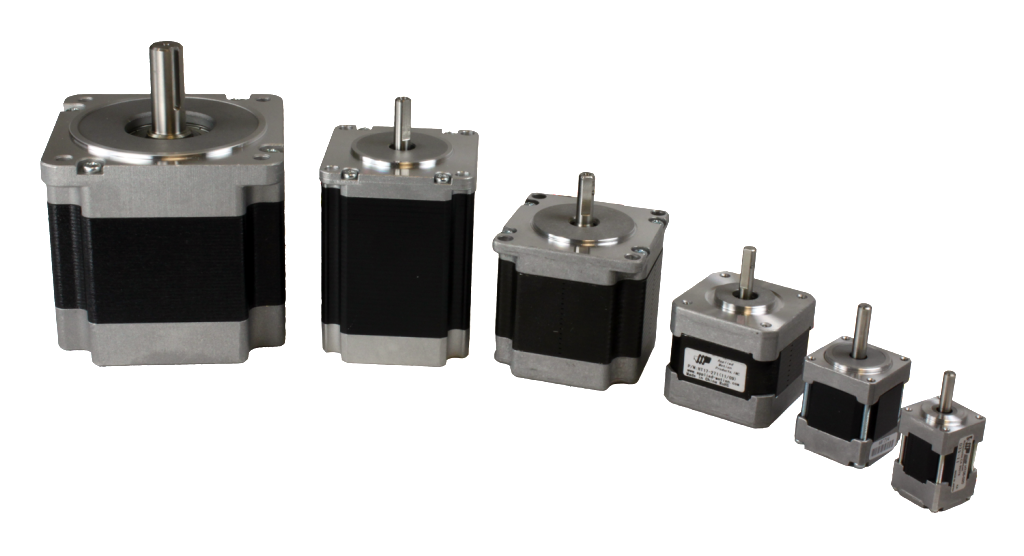
Otro tipo de motores paso a paso son los 28BYJ-48. Estos motores son bastante más lentos, pero son una versión de precisión que nos permite desarrollar modelos interesantes como el famoso escornabot.

Tipos de Drivers

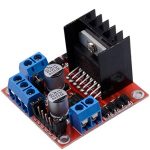
  • L298N – Driver compatible para control de 2 motores DC o un motor NEMA. No soporta micropasos.
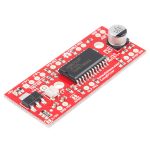
  • EasyDriver – Driver para motor NEMA con micropasos.
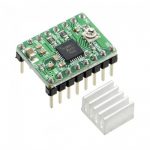
  • StepStick Driver – Driver compacto para control de motores NEMA para impresoras.
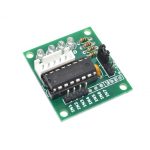
  • Driver ULN2003 – Driver para motores 28BYJ-48


Una vez completado este tutorial, puedes acceder al siguiente nivel.


Los ejercicios de código, proyectos y recursos que desarrollaremos durante el curso se pueden consultar a través de nuestro Github.

Documentacion ZaragozaMakerSpace Github

martes, 21 de junio de 2022

Pines Conector Con micrófono y Audífonos, Conector Plug Audio 3.5mm Pines Para PC, Portatil o Celular

Conector Con micrófono y Audífonos, Conector Plug Audio 3.5mm Pines Para PC, Portatil o Celular

Si deseas reparar diademas los pines para un plug de 4 pines es configuración CTIA

Ojo CTIA el más al fondo es Mic


jueves, 16 de junio de 2022

Google Apps Script: A Beginner’s Guide

https://www.benlcollins.com/apps-script/google-apps-script-beginner-guide/


Google Apps Script: A Beginner’s Guide

What is Google Apps Script?

Google Apps Script is a cloud-based scripting language for extending the functionality of Google Apps and building lightweight cloud-based applications.

It means you write small programs with Apps Script to extend the standard features of Google Workspace Apps. It’s great for filling in the gaps in your workflows.

With Apps Script, you can do cool stuff like automating repeatable tasks, creating documents, emailing people automatically and connecting your Google Sheets to other services you use.

Writing your first Google Script

In this Google Sheets script tutorial, we’re going to write a script that is bound to our Google Sheet. This is called a container-bound script.

(If you’re looking for more advanced examples and tutorials, check out the full list of Apps Script articles on my homepage.)

Hello World in Google Apps Script

Let’s write our first, extremely basic program, the classic “Hello world” program beloved of computer teaching departments the world over.

Begin by creating a new Google Sheet.

Then click the menu: Extensions > Apps Script

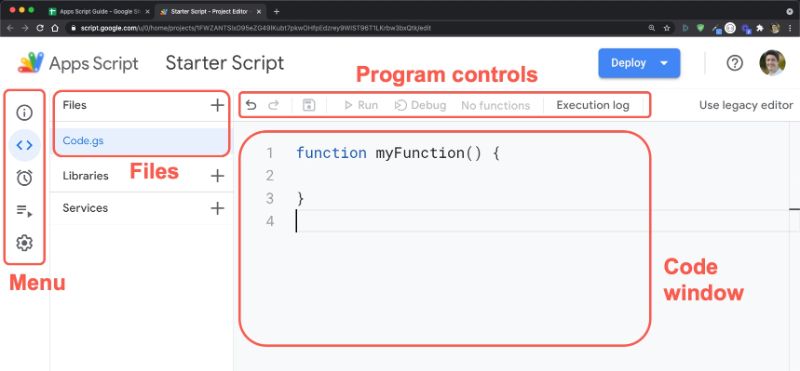
This will open a new tab in your browser, which is the Google Apps Script editor window:

Google Apps Script Editor

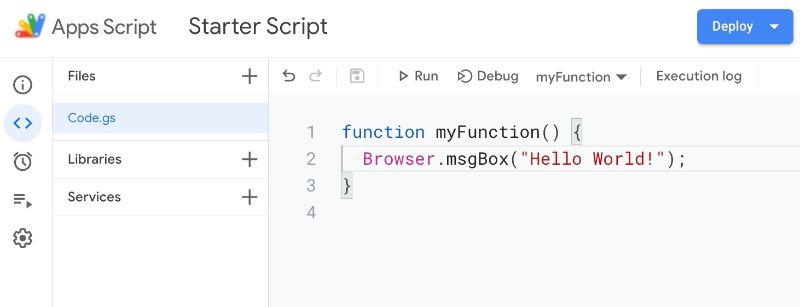
By default, it’ll open with a single Google Script file (code.gs) and a default code block, myFunction():

function myFunction() {
   
}

In the code window, between the curly braces after the function myFunction() syntax, write the following line of code so you have this in your code window:

function myFunction() {
  Browser.msgBox("Hello World!");
}

Your code window should now look like this:

Hello World Apps Script

Google Apps Script Authorization

Google Scripts have robust security protections to reduce risk from unverified apps, so we go through the authorization workflow when we first authorize our own apps.

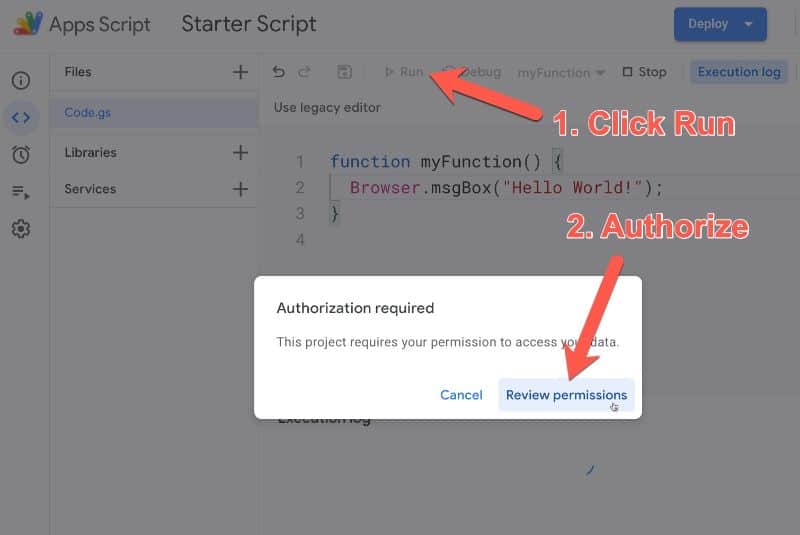
When you hit the run button for the first time, you will be prompted to authorize the app to run:

Google Apps Script Authorization

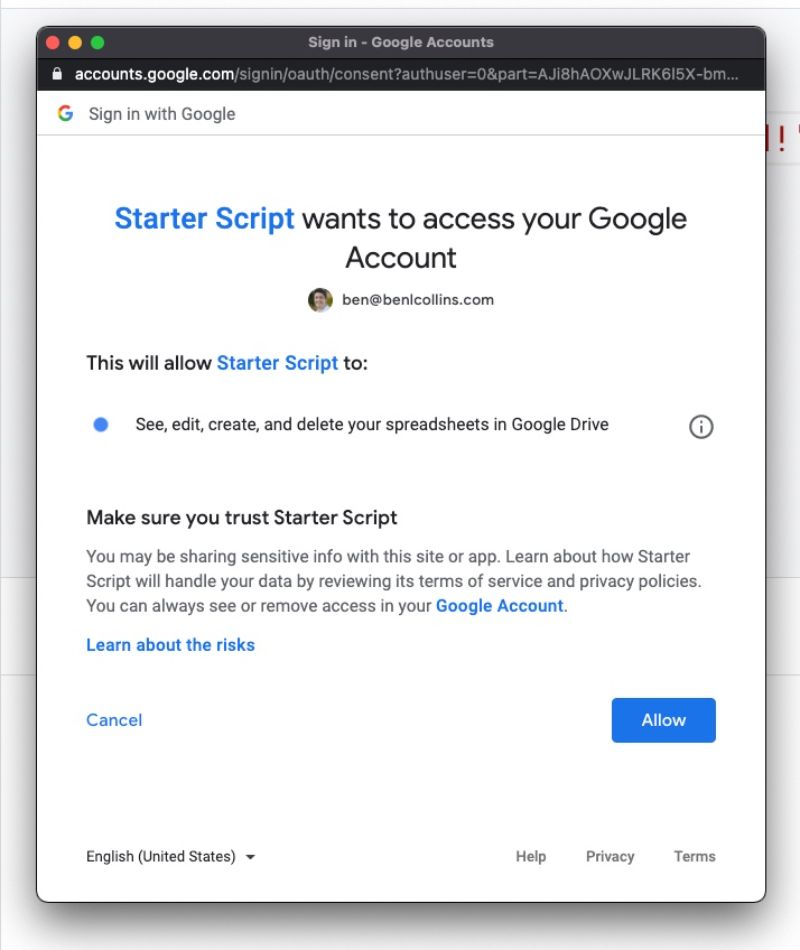
Clicking Review Permissions pops up another window in turn, showing what permissions your app needs to run. In this instance the app wants to view and manage your spreadsheets in Google Drive, so click Allow (otherwise your script won’t be able to interact with your spreadsheet or do anything):

Google Apps Script Access

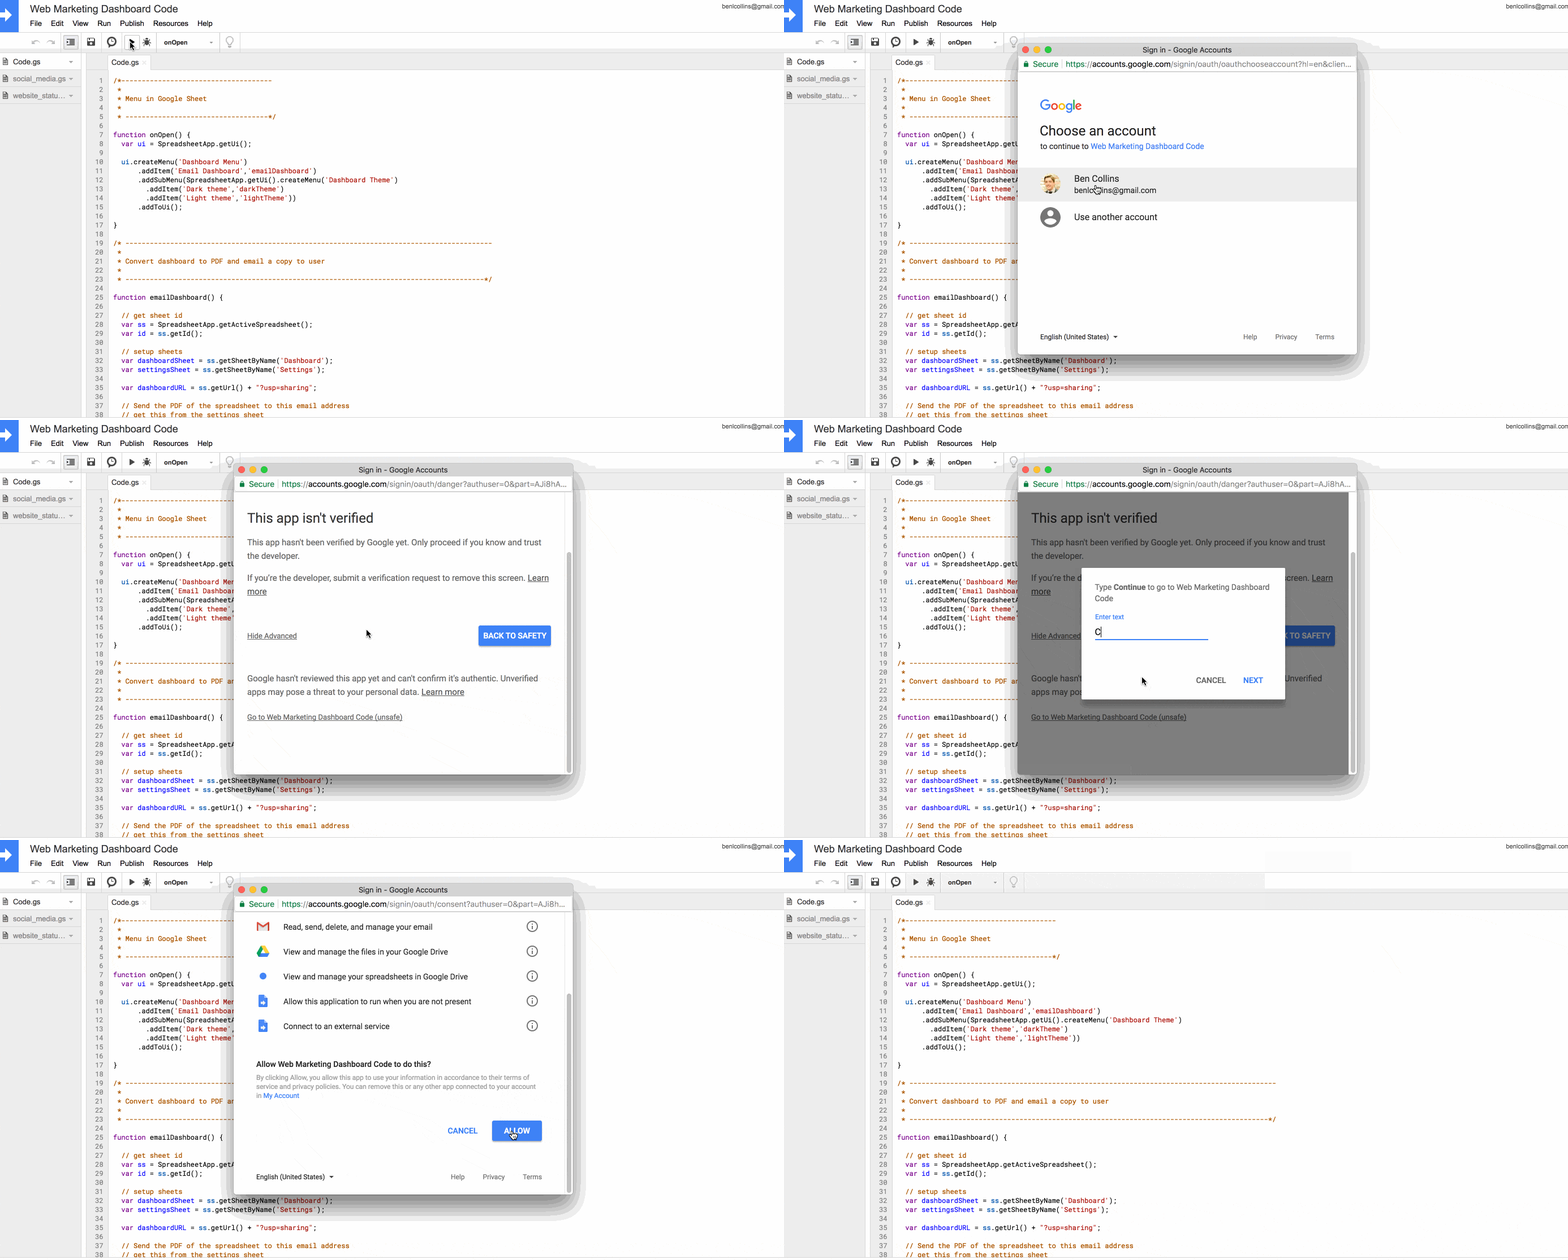
❗️When your first run your apps script, you may see the “app isn’t verified” screen and warnings about whether you want to continue.

In our case, since we are the creator of the app, we know it’s safe so we do want to continue. Furthermore, the apps script projects in this post are not intended to be published publicly for other users, so we don’t need to submit it to Google for review (although if you want to do that, here’s more information).

Click the “Advanced” button in the bottom left of the review permissions pop-up, and then click the “Go to Starter Script Code (unsafe)” at the bottom of the next screen to continue. Then type in the words “Continue” on the next screen, click Next, and finally review the permissions and click “ALLOW”, as shown in this image (showing a different script in the old editor):

More information can be found in this detailed blog post from Google Developer Expert Martin Hawksey.

Running a function in Apps Script

Once you’ve authorized the Google App script, the function will run (or execute).

If anything goes wrong with your code, this is the stage when you’d see a warning message (instead of the yellow message, you’ll get a red box with an error message in it).

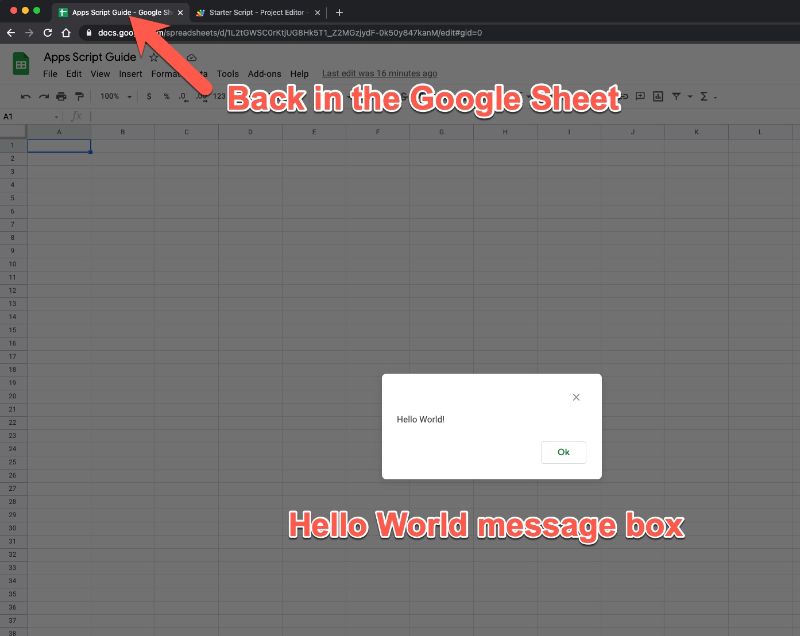
Return to your Google Sheet and you should see the output of your program, a message box popup with the classic “Hello world!” message:

Message Box Google Sheets

Click on Ok to dismiss.

Great job! You’ve now written your first apps script program.

Rename functions in Google Apps Script

We should rename our function to something more meaningful.

At present, it’s called myFunction which is the default, generic name generated by Google. Every time I want to call this function (i.e. run it to do something) I would write myFunction(). This isn’t very descriptive, so let’s rename it to helloWorld(), which gives us some context.

So change your code in line 1 from this:

function myFunction() {
  Browser.msgBox("Hello World!");
}

to this:

function helloWorld() {
  Browser.msgBox("Hello World!");
}

Note, it’s convention in Apps Script to use the CamelCase naming convention, starting with a lowercase letter. Hence, we name our function helloWorld, with a lowercase h at the start of hello and an uppercase W at the start of World.

Adding a custom menu in Google Apps Script

In its current form, our program is pretty useless for many reasons, not least because we can only run it from the script editor window and not from our spreadsheet.

Let’s fix that by adding a custom menu to the menu bar of our spreadsheet so a user can run the script within the spreadsheet without needing to open up the editor window.

This is actually surprisingly easy to do, requiring only a few lines of code. Add the following 6 lines of code into the editor window, above the helloWorld() function we created above, as shown here:

function onOpen() {
  const ui = SpreadsheetApp.getUi();
  ui.createMenu('My Custom Menu')
      .addItem('Say Hello', 'helloWorld')
      .addToUi();
}
 
function helloWorld() {
  Browser.msgBox("Hello World!");
}

If you look back at your spreadsheet tab in the browser now, nothing will have changed. You won’t have the custom menu there yet. We need to re-open our spreadsheet (refresh it) or run our onOpen() script first, for the menu to show up.

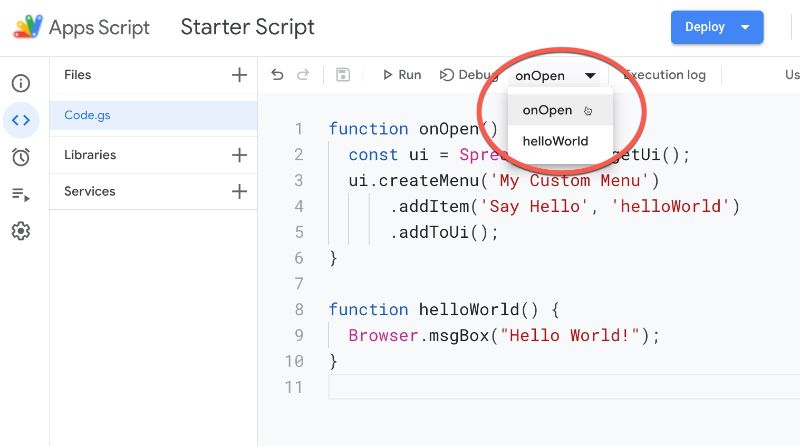
To run onOpen() from the editor window, first select then run the onOpen function as shown in this image:

Google Apps Script Function Menu

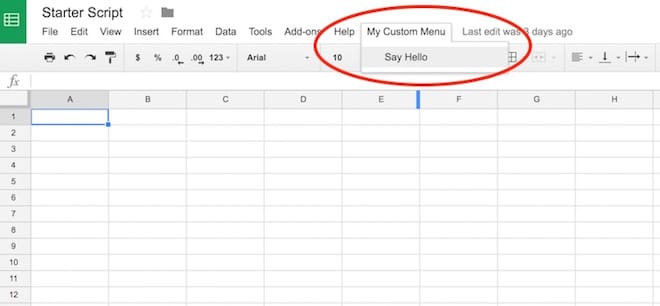
Now, when you return to your spreadsheet you’ll see a new menu on the right side of the Help option, called My Custom Menu. Click on it and it’ll open up to show a choice to run your Hello World program:

Custom menu

Run functions from buttons in Google Sheets

An alternative way to run Google Scripts from your Sheets is to bind the function to a button in your Sheet.

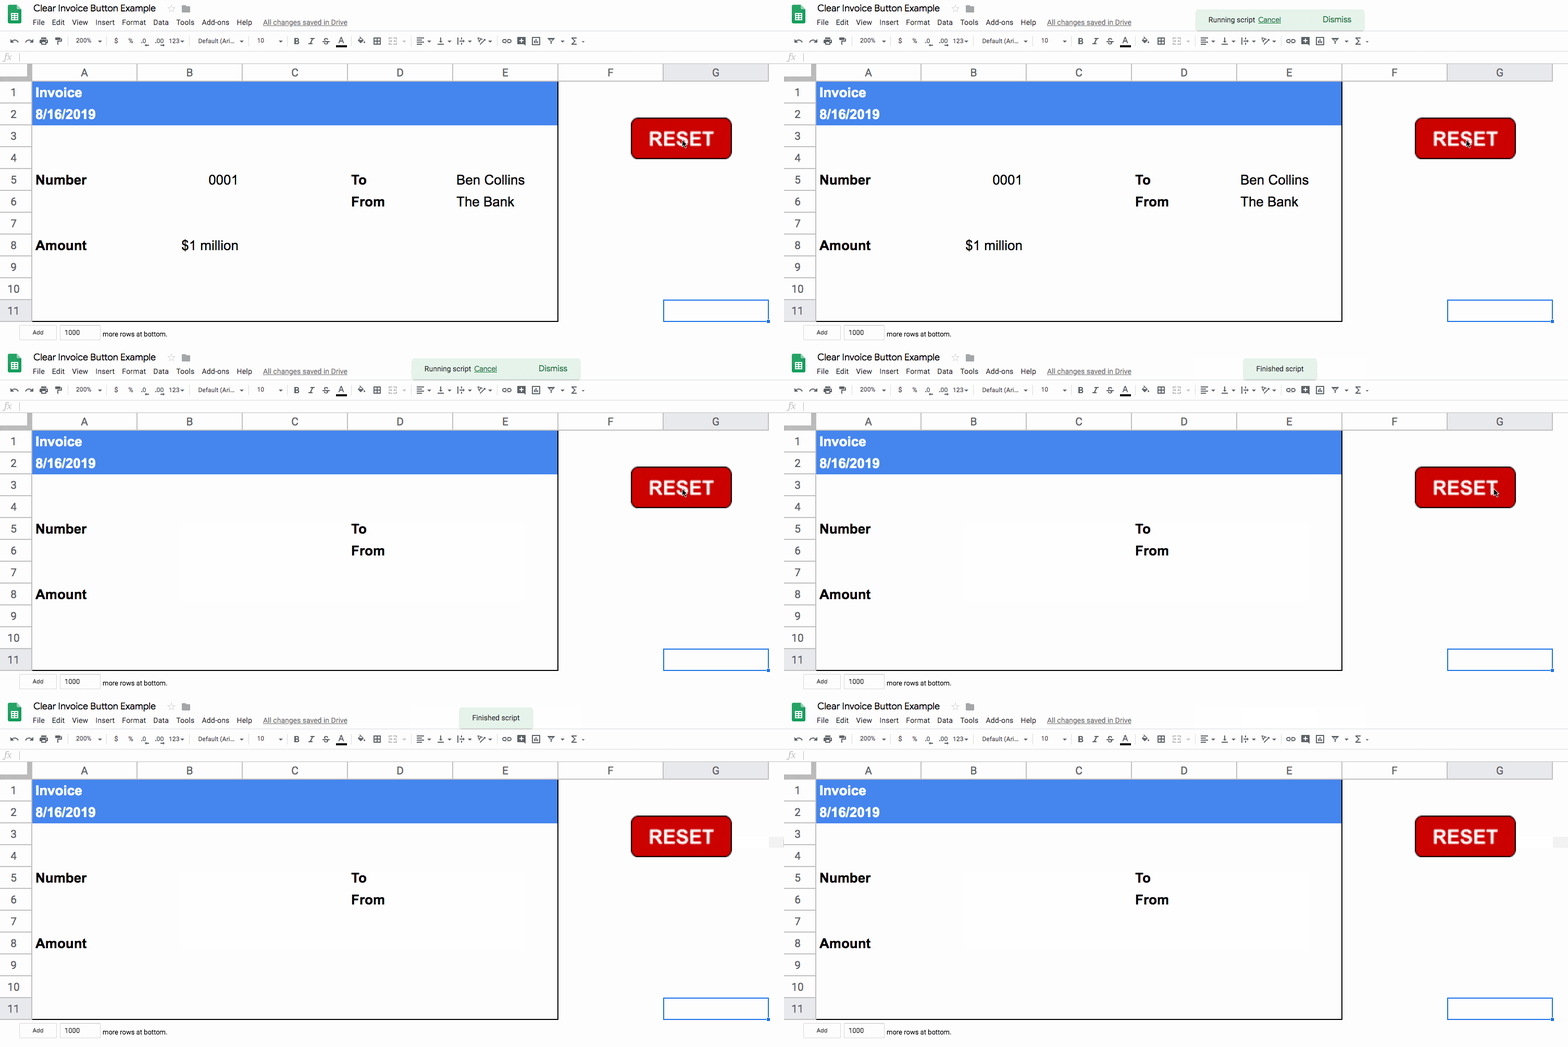
For example, here’s an invoice template Sheet with a RESET button to clear out the contents:

Button with apps script in google sheets

For more information on how to do this, have a look at this post: Add A Google Sheets Button To Run Scripts

Google Apps Script Examples

Macros in Google Sheets

Another great way to get started with Google Scripts is by using Macros. Macros are small programs in your Google Sheets that you record so that you can re-use them (for example applying standard formatting to a table). They use Apps Script under the hood so it’s a great way to get started.

Read more: The Complete Guide to Simple Automation using Google Sheets Macros

Custom function using Google Apps Script

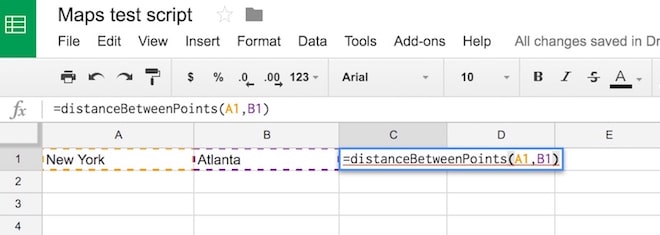
Let’s create a custom function with Apps Script, and also demonstrate the use of the Maps Service. We’ll be creating a small custom function that calculates the driving distance between two points, based on Google Maps Service driving estimates.

The goal is to be able to have two place-names in our spreadsheet, and type the new function in a new cell to get the distance, as follows:

GAS custom function for maps

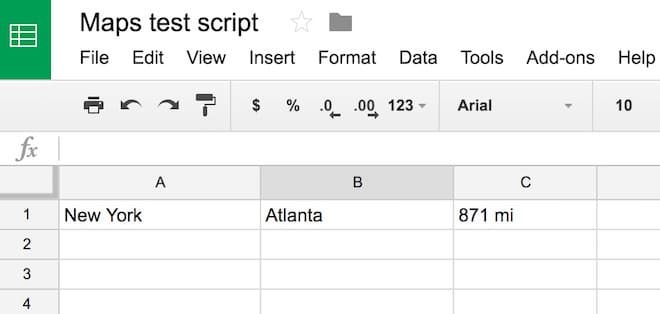
The solution should be:

GAS custom map function output

Copy the following code into the Apps Script editor window and save. First time, you’ll need to run the script once from the editor window and click “Allow” to ensure the script can interact with your spreadsheet.

function distanceBetweenPoints(start_point, end_point) {
  // get the directions
  const directions = Maps.newDirectionFinder()
     .setOrigin(start_point)
     .setDestination(end_point)
     .setMode(Maps.DirectionFinder.Mode.DRIVING)
     .getDirections();
   
  // get the first route and return the distance
  const route = directions.routes[0];
  const distance = route.legs[0].distance.text;
  return distance;
}

Saving data with Google Apps Script

Let’s take a look at another simple use case for this Google Sheets Apps Script tutorial.

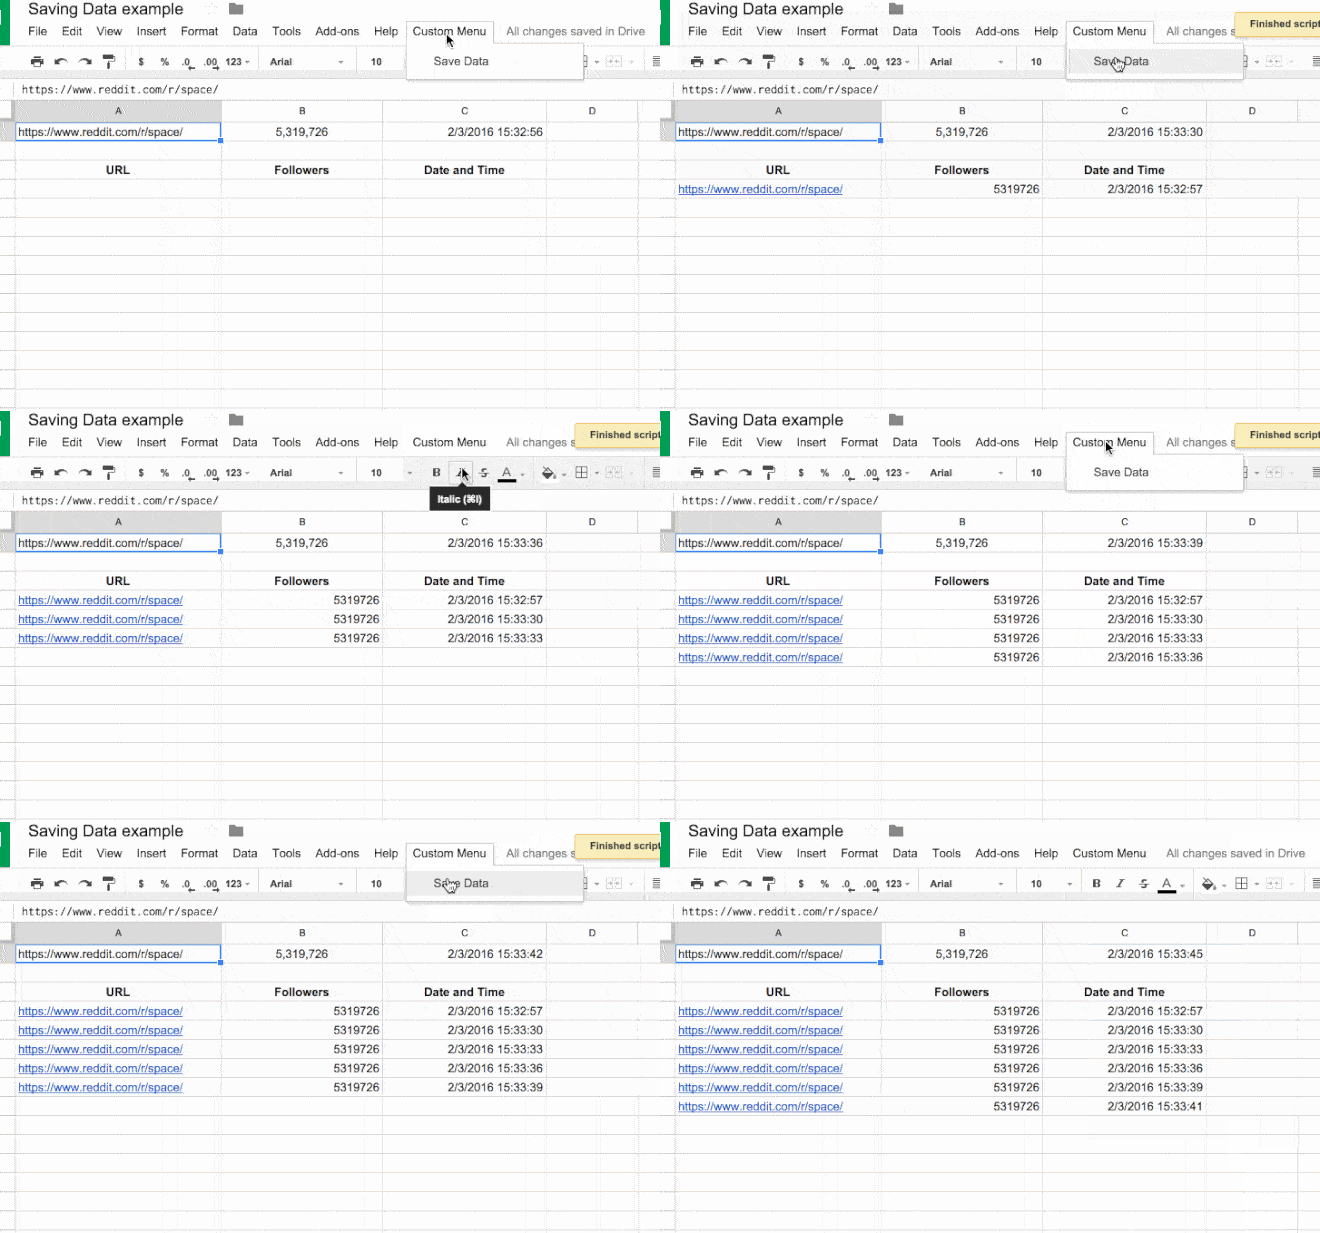
Suppose I want to save copy of some data at periodic intervals, like so:

save data in google sheet

In this script, I’ve created a custom menu to run my main function. The main function, saveData(), copies the top row of my spreadsheet (the live data) and pastes it to the next blank line below my current data range with the new timestamp, thereby “saving” a snapshot in time.

The code for this example is:

// custom menu function
function onOpen() {
  const ui = SpreadsheetApp.getUi();
  ui.createMenu('Custom Menu')
      .addItem('Save Data','saveData')
      .addToUi();
}
 
// function to save data
function saveData() {
  const ss = SpreadsheetApp.getActiveSpreadsheet();
  const sheet = ss.getSheets()[0];
  const url = sheet.getRange('Sheet1!A1').getValue();
  const follower_count = sheet.getRange('Sheet1!B1').getValue();
  const date = sheet.getRange('Sheet1!C1').getValue();
  sheet.appendRow([url,follower_count,date]);
}

See this post: How To Save Data In Google Sheets With Timestamps Using Apps Script, for a step-by-step guide to create and run this script.

Google Apps Script example in Google Docs

Google Apps Script is by no means confined to Sheets only and can be accessed from other Google Workspace tools.

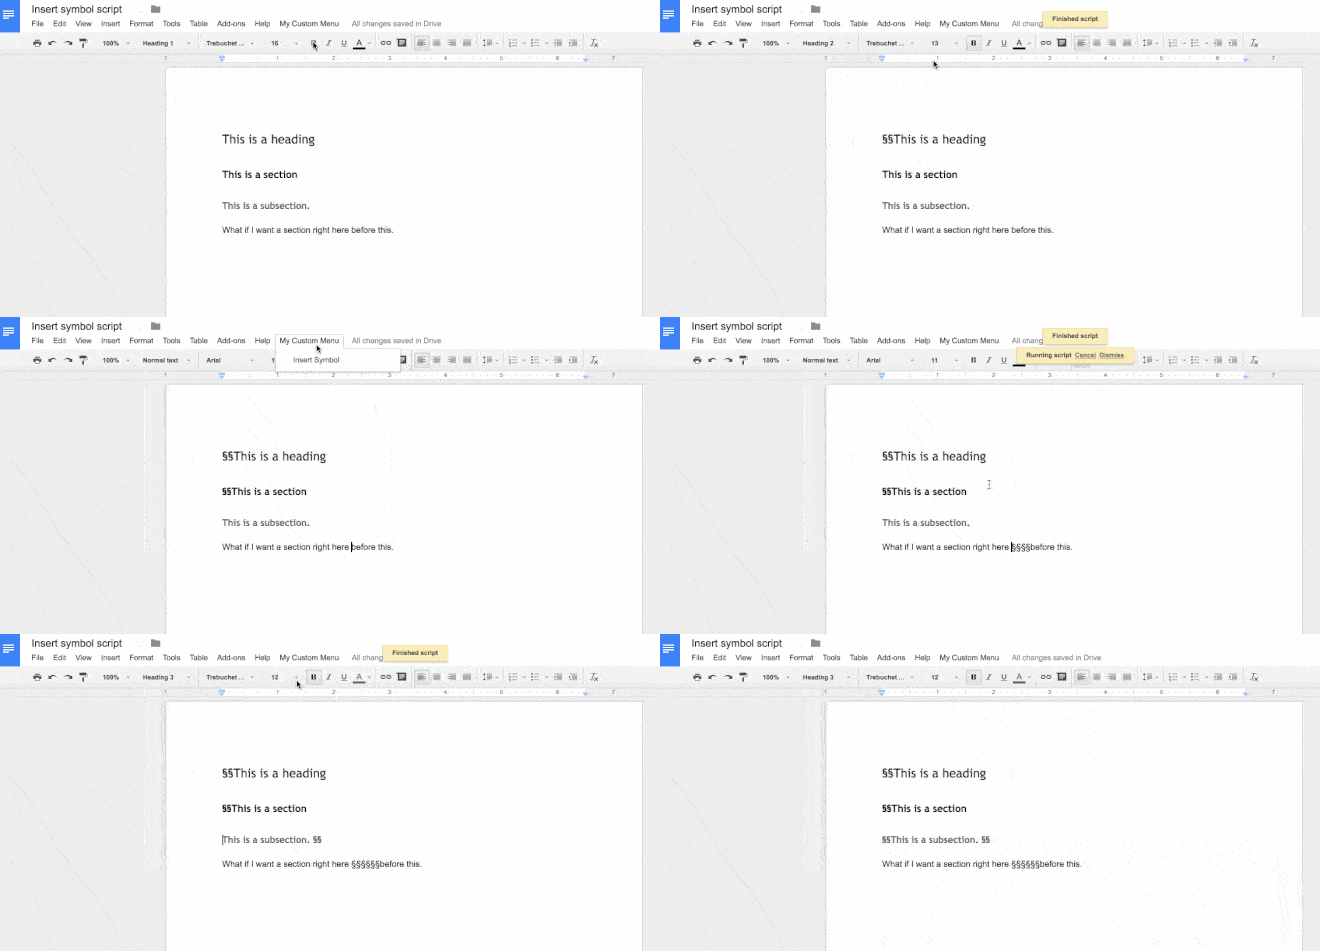
Here’s a quick example in Google Docs, showing a script that inserts a specific symbol wherever your cursor is:

Google Docs Apps Script

We do this using Google App Scripts as follows:

1. Create a new Google Doc

2. Open script editor from the menu: Extensions > Apps Script

3. In the newly opened Script tab, remove all of the boilerplate code (the “myFunction” code block)

4. Copy in the following code:

// code to add the custom menu
function onOpen() {
  const ui = DocumentApp.getUi();
  ui.createMenu('My Custom Menu')
      .addItem('Insert Symbol', 'insertSymbol')
      .addToUi();
}
 
// code to insert the symbol
function insertSymbol() { 
  // add symbol at the cursor position
  const cursor = DocumentApp.getActiveDocument().getCursor();
  cursor.insertText('§§');
   
}

5. You can change the special character in this line

cursor.insertText('§§');

to whatever you want it to be, e.g.

cursor.insertText('( ͡° ͜ʖ ͡°)');

6. Click Save and give your script project a name (doesn’t affect the running so call it what you want e.g. Insert Symbol)

7. Run the script for the first time by clicking on the menu: Run > onOpen

8. Google will recognize the script is not yet authorized and ask you if you want to continue. Click Continue

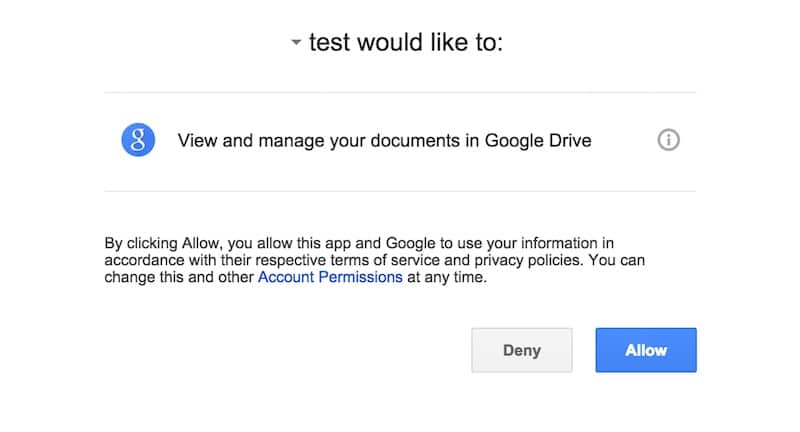
9. Since this the first run of the script, Google Docs asks you to authorize the script (I called my script “test” which you can see below):

Docs Apps Script Auth

10. Click Allow

11. Return to your Google Doc now.

12. You’ll have a new menu option, so click on it:

My Custom Menu > Insert Symbol

13. Click on Insert Symbol and you should see the symbol inserted wherever your cursor is.

Google Apps Script Tip: Use the Logger class

Use the Logger class to output text messages to the log files, to help debug code.

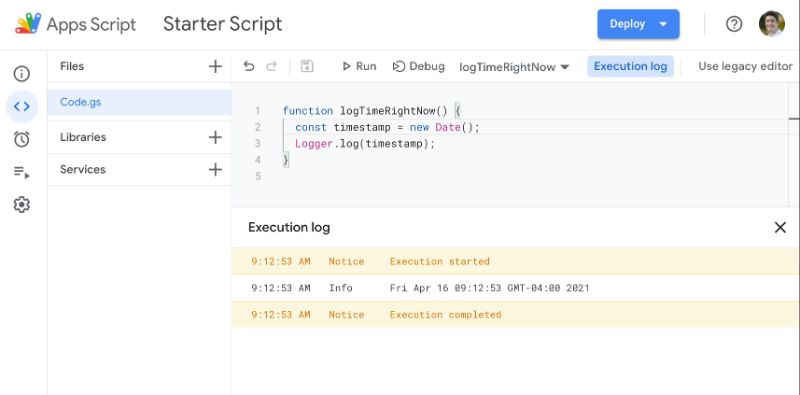
The log files are shown automatically after the program has finished running, or by going to the Executions menu in the left sidebar menu options (the fourth symbol, under the clock symbol).

The syntax in its most basic form is Logger.log(something in here). This records the value(s) of variable(s) at different steps of your program.

For example, add this script to a code file your editor window:

function logTimeRightNow() {
  const timestamp = new Date();
  Logger.log(timestamp);
}

Run the script in the editor window and you should see:

Google Apps Script Execution Logs

Real world examples from my own work

I’ve only scratched the surface of what’s possible using G.A.S. to extend the Google Apps experience.

Here are a couple of interesting projects I’ve worked on:

1) A Sheets/web-app consisting of a custom web form that feeds data into a Google Sheet (including uploading images to Drive and showing thumbnails in the spreadsheet), then creates a PDF copy of the data in the spreadsheet and automatically emails it to the users. And with all the data in a master Google Sheet, it’s possible to perform data analysis, build dashboards showing data in real-time and share/collaborate with other users.

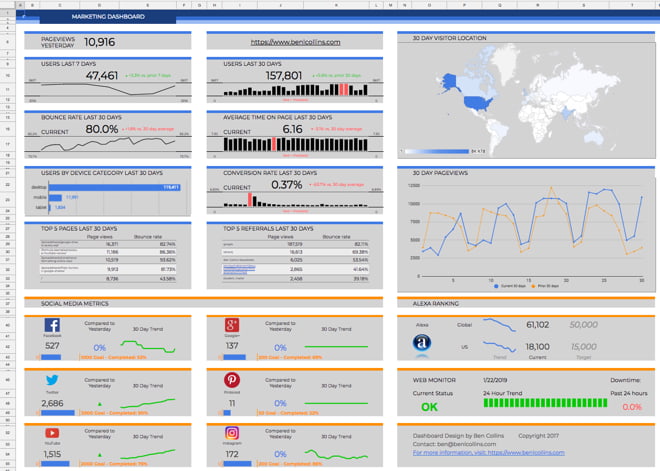
2) A dashboard that connects to a Google Analytics account, pulls in social media data, checks the website status and emails a summary screenshot as a PDF at the end of each day.

Marketing dashboard using Google Apps Script

3) A marking template that can send scores/feedback to students via email and Slack, with a single click from within Google Sheets. Read more in this article: Save time with this custom Google Sheets, Slack & Email integration

My own journey into Google Apps Script

My friend Julian, from Measure School, interviewed me in May 2017 about my journey into Apps Script and my thoughts on getting started:

Google Apps Script Resources

For further reading, I’ve created this list of resources for information and inspiration:

Course

Documentation

Official Google Documentation

Google Workspace Developers Blog

Communities

Google Apps Script Group

Stack Overflow GAS questions

Elsewhere On The Internet

A huge big up-to-date list of Apps Script resources hosted on GitHub.

For general Javascript questions, I recommend this JavaScript tutorial page from W3 Schools when you’re starting out.
​
When you’re more comfortable with Javascript basics, then I recommend the comprehensive JavaScript documentation from Mozilla.

Imagination and patience to learn are the only limits to what you can do and where you can go with GAS. I hope you feel inspired to try extending your Sheets and Docs and automate those boring, repetitive tasks!

Related Articles