https://www.frodehus.dev/suricata-rpi-robin-to-usgs-batman/
Suricata + RPi = Robin to USG's Batman
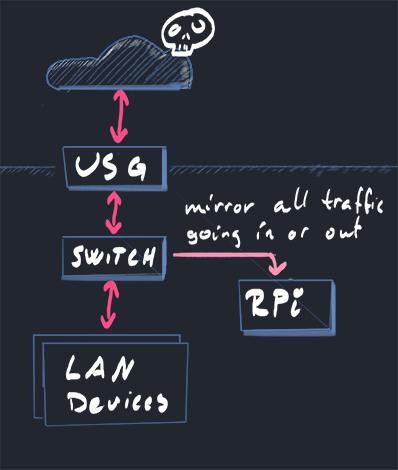
The Unifi Security Gateway has a nifty threat management module which uses Suricata for IDS/IPS - however, when enabling this you will drop down to 85Mbps on your WAN throughput as it needs to use a lot of resources to inspect the traffic and it cannot off-load to hardware modules.
This is a bit of a pain for me since I have 300Mbps and I'd like to keep that. Ideally, I'd upgrade to the Unifi Dream Machine Pro (since my network is mostly Unifi devices) which can handle it just fine, but this is a much larger device and has a higher price tag.
So, as the theme of my last few posts have been securing my home network I'd like to have something like this without sacrificing that much bandwidth.
A thought occurred: What if I can off-load the processing to a Raspberry Pi 4 with a good amount of RAM to at least get some functionality?
The Unifi switches I use support port mirroring and that sounds like a step in the right direction - I can let the USG happily go about its work while the Raspberry Pi is cc'd on all the traffic.
This won't let me do effective Intrusion Prevention, but I can do some Intrusion Detection at least. And I will only see the traffic that passes beyond the USG - not all that it blocks, but it's a start :)
Configuring the Raspberry Pi Wi-Fi
Before you enable port mirroring, make sure the RPi has Wi-Fi enabled as you won't be able to connect to it on the LAN port once mirroring is enabled.
If you are using Raspbian, the simplest way is sudo raspi-config and go to System Options -> S1 Wireless LAN.
Installing Suricata
If you install Suricata with the default package repositories, you will get version 4.x only - we want to get the good stuff so we add the official sources.
As root do:
echo "deb http://deb.debian.org/debian/ buster-backports main contrib non-free" > \
    /etc/apt/sources.list.d/backports.list
apt-get update
apt-get install suricata suricata-update -t buster-backports
This will install a barebones Suricata with outdated rules. Luckily, we also installed suricata-update which will handle that for us.
Run sudo suricata-update -D /etc/suricata to get the latest rules and add a crontab to update it regularly so you are kept up to speed on emerging threats.
You are now pretty much ready to go - except you will get a lot of noise and false positives.
Tweak your rules and don't go insane
By creating /etc/suricata/disable.conf we can decide which rules we don't want to listen to by adding signature id of the rule on a new line. This is a ongoing process - you will have to keep a keen eye on what alerts you get and which ones are just noise and update this file.
A Suricata rule can look like this:
alert pkthdr any any -> any any (msg:"SURICATA TCP invalid option length"; decode-event:tcp.invalid_optlen; classtype:protocol-command-decode; sid:2200035; rev:2;)
The id you want to use when disabling (or enabling - use the /etc/suricata/enable.conf file for that) is denoted by the sid key.
Once you've updated the file, run the suricata-update tool again.
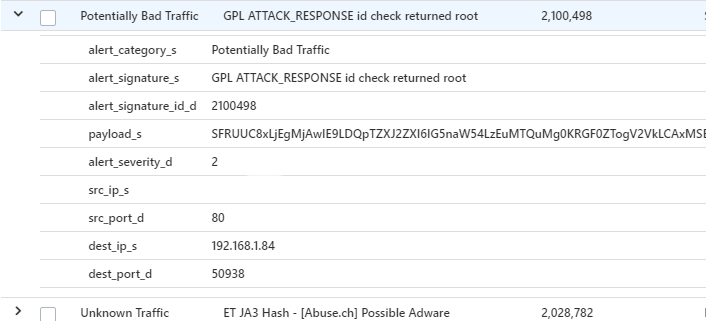
Monitoring for alerts
Update: To enable HTTP monitoring with this setup, you might need to disable vlan-tracking in suricata.yaml:vlan:
use-for-tracking: false
By default, all Suricata logs end up in /var/log/suricata and you can get a quick overview of the alerts by looking in the fast.log file which can look like this:
11/11/2020-06:00:18.087298  [**] [1:2200036:2] SURICATA TCP option invalid length [**] [Classification: Generic Protocol Command Decode] [Priority: 3] {TCP} 717.257.14.122:443 -> 192.168.1.86:60750
11/11/2020-06:01:06.405258  [**] [1:2210045:2] SURICATA STREAM Packet with invalid ack [**] [Classification: Generic Protocol Command Decode] [Priority: 3] {TCP} 192.168.1.140:62518 -> 256.652.166.12:443
For more detailed data - look in the eve.json file which contains basically everything you want.
To easier filter on alerts - try this: tail -f /var/log/suricata/eve.json | jq 'select(.event_type=="alert")'
The same alert as in fast.log will then have a lot more data:
{
  "timestamp": "2020-11-10T14:26:39.407218+0000",
  "flow_id": 1633941440102616,
  "in_iface": "eth0",
  "event_type": "alert",
  "vlan": [
    1
  ],
  "src_ip": "192.168.1.84",
  "src_port": 63122,
  "dest_ip": "273.326.6.3",
  "dest_port": 443,
  "proto": "TCP",
  "flow": {
    "pkts_toserver": 11,
    "pkts_toclient": 0,
    "bytes_toserver": 1204,
    "bytes_toclient": 0,
    "start": "2020-11-10T14:26:39.327896+0000"
  },
  "payload": "",
  "stream": 0,
  "alert": {
    "action": "allowed",
    "gid": 1,
    "signature_id": 2210046,
    "rev": 2,
    "signature": "SURICATA STREAM SHUTDOWN RST invalid ack",
    "category": "Generic Protocol Command Decode",
    "severity": 3
  }
}
Because I already have a setup which sends syslog to Azure Sentinel, I want to send all the logs to syslog instead of a file.
You can do that by editing /etc/suricata/suricata.yaml and find the outputs section which contains eve-log and set it to something similar to below.
  # Extensible Event Format (nicknamed EVE) event log in JSON format
  - eve-log:
      enabled: yes
      filetype: syslog #regular|syslog|unix_dgram|unix_stream|redis
      #filename: eve.json
      #prefix: "@cee: " # prefix to prepend to each log entry
      # the following are valid when type: syslog above
      identity: "suricata"
      facility: local5
      level:  Alert ## possible levels: Emergency, Alert, Critical,
                   ## Error, Warning, Notice, Info, Debug
More information
Suricata has alot of configuration options - hit up the docs to see more.
Setting up port mirroring on the Unifi Switch
It is now time to set up port mirroring so that Suricata can process the traffic.
Using the Unifi Controller software, this is quite straight forward.
Go to "Devices" and click on the switch your USG is connected to.

The Raspberry Pi will need to be connected to the same switch.
Now, click "Edit" on the port your RPi is connected to.
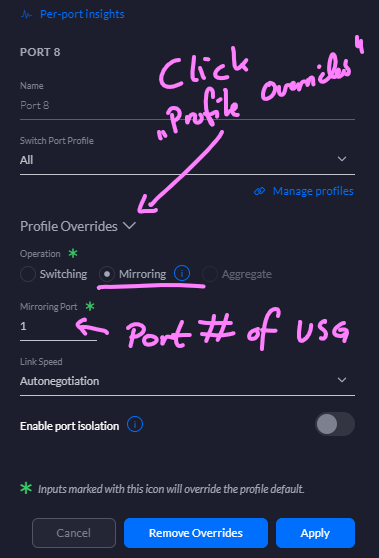
Expand the "Profile Overrides" section and select the "Mirroring" operation. Then, in "Mirroring Port", set the port number of your USG and hit the ol' "Apply".
You won't be able to connect to your RPi on this port any longer, so make sure your Wi-Fi-connection is up.
In conclusion
Now you should have the logs and alerts in place - its up to you how to make use of it :)
For my part, I can now do fun alerting in Azure Sentinel:
You might find some inspiration in the other posts related to this:
No hay comentarios:
Publicar un comentario