PysimpleguiWEb Raspberry Pi Rover Interface con python y GPIO
https://funprojects.blog/2020/02/18/pysimplegui-quick-and-easy-interfaces/
Below is the final code and it used a command line option (any character) to toggle into a Web application, otherwise it was the default PySimpleGUI interface. The application also included the Pi GPIO library to start/stop the car chassis motors.
1 2 3 4 5 6 7 8 9 10 11 12 13 14 15 16 17 18 19 20 21 22 23 24 25 26 27 28 29 30 31 32 33 34 35 36 37 38 39 40 41 42 43 44 45 46 47 48 49 50 51 52 53 54 55 56 57 58 59 | # SGui_rover.py - use PySimpleGUI/Web to control a Pi Rover Pi#import sys# Pass any command line argument for Web useif len(sys.argv) > 1: # if there is use the Web Interface import PySimpleGUIWeb as sg mode = "web"else: # default uses the tkinter GUI import PySimpleGUI as sgimport RPi.GPIO as gpiogpio.setmode(gpio.BOARD)# Define the motor pins to match your setupmotor1pin = 38 # left motormotor2pin = 37 # right motorgpio.setup(motor1pin, gpio.OUT)gpio.setup(motor2pin, gpio.OUT)# Send Action to Control Roverdef rover(action):if action == "FORWARD": gpio.output(motor1pin, gpio.HIGH) gpio.output(motor2pin, gpio.HIGH)if action == "LEFT": gpio.output(motor1pin, gpio.HIGH) gpio.output(motor2pin, gpio.LOW)if action == "RIGHT": gpio.output(motor1pin, gpio.LOW) gpio.output(motor2pin, gpio.HIGH)if action == "STOP": gpio.output(motor1pin, gpio.LOW) gpio.output(motor2pin, gpio.LOW)# All the stuff inside your window.myfont = "Ariel 32"layout = [ [sg.Text(" ",size=(20,1) , key="feedback")],[sg.Button("FORWARD", size=(32,3), font=myfont, button_color=('white','green'))],[sg.Button("LEFT", size=(15,3), font=myfont),sg.Button("RIGHT", size=(15,3), font=myfont)],[sg.Button("STOP", size=(32,3), font=myfont, button_color=('white','red'))],[sg.Button("QUIT")]]# Create the Windowif mode == "web": window = sg.Window('PySimpleGUI Rover Control', layout, web_ip='192.168.0.106', web_port = 8888, web_start_browser=False)else: window = sg.Window('PySimpleGUI Rover Control', layout )# Event Loop to process "events" and pass them to the rover functionwhile True: event, values = window.read() print(event,values) if event in (None, 'QUIT'): # if user closes window or clicks cancel break window['feedback'].Update(event) # show the button in the feedback text rover(event)window.close() # exit cleanly |
PySimpleGUI – quick and easy interfaces

The Python PySimpleGUI project has two main goals, a simpler method for creating graphical user interfaces (GUIs), and common code for Tkinter, QT, xW and Web graphics.
I feel comfortable doing my own Python Tkinter and Web interfaces, but using common code for both local interfaces and Web apps could be extremely useful for Rasp Pi projects.
In the this blog I wanted to introduce PySimpleGUI by creating a local GUI/Web interface to control a Raspberry Pi Rover, all in less than 60 lines of code.
Getting Started with PySimpleGUI
The Python PySimpleGUI project has a number of “ports” or versions. The main version is for Tkinter based graphics and it is very fully featured. The versions for Qt,Wx and Web graphics are still in development so some testing may be required if you are hoping for full code compatibility between the different libraries.
There probably aren’t a lot of cases where you would want to flip between Qt, Wx and Tkinter graphic engines but it is remarkable that the possibility exists.
To install the default Tktinter version of Pysimplegui enter:
pip install pysimpleguiPySimplegui has a wide range of graphic widgets or elements. Graphic presentations are built by creating a layout variable. Graphic elements are placed in separate rows by open and closed square brackets.

A Button Interface Project
For my rover project I used a layout of 5 rows. The first row contains a feedback text, then rows 2-5 contains buttons.
The code below is a simple button app.
1 2 3 4 5 6 7 8 9 10 11 12 13 14 15 16 17 18 19 20 | # Create a simple graphic interface#import PySimpleGUI as sglayout = [ [sg.Text("the feedback" , key="feedback")], [sg.Button("FORWARD")], [sg.Button("LEFT"),sg.Button("RIGHT")], [sg.Button("STOP")], [sg.Button("QUIT")] ]# Create the Windowwindow = sg.Window('My First App', layout)# Event Loop to process "events"while True: event, values = window.read() window['feedback'].Update(event) # show the button in the feedback text print(event,values) if event in (None, 'QUIT'): breakwindow.close() |
The PySimplegui sg.window() call displays a window with the title and a layout definition (line 11). The window.read() will return events and values that have been changed (line 14). The feedback text element (line 5) is given a key name of feedback, and this key name is used for updates to show the key press (line 15).

Standalone Web Apps with PySimpleGUIWeb
The PySimpleGUIWeb library is still under development, so be aware that not all the features in PySimpleGUI are fully supported in the Web version. PySimpleGUIWeb is an excellent way to create a lightweight standalone Web interface, but it is important to note that it isn’t designed to be a multi-page/multi-user Web environment.
To install PySimpleGUIWeb enter:
pip install remi
pip install pysimpleguiweb
The PySimpleGUIWeb window() call has a few more options, such as:
- web_ip – the IP address to use for the PySimpleGUIWeb micro Web server
- web_port – port on the micro Web server
- web_start_browser – open a Web browser on app start
If you use our earlier button example but this time import PySimpleGUIWeb and add some web options we see an almost identical presentation however this time it’s in a Web interface.

Command line options can be used to toggle between the different libraries by:
import sys

# Pass any command line argument for Web use
if len(sys.argv) > 1: # if there is use the Web Interface
    import PySimpleGUIWeb as sg
    mode = "web"
else: # default uses the tkinter GUI
    import PySimpleGUI as sg
    mode = "tkinter"
Formatting of Display Elements
The next step is to adjust the graphic elements’ fonts, colors, and size properties.
Below is an example of changing the “FORWARD” button to have a size of 32 characters wide and 3 lines high with color and larger font.
[sg.Button("FORWARD", size=(32,3),
  font="Ariel 32",
  button_color=('white','green'))]
To make the interface more usable all the rover control buttons can be adjusted and the “QUIT” button can be left the default.
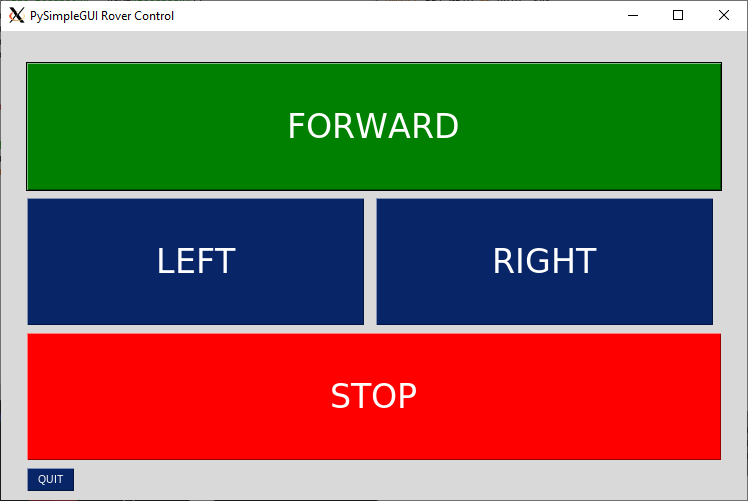
Raspberry Pi Rover Interface
For my Raspberry Pi Rover project I used :
- Arduino car chassis (~ $15),
- a portable USB charger
- Pimoroni Explorer Hat Pro (a Pi motor shield)
Below is the final code and it used a command line option (any character) to toggle into a Web application, otherwise it was the default PySimpleGUI interface. The application also included the Pi GPIO library to start/stop the car chassis motors.
No hay comentarios:
Publicar un comentario